Ask Reuben – June 14, 2023
BEFORE DISPLAY EXIT DISPLAY
Why are only X rows of my array rendered?
I briefly covered this topic as part of an article Tables 101 that covered a lot of topics to do with the use of TABLE container in forms. I want to cover in a little more detail the following technique …
DISPLAY ARRAY arr TO scr.*
   BEFORE DISPLAY
      EXIT DISPLAY
END DISPLAY
… the key being to exit from the DISPLAY ARRAY as soon as it has been displayed.
This technique is useful when transforming old character screens that used the QAUD pattern to display data from two or more tables that have a Master-Detail relationship in the one screen form. The old character screen might have had approximately 25 lines (80×25), the top portion would contain details about the current row from the master table whilst the bottom portion would contain data from multiple rows from the detail table. As the user navigated through the rows from the master table, the top portion would show the values from the current row of the master table whilst the bottom portion would change to show multiple rows from the detail table that are related to the current master row. If the user wanted to scroll through the rows in the detail table, a seperate dialog was required.
As the screens were character based, the number of rows from the detail table displayed in the bottom portion of the form were fixed. For the purposes of this article I will say that the number of detail rows able to be displayed is 5. So the existing code would be similar to …
   MENU ""
      ...
      COMMAND "Next" -- Previous would be similar
      ...
         CALL fetch_detail_rows()
         CALL show_detail_rows()
      ...

FUNCTION show_detail_rows()
...
   FOR i = 1 TO 5
      DISPLAY detail_arr[i] TO detail_scr[i].*
   END FOR
...
When transforming to Genero, the bottom portion of the screen was typically changed to a TABLE, but what was not taken into account was that the Table could stretch and that there would be room for more than 5 rows of data.
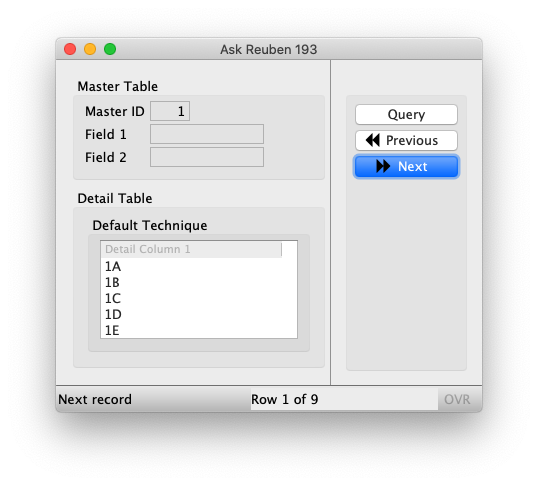
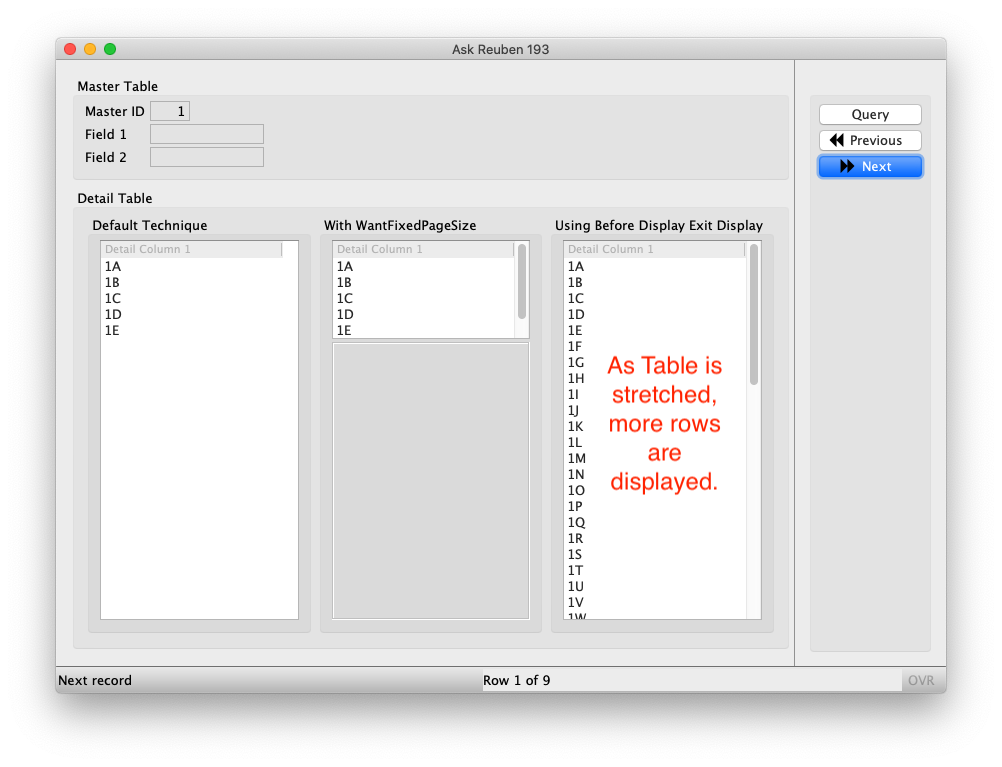
Using the example code at the end of the article, your initial screen might look like the following with 5 rows of data displayed …
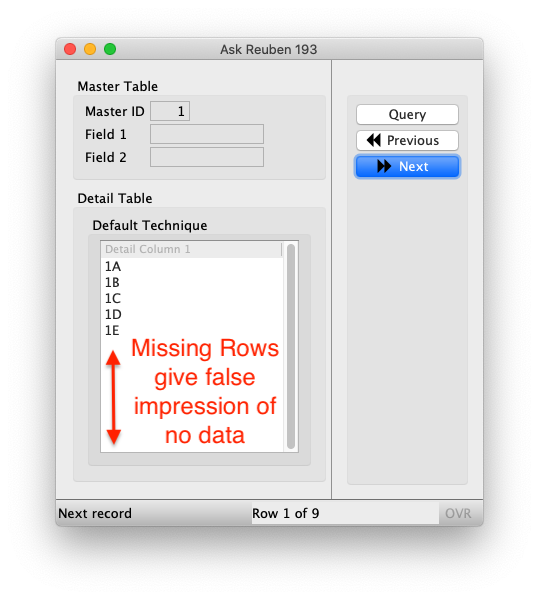
… If you next and previous through the 9 rows of the master you see the value 1 through 9 in the top portion of the screen, and the detail rows in the bottom portion of the screen is the master id followed by A-Z e.g. 1A, there are 26 detail rows for each master record. Note what happens when the user stretches the window. More rows are not displayed to this bottom portion and so the user gets the false impression that there are only 5 rows of data in the detail table…
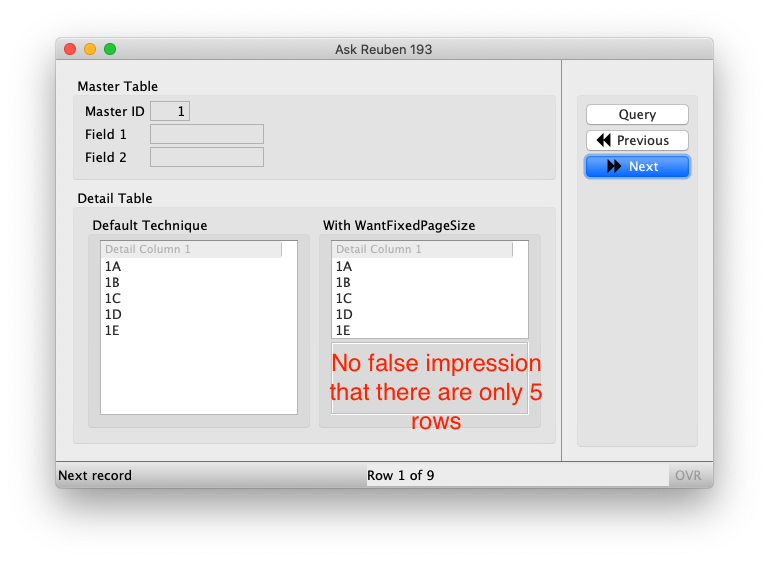
The quick solution at this point is to use the WANTFIXEDPAGESIZE to tell the Table not to stretch. This will prevent the user getting the false impression that there is only 5 rows of data but you will end up with unused space…
What the BEFORE DISPLAY EXIT DISPLAY technique does is instead of a FOR loop displaying a fixed number of lines from the detail table, replace the FOR loop with a DISPLAY ARRAY statement that consists of a BEFORE DISPLAY EXIT DISPLAY. That is your code is now of the form …
MENU ""
   ...
   COMMAND "Next" -- Previous would be similar
      ...
      CALL fetch_detail_rows()
      CALL show_detail_rows()
      ...

FUNCTION show_detail_rows()
   ...
   DISPLAY ARRAY detail_arr[master_idx] TO detail_scr[master_idx].*
      BEFORE DISPLAY
         EXIT DISPLAY
   END DISPLAY
   ...
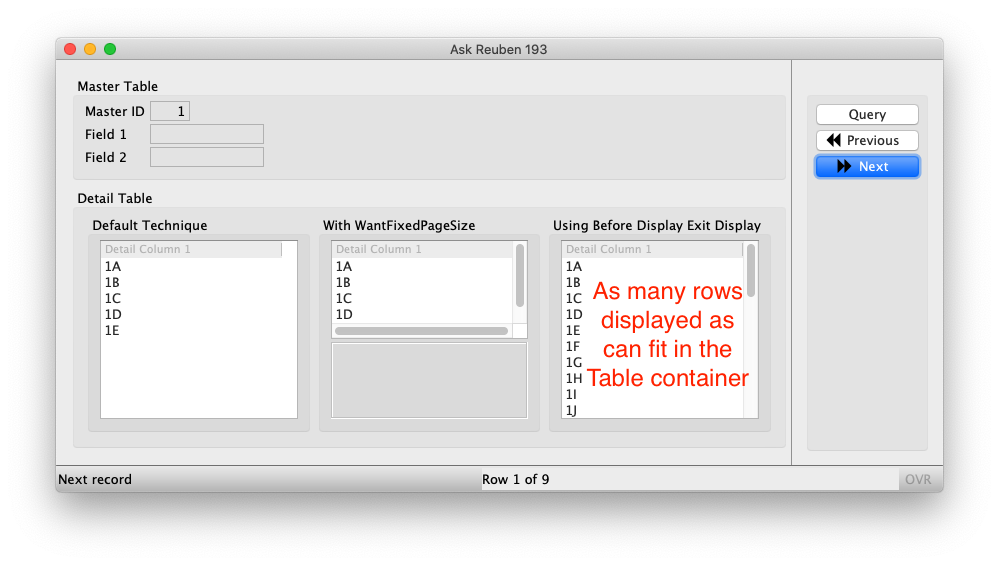
Now instead of the code being hard coded to display a fixed number of rows from the detail row, the DISPLAY ARRAY will display as many rows as can fit in the table, and will immediately exit passing the user back to the previous dialog …
There is one further enhancement that can be made if you go down this path. If the user resizes the window, you might want to display additional rows. So your MENU statement might now have an ON ACTION windowresized added to the dialog used to display rows in the master table.
MENU ""
   ...
   COMMAND "Next" -- Previous would be similar
      ...
      CALL fetch_detail_rows()
      CALL show_detail_rows()
      ...
   ON ACTION windowresized
      CALL show_detail_rows()

FUNCTION show_detail_rows()
   ...
   DISPLAY ARRAY detail_arr[master_idx] TO detail_scr[master_idx].*
      BEFORE DISPLAY
         EXIT DISPLAY
   END DISPLAY
   ...
So note the window has been stretched and the additional detail rows are visible…
It should be stressed that this technique of using DISPLAY ARRAY BEFORE DISPLAY EXIT DISPLAY helps when you don’t want to transform the code too much. It allows you to use the GUI Table container to display the detail rows in a form that is displaying both master and detail, and does so in a way that does not involve major surgery to your 4gl code..
Ideally to display a master-detail in a GUI environment you would use Multiple Dialog with two active DISPLAY ARRAY statements, that approach requires more surgery on your code. That might be the topic of a future Ask-Reuben article, the key being to use UNBUFFERED and to repopulate the detail array in the BEFORE ROW of the master array.
#! askreuben193.4gl
TYPE arrType RECORD
    code CHAR(2)
END RECORD
DEFINE arr1, arr2, arr3 DYNAMIC ARRAY OF arrType
DEFINE idx INTEGER

MAIN
    OPEN WINDOW w WITH FORM "askreuben193"
    CLOSE WINDOW SCREEN

    MENU ""
        ON ACTION query ATTRIBUTES(TEXT="Query")
            LET idx = 1
            CALL populate(idx)
            CALL display(idx)

        ON ACTION previous  ATTRIBUTES(TEXT="Previous")
            LET idx = idx - 1
            IF idx < 1 THEN
                LET idx = 1
            END IF
            CALL populate(idx)
            CALL display(idx)

        ON ACTION next  ATTRIBUTES(TEXT="Next")
            LET idx = idx + 1
            IF idx > 9 THEN
                LET idx = 9
            END IF
            CALL populate(idx)
            CALL display(idx)

        ON ACTION windowresized  ATTRIBUTES(DEFAULTVIEW=NO)
            CALL display(idx)

        ON ACTION close
            EXIT MENU
    END MENU
END MAIN

FUNCTION populate(idx INTEGER)
    DEFINE code CHAR(2)
    DEFINE letter INTEGER

    -- Populate
    FOR letter = 1 TO 26
        LET code = SFMT("%1%2", idx USING "&", ASCII (64 + letter))
        LET arr1[letter].code = code
        LET arr2[letter].code = code
        LET arr3[letter].code = code
    END FOR
END FUNCTION

FUNCTION display(idx INTEGER)
    DEFINE row INTEGER

    -- Display current Index Value
    DISPLAY idx TO idx
    MESSAGE SFMT("Row %1 of %2", idx, 9)

    --  Old 4gl technique
    FOR row = 1 TO 5
        DISPLAY arr1[row].code TO scr1[row].col1
    END FOR

    -- Using WANTFIXEDPAGESIZE, can use old technique
    FOR row = 1 TO 5
        DISPLAY arr2[row].code TO scr2[row].col2
    END FOR

    -- Use BEFORE DISPLAY, EXIT DISPLAY
    DISPLAY ARRAY arr3 TO scr3.*
        BEFORE DISPLAY
            EXIT DISPLAY
    END DISPLAY
END FUNCTION
#!askreuben193.per
LAYOUT (TEXT="Ask Reuben 193")
VBOX
GROUP(TEXT="Master Table")
GRID
{
Master ID [i00]
Field 1 [i01 ]
Field 2 [i02 ]
}
END
END
GROUP (TEXT="Detail Table")
HBOX
GROUP (TEXT="Default Technique")
TABLE
{
[t01 ]
[t01 ]
[t01 ]
[t01 ]
[t01 ]
}
END
END
GROUP (TEXT="With WantFixedPageSize")#, HIDDEN)
VBOX
TABLE (WANTFIXEDPAGESIZE)
{
[t02 ]
[t02 ]
[t02 ]
[t02 ]
[t02 ]
}
END
GRID
{
[spring01]
}
END
END
END
GROUP (TEXT="Using Before Display Exit Display")#, HIDDEN)
TABLE
{
[t03 ]
}
END
END
END
END
END
END
ATTRIBUTES
EDIT i00 = formonly.idx;
EDIT i01 = formonly.master1;
EDIT i02 = formonly.master2;
EDIT t01 = formonly.col1, TITLE="Detail Column 1";
EDIT t02 = formonly.col2, TITLE="Detail Column 1";
EDIT t03 = formonly.col3, TITLE="Detail Column 1";
IMAGE spring01 = formonly.spring01, STRETCH=BOTH;
INSTRUCTIONS
SCREEN RECORD scr1(col1);
SCREEN RECORD scr2(col2);
SCREEN RECORD scr3(col3);

