Ask Reuben – April 16, 2025
HBOX+VBOX vs Grid Layout Tags
When should I use HBOX and VBOX containers?
When should I use Grid Layout Tags?
What are some of the advantages / disadvantages of either technique ?
The two screenshots below have been produced from two .per Genero form files using the code at the end of the article. The two forms use two different methods of defining how the child containers are positioned and sized, HBOX +VBOX Containers on the left, and Grid Layout tags on the right …

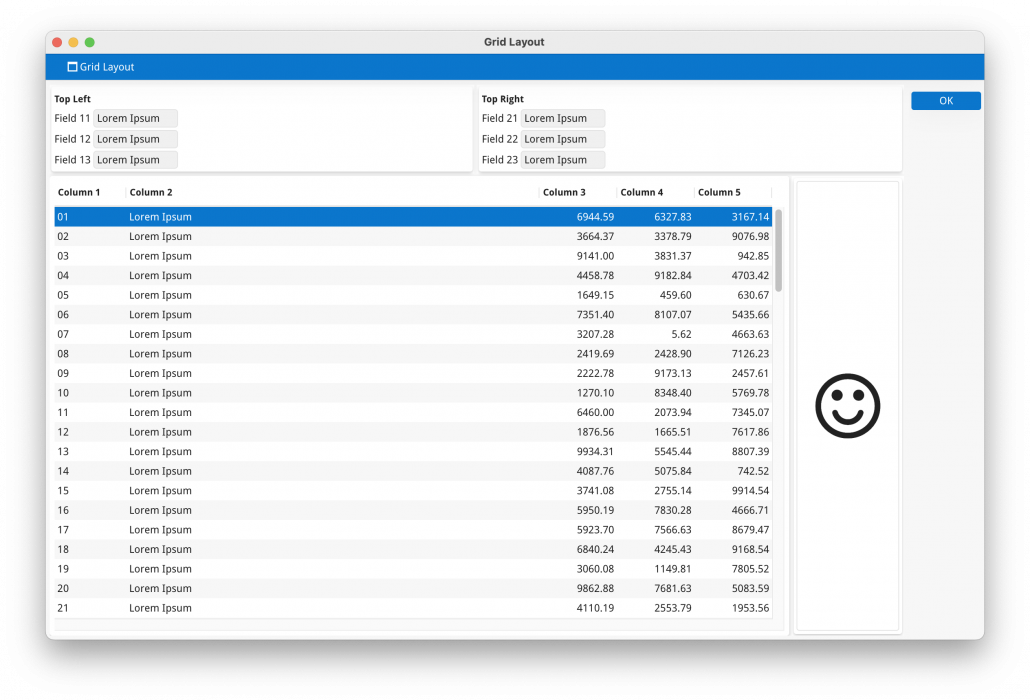
There is no right/wrong method but what I find is that users of the Grid Layout technique are over represented in support calls. I’ll first explain the two techniques and then list some things you need to consider when choosing what technique to use.
The HBOX+VBOX technique uses the HBOX and VBOX container to represent how the child containers are arranged. As the name suggests, HBOX arranges its child containers horizontally to one another, VBOX vertically. The child containers size is determined by its stretchable property, if it can stretch in either direction to fill space it will, this in turn maybe dictated by the child containers own child containers. You can combine HBOX and VBOX containers together. So in this example, we have a VBOX container at the top level, it has two children at the first level, an HBOX container and a TABLE container. This HBOX container contains two GRID containers as its children.
The Grid Layout technique involves having a GRID container and in this Grid as well as having normal arrangement of widgets (Edit, ButtonEdit, Label etc), you can specify the size and position of child Group, Table, and ScrollGrid containers using Grid Layout Tags.
In both cases, the stretch property of the TABLE influences how it expands to fill the space available.
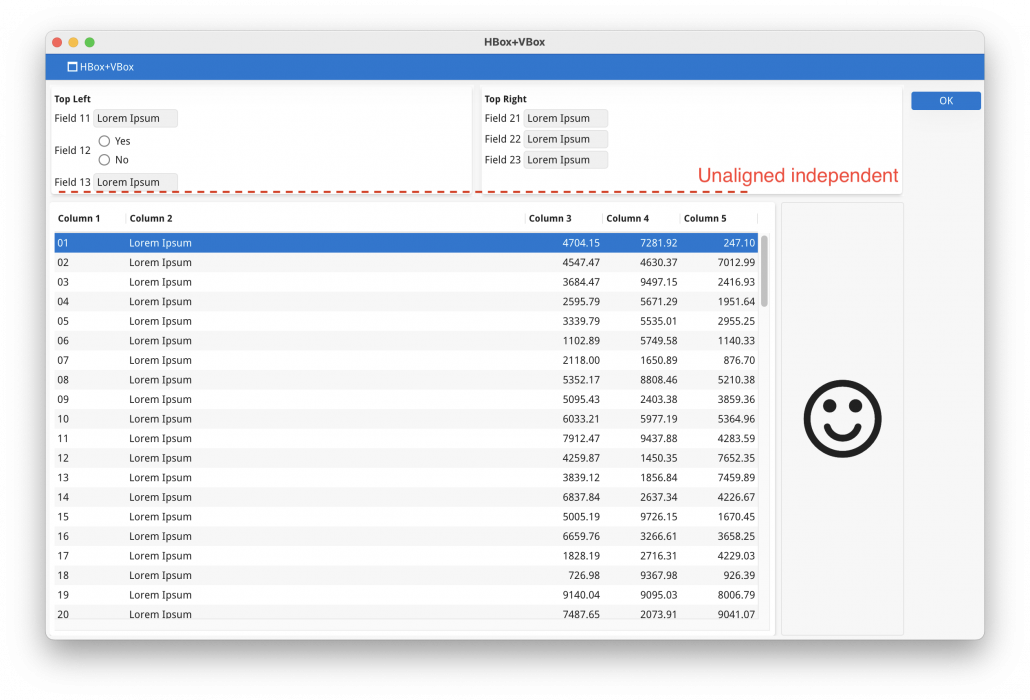
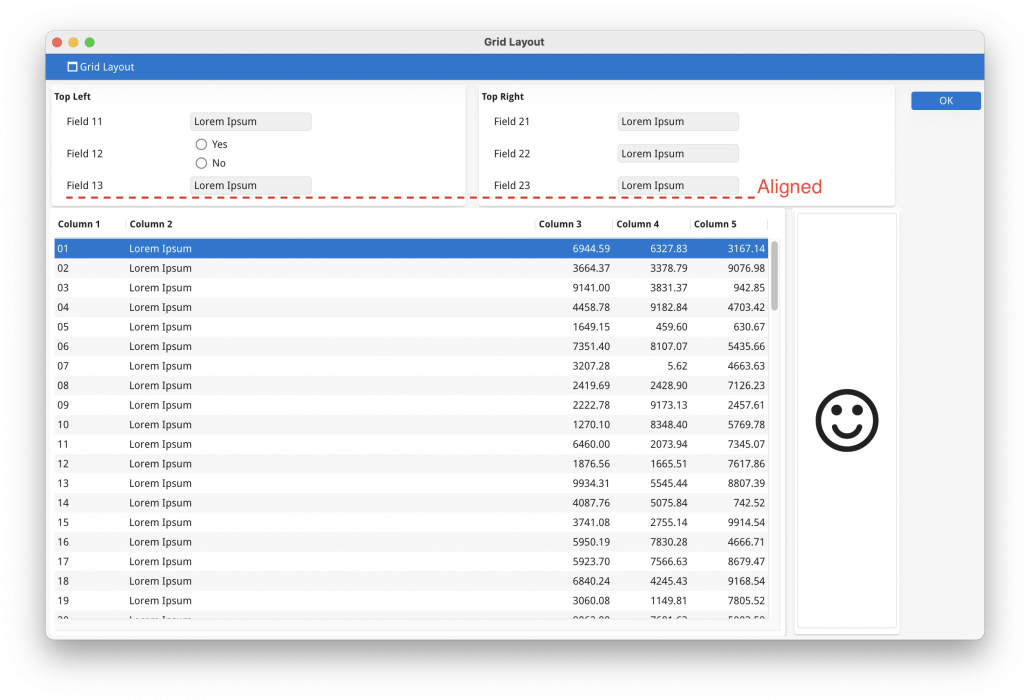
With HBOX and VBOX containers, the children are independent of one another. It is not possible to get elements in one container to align with elements in a sibling container. This is noticeable in some of the screenshots from this Ask-Reuben article, Note: how the different widget types have different heights and so take up a different amount of vertical space, such that the widgets do not align horizontally across the groups. Using Grid Layout tags you have the option of using GRIDCHILDRENINPARENT attribute to tell the Grid Layout rendering engine to position the child elements of the container as if they were elements in the parent grid. This has the effect of aligning elements that are in different containers. You can see that with this articles example by doing the following …
In the gridlayout form, uncomment the use of the GRIDCHILDRENINPARENT attribute here …
GROUP g1: TEXT="Top Left";#, GRIDCHILDRENINPARENT;
GROUP g2: TEXT="Top Right";#, GRIDCHILDRENINPARENT;
In both forms, replace an EDIT widget with a widget that has some height by commenting out the top line and uncommenting the second line here …
f12 = formonly.field12;
#RADIOGROUP f12 = formonly.field12, ITEMS=("Yes","No");
… the RADIOGROUP orientated vertically has been deliberately chosen to emphasise this.
In the screenshot below, note how …
- using the HBox+VBox form these fields do not align, the contents of the two group containers are independent of one another
- using the GridLayout form field13 and field23 are still vertically aligned with one another
When using GridLayout, there is a set of rules that dictate if a Splitter is automatically created between sibling containers. When using HBOX and VBOX, you have full control over the creation of splitters by use of the SPLITTER attribute. You should also be aware that position of Splitters is subject to stored settings., so whilst at the moment you cannot influence the size of child containers other than by saying wether they stretch or not, or by altering the size of the contents of the child container, an end-user should only have to move the splitter once to set their preferred arrangement.
To elaborate on that point, using HBOX and VBOX you can’t dictate that the first child container is 25% width, and the second child container is 75% width. If both are stretchable, the initial position will be 50% each (subject to minimum width of each container) . Using the spliiter, the user can resize the two containers so that they are 25/75 and stored settings will remember that.
You can experiment with SPLITTER in the hboxvbox example by uncommenting the use of the SPLITTER attribute…
VBOX #(SPLITTER)
HBOX #(SPLITTER)
...
HBOX #(SPLITTER)

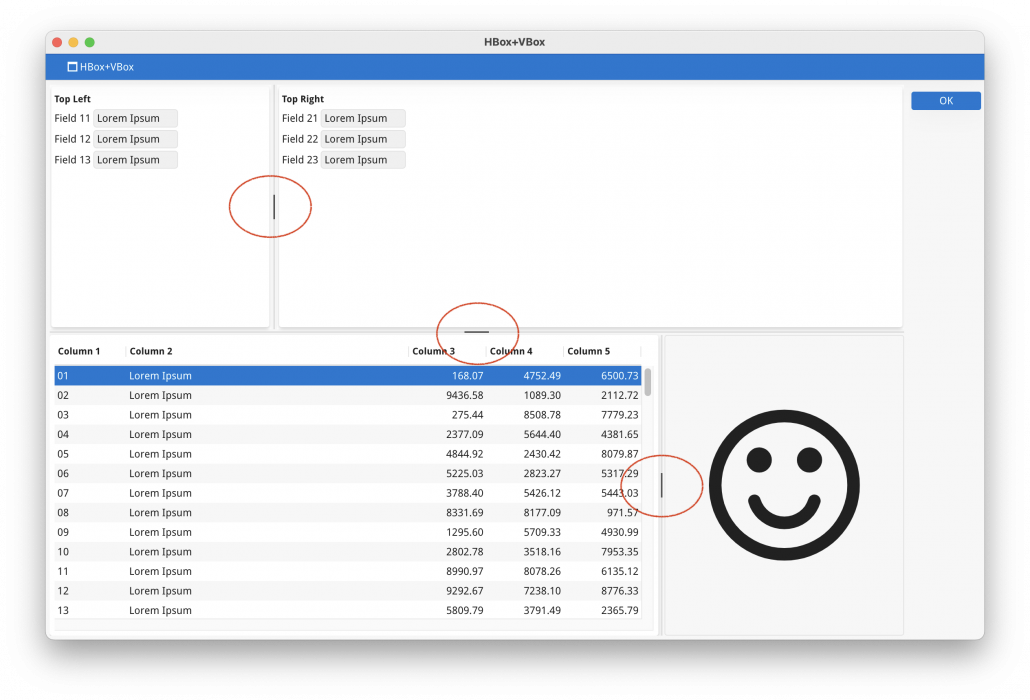
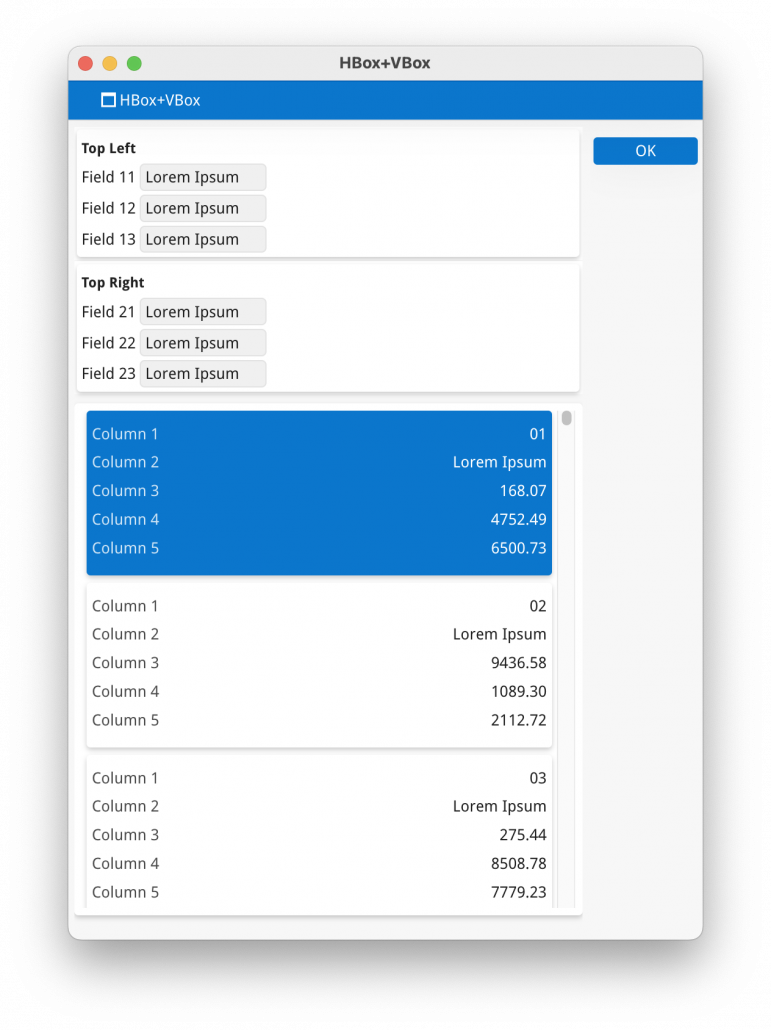
When using HBOX and VBOX you have some control over the responsiveness properties of the screen. By using syntax such as ORIENTATION@SMALL=VERTICAL you can say that on small devices, a HBOX should be rendered as a VBOX. Using GridLayout syntax, you do not have the same equivalent control other that what is available for individual widgets inside your GRID. Using HBOX and VBOX arguably better positions your forms to be more responsive than using the GridLayout technique. IN this comparison I have uncommented the three uses of @SMALL in the HBox+VBox example form

When it comes to editing form files, using Grid Layout tags can be frustrating. Although it is more WYSIWYG you can end up having to add spaces, remove spaces from adjacent containers to keep things in alignment.
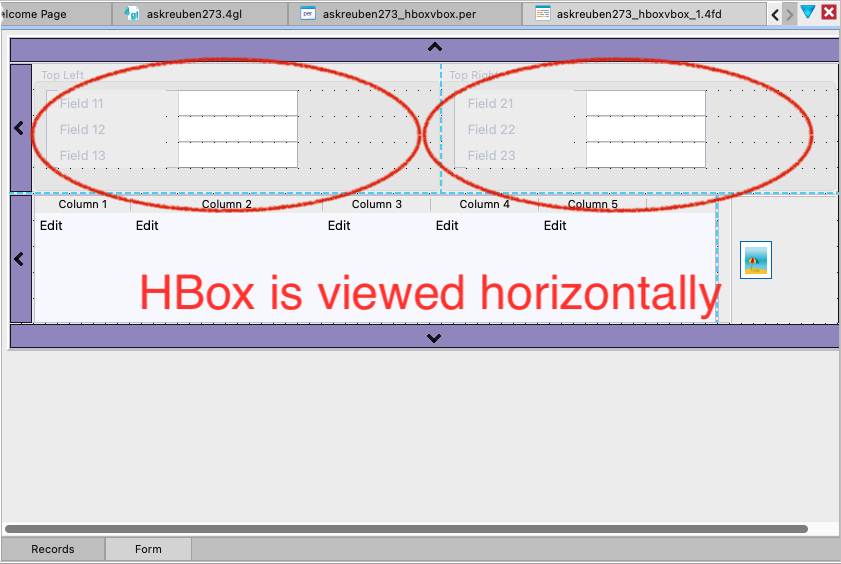
With HBOX and VBOX each container can be edited independently, however when you use HBOX you do have to use some imagination to imagine that two adjacent siblings are positioned to the left and right of one another rather than above and below. If you have several layers of nesting, it can also be difficult to accurately picture the form in your end. If you use the form designer, this is less of an issue. This screenshot shows the HBox+VBox example as a .per and .4fd, note in the .4fd you can see that the HBOX elements are horizontally positioned.

I said at the beginning, there was no right or wrong technique. I personally favour HBox+VBox whilst I suspect the majority use GridLayout tags. I suspect the reason for the use of GridLayout tags is that :
- It is closer to how the old Informix-4gl screen would have been arranged so required less modification to forms in your initial Genero transformation.
- when editing a .per, it is more WYSIWYG
- you feel as if you have more control over the size of the containers.
I have good spatial imagination and can read HBOX and VBOX and see in my head how the child elements will be arranged. Most Web Designers would be familiar with HBox+VBox as it is analogous to the use of table, tr, td elements and how they can be used to arrange child elements horizontally and vertically. If we ever added the ability to provide hints for the relative sizing of adjacent stretchable containers e.g. 40/60, not 50/50 then I think HBox+VBox technique will find more favour. Anecdotally I would say it is easier for the rendering engine to work with HBox/VBox than GridLayout as with GridLayout there is more calculations to figure out the width of each Grid column and height of each Grid row,a nd the bigger the Grid the more of these calculations.
For now, be aware of both techniques and make sure you have coding standards that dictate when they are used. If you do use Grid Layout, do keep reviewing your continued use of this technique as you may find that using HBox +VBox combined with SPLITTER and Responsive syntax is a move in a positive direction.
#! askreuben273.4gl
IMPORT util
MAIN

    MENU ""
        ON ACTION hboxvbox ATTRIBUTES(TEXT="HBox+VBox")
            CALL do("hboxvbox")
        ON ACTION gridlayout ATTRIBUTES(TEXT="Grid Layout Tags")
            CALL do("gridlayout")
        ON ACTION CLOSE
            EXIT MENU
    END MENU
END MAIN

FUNCTION do(form_name STRING)
DEFINE i INTEGER
DEFINE arr DYNAMIC ARRAY OF RECORD
     col1 STRING,
     col2 STRING,
     col3 DECIMAL(11,2),
     col4 DECIMAL(11,2),
     col5 DECIMAL(11,2)
END RECORD

    OPEN WINDOW w WITH FORM "askreuben273_"||form_name
    DISPLAY "Lorem Ipsum" TO field11
    DISPLAY "Lorem Ipsum" TO field12
    DISPLAY "Lorem Ipsum" TO field13
    DISPLAY "Lorem Ipsum" TO field21
    DISPLAY "Lorem Ipsum" TO field22
    DISPLAY "Lorem Ipsum" TO field23
    DISPLAY "smiley" TO img
    FOR i = 1 TO 99
        LET arr[i].col1 = i USING "&&"
        LET arr[i].col2 = "Lorem Ipsum"
        LET arr[i].col3 = util.Math.rand(1000000)/100
        LET arr[i].col4 = util.Math.rand(1000000)/100
        LET arr[i].col5 = util.Math.rand(1000000)/100
    END FOR
    DISPLAY ARRAY arr TO scr.* ATTRIBUTES(CANCEL=FALSE);

    CLOSE WINDOW w
END FUNCTION
#! askreuben273_gridlayout.per
LAYOUT (TEXT="Grid Layout")
GRID
{
<G g1 ><G g2 >
Field 11 [f11 ] Field 21 [f21 ]
Field 12 [f12 ] Field 22 [f22 ]
Field 13 [f13 ] Field 23 [f23 ]
< >< >
<T t1 ><G >
[c01 |c02 |c03 |c04 |c05 ] [i01 ]
[c01 |c02 |c03 |c04 |c05 ] [ ]
[c01 |c02 |c03 |c04 |c05 ] [ ]
[c01 |c02 |c03 |c04 |c05 ] [ ]
[c01 |c02 |c03 |c04 |c05 ] [ ]
< >< >
}
END
END
ATTRIBUTES
GROUP g1: TEXT="Top Left";#, GRIDCHILDRENINPARENT;
GROUP g2: TEXT="Top Right";#, GRIDCHILDRENINPARENT;
TABLE t1:;
f11 = formonly.field11;
f12 = formonly.field12;
#RADIOGROUP f12 = formonly.field12, ITEMS=("Yes","No");
f13 = formonly.field13;
f21 = formonly.field21;
f22 = formonly.field22;
f23 = formonly.field23;
c01 = formonly.col1, TITLE="Column 1";
c02 = formonly.col2, TITLE="Column 2", STRETCH=X;
c03 = formonly.col3, TITLE="Column 3";
c04 = formonly.col4, TITLE="Column 4";
c05 = formonly.col5, TITLE="Column 5";
IMAGE i01 = formonly.img, AUTOSCALE, STRETCH=BOTH;
INSTRUCTIONS
SCREEN RECORD scr(col1, col2, col3, col4, col5);#! askreuben273_hboxvbox.per
LAYOUT (TEXT="HBox+VBox")
VBOX #(SPLITTER)
HBOX #(SPLITTER, ORIENTATION@SMALL=VERTICAL)
GROUP (TEXT="Top Left")
GRID
{
Field 11 [f11 ]
Field 12 [f12 ]
Field 13 [f13 ]
}
END #GRID
END #GROUP
GROUP (TEXT="Top Right")
GRID
{
Field 21 [f21 ]
Field 22 [f22 ]
Field 23 [f23 ]
}
END #GRID
END #GROUP
END #HBOX
HBOX #(SPLITTER)
TABLE #(FLIPPED@SMALL)
{
[c01 |c02 |c03 |c04 |c05 ]
}
END #TABLE
GRID #(HIDDEN@SMALL)
{
[i01 ]
[ ]
[ ]
[ ]
[ ]
}
END
END #HBOX
END #VBOX
ATTRIBUTES
f11 = formonly.field11;
f12 = formonly.field12;
#RADIOGROUP f12 = formonly.field12, ITEMS=("Yes","No");
f13 = formonly.field13;
f21 = formonly.field21;
f22 = formonly.field22;
f23 = formonly.field23;
c01 = formonly.col1, TITLE="Column 1";
c02 = formonly.col2, TITLE="Column 2", STRETCH=X;
c03 = formonly.col3, TITLE="Column 3";
c04 = formonly.col4, TITLE="Column 4";
c05 = formonly.col5, TITLE="Column 5";
IMAGE i01 = formonly.img, AUTOSCALE, STRETCH=BOTH;
INSTRUCTIONS
SCREEN RECORD scr(col1, col2, col3, col4, col5);
