Ask Reuben – June 28, 2022
Terminal Strings
How does a GDC shortcut work?
How do I debug a GDC shortcut?
What are GDC Terminal Strings?
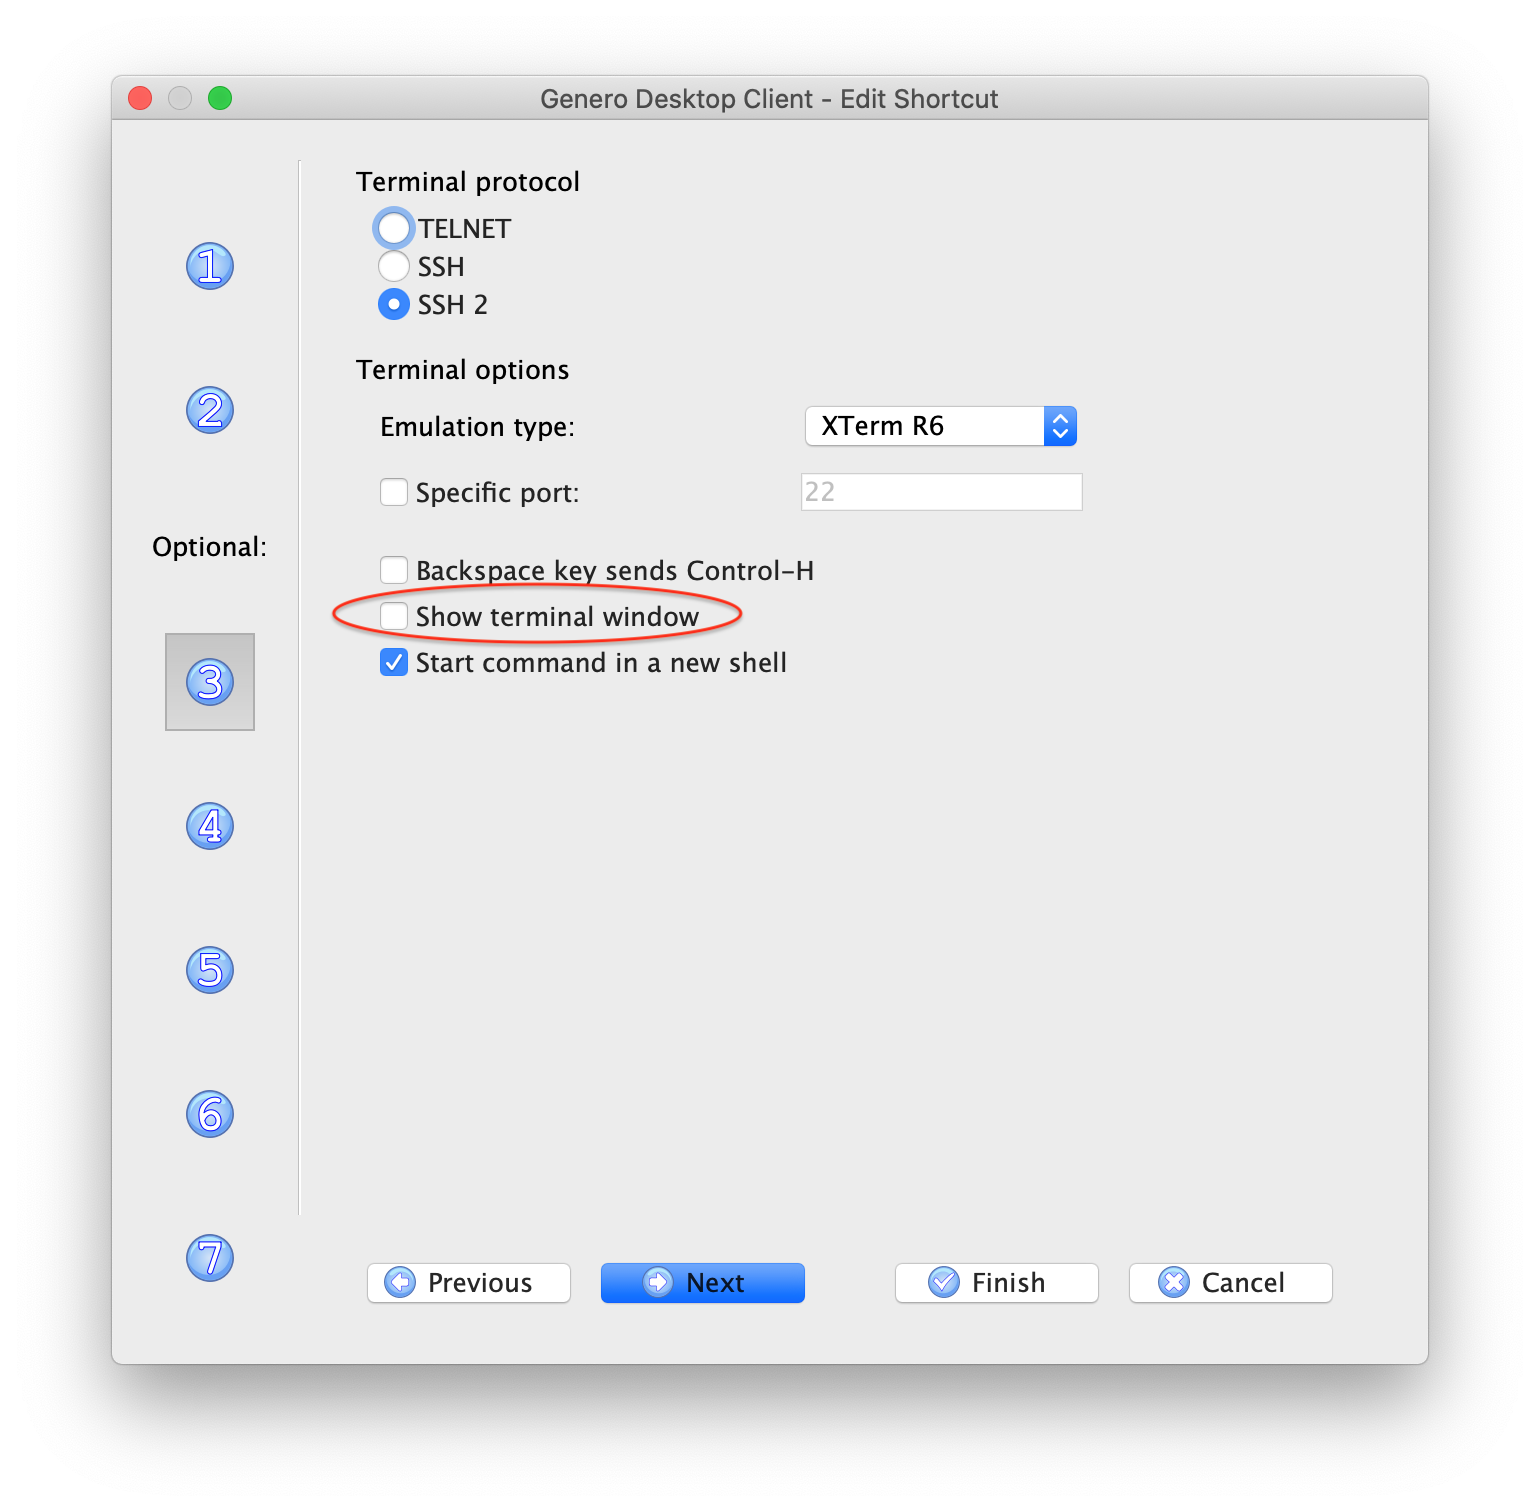
GDC Short-cuts are a neat piece of functionality that I often find Genero developers and system administrators raise support questions because they don’t have a great appreciation of what is happening underneath. It is one of these areas where once you look underneath, you think that is clever and have a greater appreciation of what is going on. GDC Shortcuts can be saved in files with extension .gdc. When installing GDC, one of the steps will associate .gdc files with the Genero Desktop Client executable. Just as you can double-click on an .xls / .doc file etc to start Excel/Word respectively with that file open, you can double-click a .gdc file and start the GDC executable using the shortcut defined in that .gdc file. There are three types of shortcuts that vary by the connection type. Historically the Direct Connection type was the most popular but as use of Genero Application Server has increased, so has the use of the HTTP Connection Type. With a HTTP Connection Type, the main argument is the URL. This is a similar URL and configuration to what you would use in a browser to start a Genero web application and in a web service call to invoke a particular web service. For this article I will concentrate on the Direct Connection type. In the case of a Direct Connection, the information in the GDC Shortcut has the information to … What you should observe is that in the GDC installation, next to gdc.exe (or its Linux or Mac equivalents), you will see an executable fgltty. This is a lightweight terminal emulator. When you start a direct connection shortcut through the GDC, it is starting this terminal emulator to establish a connection to the application server and then to start a Genero application that is communicating with the GDC executable as per our User Interface protocol. For help in debugging the creation of a GDC Shortcut and to also help provide information on what is going on behind the scenes, on the third screen of creating a GDC Shortcut there is a field “Show Terminal Window” which allows you to see this terminal emulator. If you check that field and run your GDC Shortcut, you will see a terminal window that shows … So if you are having trouble with a GDC Short-cut, checking this box is one of the first steps to determine what is actually occurring.
A simple test / learning exercise you can use for GDC Short-cuts is to run the demo programs shipped in $FGLDIR/demo as a GDC Short-cut.
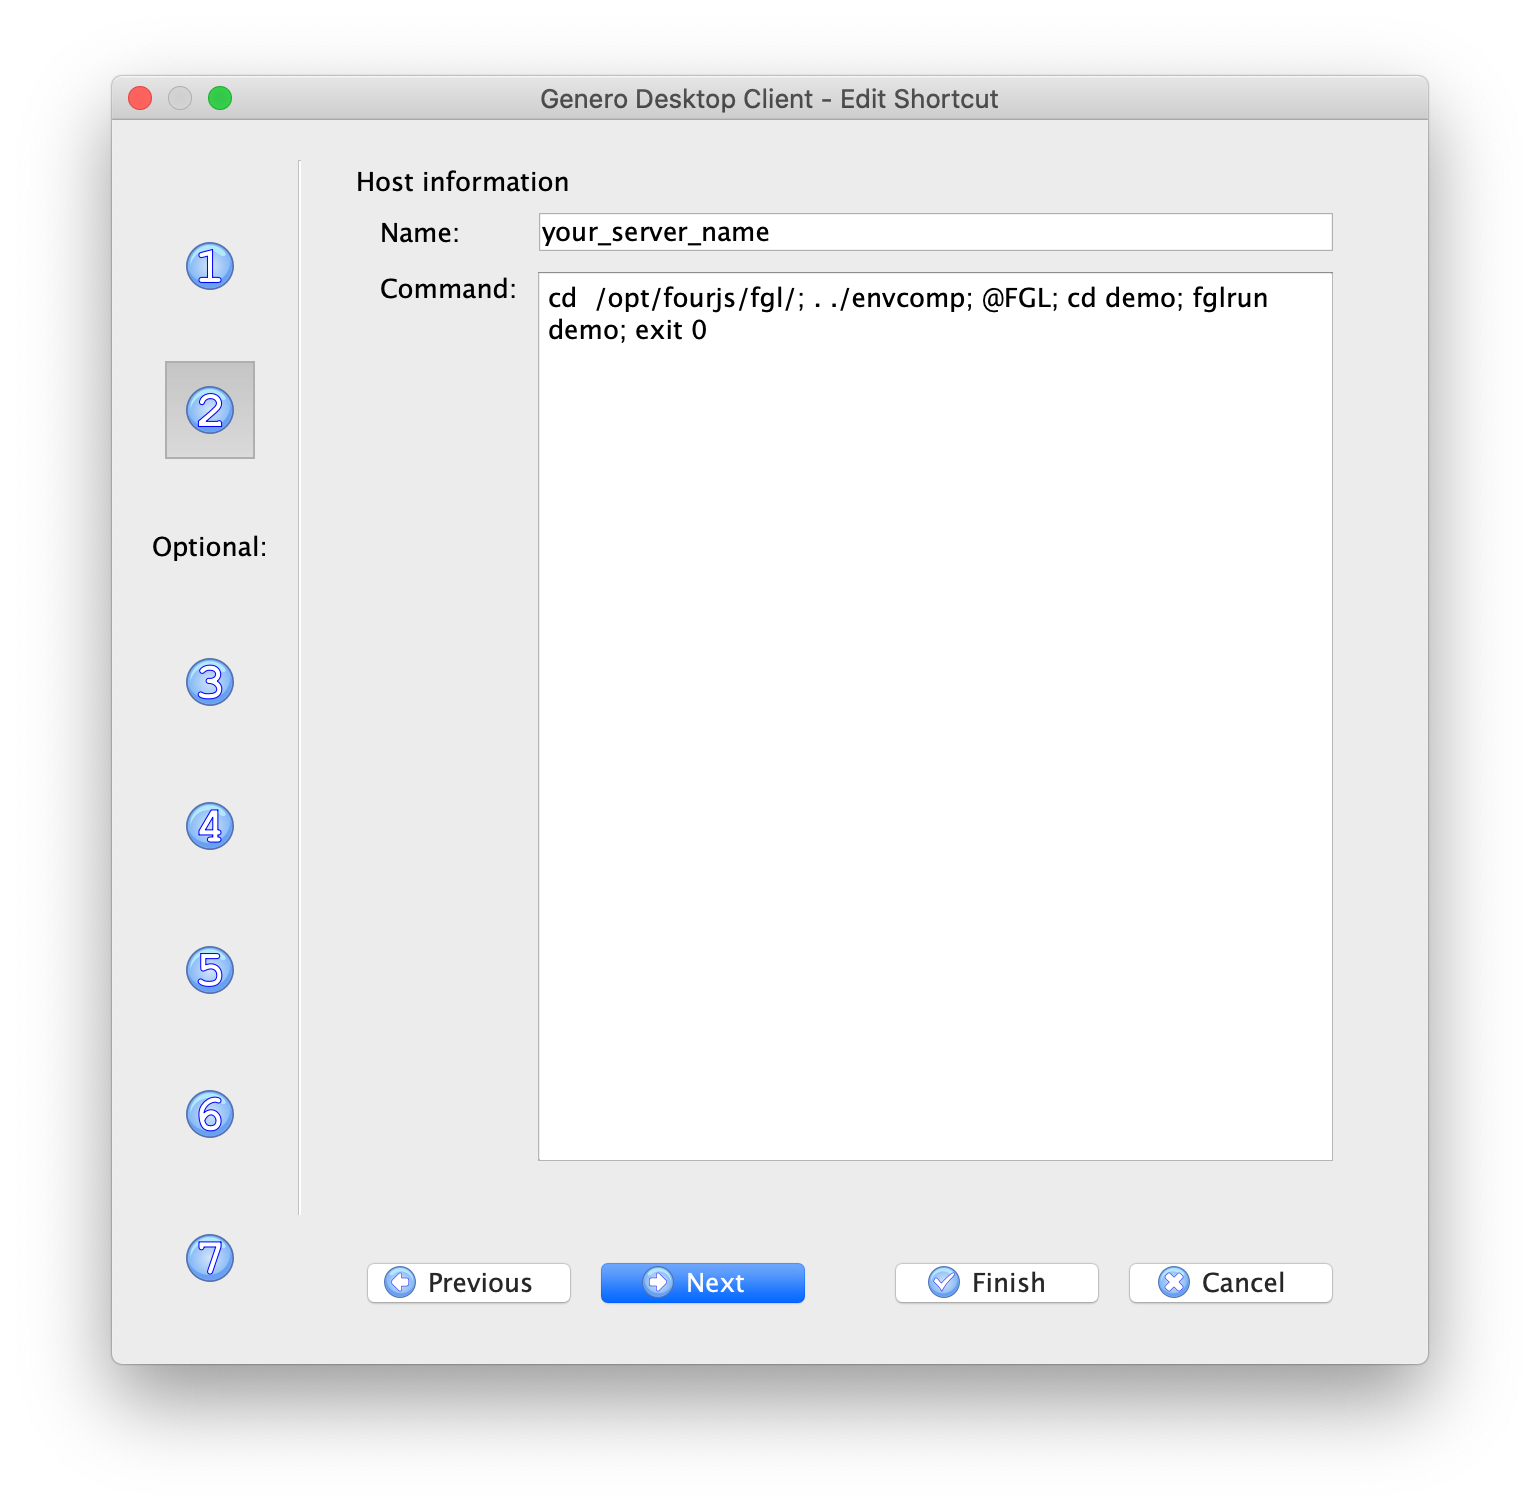
On the second screen of creating a GDC Short-cut (note the documentation for creating a Direct Connection GDC shortcut is all on one page)…
- set the Name field to the name or IP address of your server where Genero is installed.
- populate the Command field with the command necessary to set the environment, cd to the appropriate directory, and run the demo program shipped with Genero. In the screenshot below, you can see
-
- cd /opt/fourjs/fgl — cd to directory to where Genero is installed, note that $FGLDIR is not specified at this point so you need to enter the directory. You may have installed Genero in a different directory so this value may be different for you.
- . ./envcomp — set the minimum environment
- @FGL– this is a special tag that sets FGLSERVER and other environment variables. This tag may vary with operating system as per Table 1 and Table 2 here.
- cd demo – cd to directory when Genero demo is installed
- fglrun demo – start the Genero demo program
I have “exit” in the screenshot, for debugging purposes what you can do is remove the “exit” and/or add a “sleep” or “wait” type command. In some scenarios the debug window will disappear before you have had a change to read it, so a handy tip to remember is to add a sleep/wait command before the process terminates so you can read what has been written to stdout/stderr.
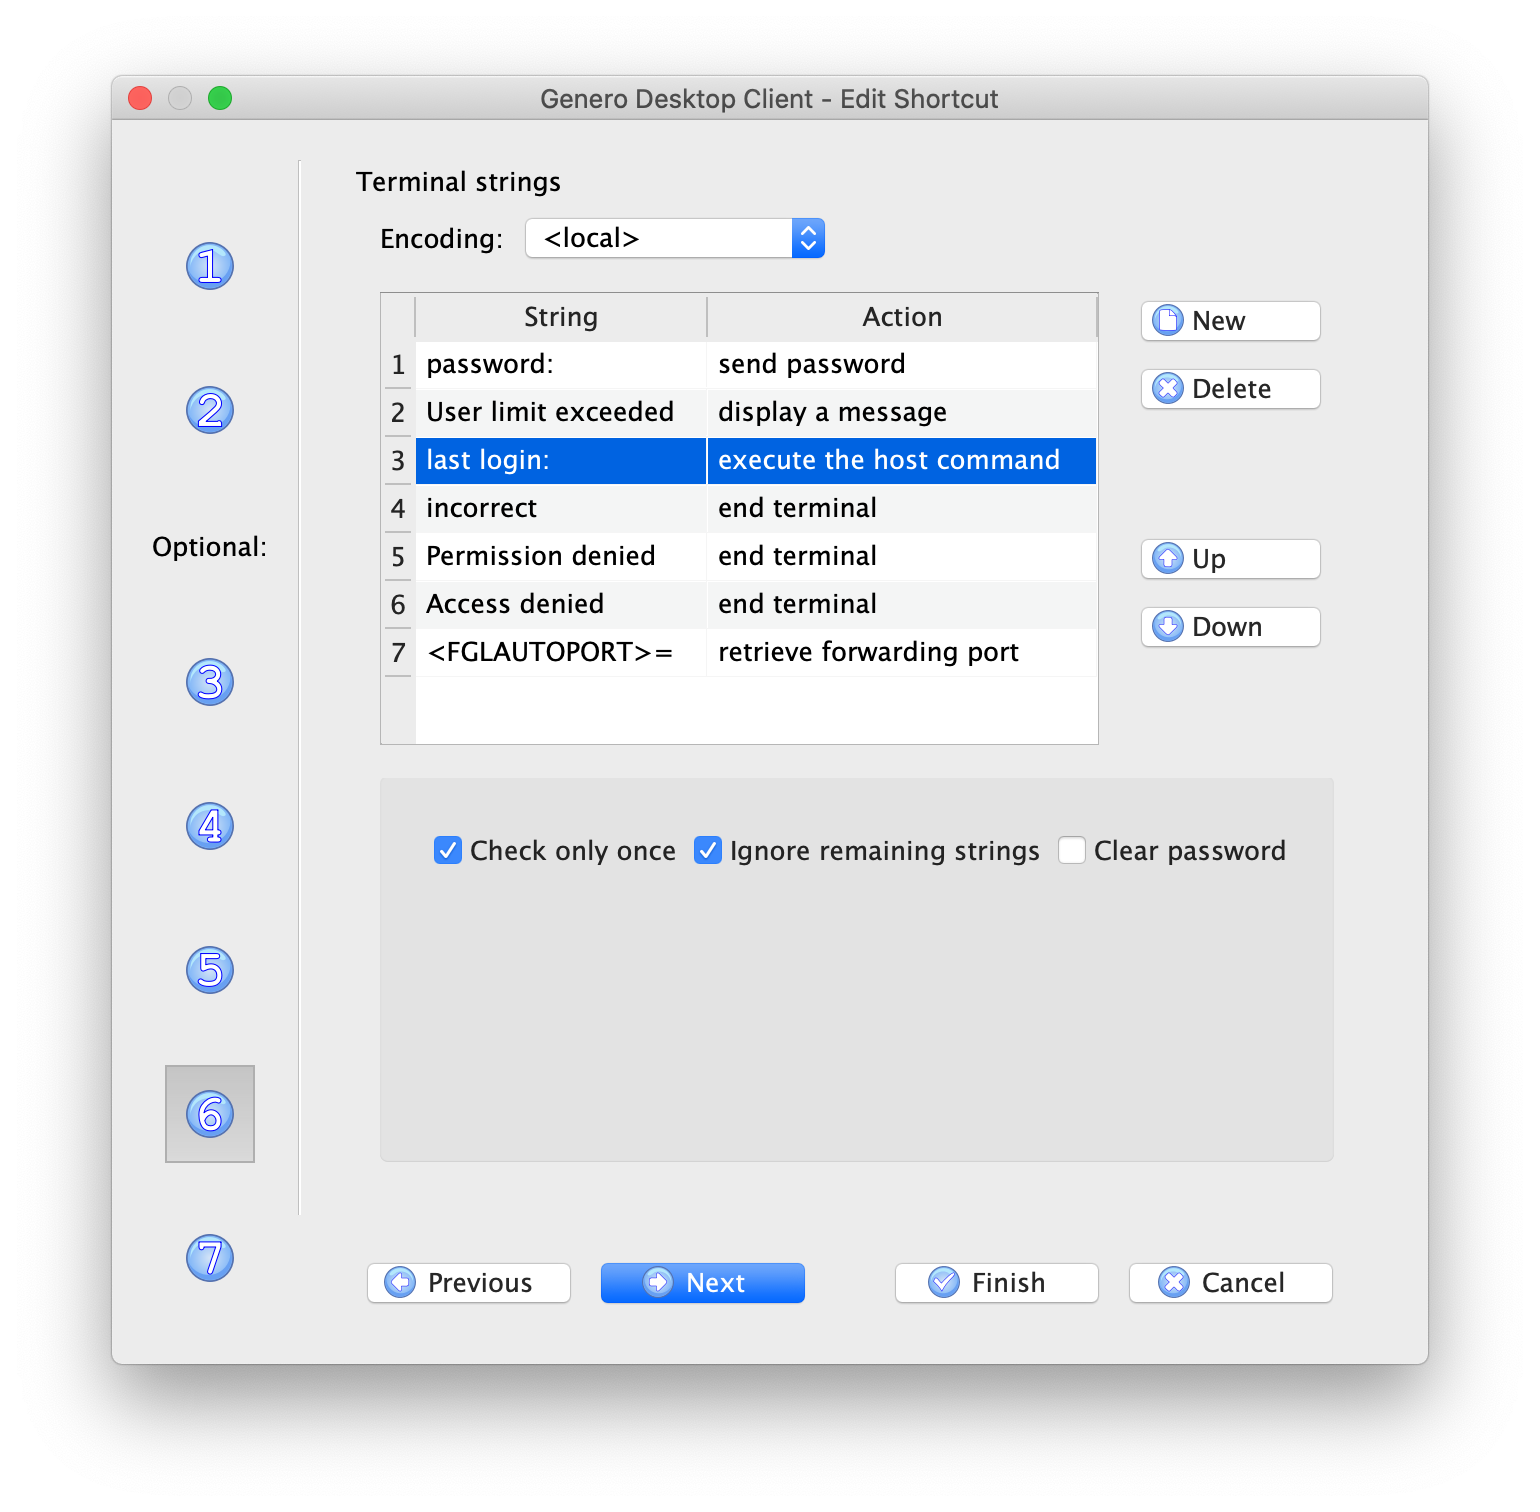
On the 6th screen of the creating a GDC Shortcut wizard, there is a screen Terminal Strings.
The left hand column is a string that may appear as part of the login process, and the information in the right hand column is how the GDC will respond.
So the first entry “password:” in the screenshot below, if the terminal has the phrase “password:” appear in the terminal screen, then the GDC is going to respond by sending the password that the user has entered into the GDC dialog, as indicated by the “send password” action in the second column.
The entry “last login:” is what the operating system will display after a successful login. At this point the GDC knows that it has successfully logged onto the server and at that point it will send the command to execute on the server, as indicated by the “send command” action.
If everything has worked correctly, these should be the only two terminal strings executed. If something has gone wrong then you might expect to see “incorrect”, “Permission denied”, “Access denied” displayed to the terminal, and when that happens the GDC sees this and responds with the action, in this case “end terminal”
You can display a custom error message in these situations and this is what the “User limit exceeded” entry does. It displays a dialog to the end user if it sees “User limited exceeded” displayed in the terminal.
That is the crux of how Terminal Strings concept works, something is displayed to the terminal, the GDC reads that and performs the configured action. You don’t normally see this because normally the terminal window is not displayed.
You should note that any DISPLAY to standard output will appear in the terminal and can potentially be read by the GDC and potentially actioned. If you have some lazy debug code e.g. DISPLAY “incorrect value”, variable_name , you may find that the terminal string for “incorrect” gets executed!.
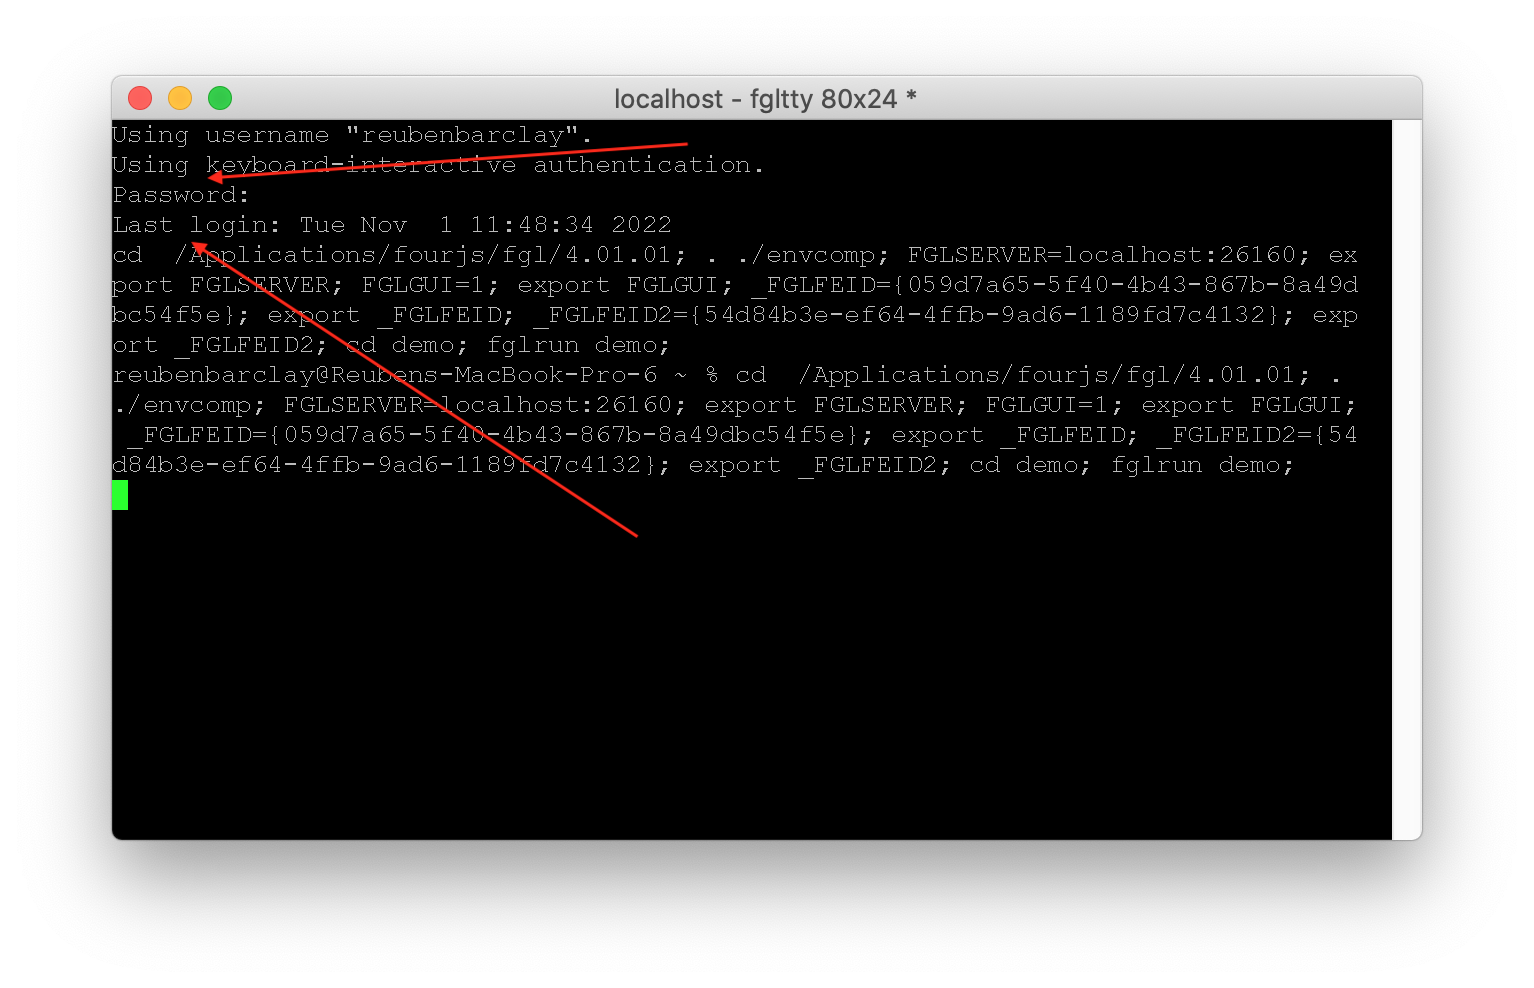
If you create and run a GDC shortcut to run $FGLDIR/demo, you might see output similar to the screenshot below.
- Note how “Password:” has appeared and resulted in the GDC sending my password into the GDC dialog into the Password field.
- The terminal then displayed as part of my successful login the phrase “last login:” and executed the command.
- In the command, the @FGL has been expanded to set FGLGUI=1 and FGLSERVER equal to the address and port where I am running the GDC. The FGLFEID environment variables are system generated as part of the security implementation and not something you would ever need to set manually.
The key takeaways are …
- understand that a .gdc file via File Associations can be used to start GDC and run a GDC Shortcut,
- click the Show Terminal Window to see what is happening behind the scenes with a GDC Shortcut,
- understand how the Terminal Strings control what the GDC does in logging on to the server and and starting a Genero application.
- practise creating a shortcut to start FGLDIR/demo (you can do this for both Direct and HTTP)


