Ask Reuben – October 28, 2020
Starting With Genero Ghost Client (GGC)
I can’t get the Genero Ghost Client to work?
How does the Genero Ghost Client work?
What is the Genero Ghost Client?
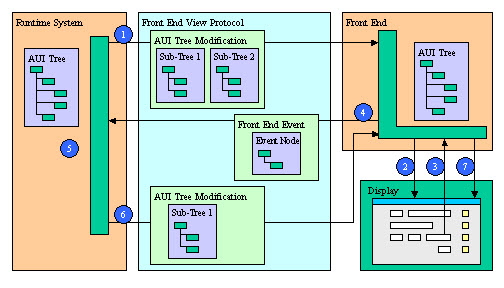
When people start using our newer products I often see them jumping in the deep end, trying to run before they can walk, biting off more they can chew etc. and their first experiences are not as positive as they can be. Over time I am going to do a series of articles entitled “Starting …” where I will explain what I think are the key concepts points you should understand with our products and try and make your initial experience a positive one. Today I will look at Genero Ghost Client (or GGC). Lets start off with the name “Ghost”, where does that come from. You have hopefully seen how we are able to render the same code to the various front-ends through the concept of the Dynamic User Interface, the Abstract User Interface (AUI) tree, and the front-end protocol. If you look at this diagram …
Introduction
… you will see a rectangle labelled Front-End. This is the Genero Desktop Client, the Genero Browser Client, and inside a Genero Mobile app there is also a thread doing the same thing on the mobile device. This front-end is communicating with the fglrun process (the runtime system), displaying the AUI tree on the front-end and sending back the user input. The Genero Ghost Client is a program that is another instance of this rectangle labelled Front-End that is having the same communication with the fglrun process only instead of displaying to a screen, as a program it is checking the values in the AUI tree and sending back simulated user input back to the fglrun process. It is called Ghost because you can’t see it on the screen.
So in whiteboard sessions I like to draw …
fglrun <---> GDC
fglrun <---> GBC
fglrun <---> GMI
fglrun <---> GMA
fglrun <---> GGC
… to emphasise that it is receiving and communicating with the fglrun process the same as the other clients.
The Genero Ghost Client is shipped inside FGLDIR/testing_utilities so you won’t find it as a seperate download in the downloads area of the website, but you will find its documentation available separately in the documentation area of the website. Like all documentation, an online copy is available with the latest version. Included in FGLDIR/envcomp is the minimum environment necessarily to run Ghost Client but you will need to ensure JAVA_HOME is set as per the Install and Configure section of the documentation.
My First Test
To get an introduction what I suggest is that rather than testing one of your programs, is to first do a test using a simple little calculator program.
#! calculator.4gl
MAIN
DEFINE a,b,c INTEGER

    DEFER INTERRUPT
    DEFER QUIT
    OPTIONS FIELD ORDER FORM
    OPTIONS INPUT WRAP
    CALL ui.Dialog.setDefaultUnbuffered(TRUE)

    CLOSE WINDOW SCREEN
    OPEN WINDOW w WITH FORM "calculator"

    -- DISPLAY ui.Interface.getFrontEndName()

    INPUT BY NAME a, b,c  ATTRIBUTES(WITHOUT DEFAULTS=TRUE, ACCEPT=FALSE, CANCEL=FALSE)
        ON ACTION add
            LET c = add(a,b)

        ON ACTION close
            EXIT INPUT
    END INPUT
END MAIN

FUNCTION add(a INTEGER,b INTEGER) RETURNS INTEGER
    RETURN a+b
END FUNCTION
#! calculator.per
LAYOUT (TEXT="Calculator", MINHEIGHT=10, MINWIDTH=20)
GRID
{
[f01 ]
+[f02 ]
=[f03 ] [b01 ]
}
END
END
ATTRIBUTES
f01 = formonly.a TYPE INTEGER;
f02 = formonly.b TYPE INTEGER;
f03 = formonly.c TYPE INTEGER, NOENTRY;
BUTTON b01: add, TEXT="Add";if you run this program, you can hopefully see that entering 1,2 into the two fields and pressing Add displays 3 in the bottom field. What we are going to do is create a test program to test that this program does this correctly.
In Studio this will involve (similar steps to what is documented here https://4js.com/online_documentation/fjs-gst-manual-html/#gst-topics/t_gst_ggc.html)
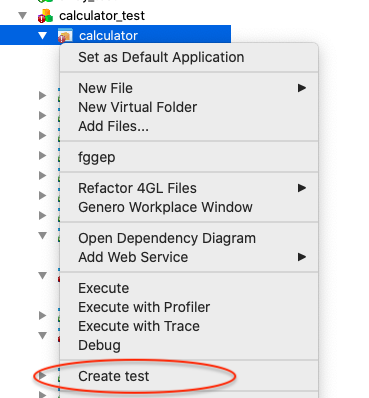
- Right-clicking on the application node of the application to test and selecting Create Test (pictured below). This will start the application.
- Enter 1,2 in the two fields and click Add. You should see 3 appear.
- Exit this program.
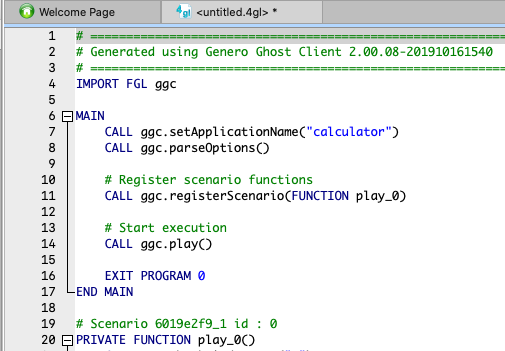
- In the Code Editor this will create a new untitled 4gl that will look similar to the code pictured below (note the Generated Using comment at the top) …
- You should then save this .4gl with a name like calculator_test.4gl
To get to the same point from the command line you will need to follow steps similar to the getting started page This will generate a .4gl file calculator_test.4gl that is similar to that pictured for Studio above We are now ready to run this test. In Studio you need to To run a test from command line In Studio you will see output in the Output panel, from the command line this will be written to stdout, info similar to … What has happened, is that the test program calculator_test.42r has run the program under test, calculator.42r where the test program calculator_test.42r has acted as the front end. So instead of “fglrun calculator.42r” communicating with gdc.exe or gbc.js, it has communicated with “fglrun calculator_test.42r”. The test program “fglrun calculator_test.42r” has received the AUI tree from the program under test “fglrun calculator.42r”, tested that certain values in the AUI Tree are as expected, and has sent back some simulated user input to the program under test. There are some bits in the middle making this happen, the Scenario Server as documented here but that is all under the hood. Having shown a successful test what I normally demonstrate then is one of three things to make a test fail. In calculator.4gl, I change the plus (+) to a minus (-), recompile calculator.4gl and rerun the test. In the output you should now see … That is, the test was expecting to see a 3 but instead saw a -1. This demonstrates what you can expect to happen if the logic that is being tested is altered and returns an unexpected result. Change the code in calculator.4gl back to a plus before you forget and this time modify calculator_test.4gl. Now in the calculator_test.4gl, wherever you see a “2”, change that to a “4” (should be three places). That is instead of testing 1+2, we will test 1+4. Now when you run calculator_test.4gl you will see in the output … We changed the inputs but we did not change the expected result, so change the one place you see a “3” to a “5” in calculator_test.4gl Now compile and run calculator_test again and it should succeed. What this has illustrated is how you can modify the test program to add more tests. That is you are not limited to what you recorded, you can modify the test program to perform additional tests. At an extreme you could record in a file or database table, a whole list of inputs and expected outputs, and modify this test program to iterate through this list of inputs and expected outputs. A final test is to see what happens if the user input changes. In calculator_test.4gl, change the values back to test 1+2=3. In calculator.4gl, change the ON ACTION add to the following … … , rebuild the calculator application, and now when you run the test it fails with … … the key line is the Focused field name is not valid. The test program was not expecting the MENU inside FGL_WINMESSAGE to be there, it expected the cursor to be in field formonly.b and started reporting errors. The key lesson is that if the user interface changes, you need to be prepared to amend the test program. It isn’t going to know how to react if a different window is opened, the field with focus has changed, or the field name has changed since the test was recorded. I didn’t look deeply at the code in the test program. It should be fairly explanatory but what it consists of is code that is checking certain values in the AUI Tree and code that simulates user input e.g. Hopefully you can see that you could if you wanted If you are interested the source for ggc is in $FGLDIR/testing_utilities/ggc/src/ggclib/ggc.4gl That is what I consider the first building block. If you can get to this point where you can generate a simple test to test a simple program, can run the test, and modify it so you can see what happens, you can now try that on one of your own programs and you will always have this building block you can fallback to. Some areas you can then look to explore further include… There is a lot you need to consider for a fully fledged test environment… There is a lot to setting up a testing suite, getting Genero Ghost Client to generate and run tests is only the start of something much bigger. If you can get to the point where you can run and modify a simple calculator test, and then repeat what you have learned on one of your own programs, you are in a good position.
fglrun --start-guilog=calculator_test.log calculator.42r
ggcgen bdl calculator_test.log
tcp --command-line "fglrun calculator"
fglcomp calculator_test.4gl
fglrun calculator_test tcp --working-directory $(pwd) --command-line 'fglrun calculator'
BDL Scenario server is not started.
Starting BDL scenario server on port 6500.
Listening on port 6500
BDL Scenario server not yet started, retry - Retry ..
BDL Scenario server not yet started, retry - Retry ..
SessionManager 0.001 "SessionManager" Create.
SessionManager 0.030 "SessionManager" Create TCP session.
TCPSession close server socket
== Session statistics == Id: 440ae84b9d5b4d96974c64ca317cba78
Duration: 0:00:08.002
Bytes received: 7818
Bytes sent: 356
Scenario count: 1
Scenario failed: 0
Checks failed: 0
ScenarioServer 9.291 "Scenario server stop requested." -
ScenarioServer 9.293 "Scenario server exiting." -
Success
Expanding on that First Test
Checks failed: 1
Check failures:
/Volumes/Daily/github/fourjs-reuben/eap_3_20/trunk/ggc/calculator_test/calculator_test20.4gl:66:error:Field value is not valid, expected: '3', got: '-1'
Checks failed: 1
Check failures:
/Volumes/Daily/github/fourjs-reuben/eap_3_20/trunk/ggc/calculator_test/calculator_test20.4gl:66:error:Field value is not valid, expected: '3', got: '5'
Checks failed: 0
ON ACTION add
    IF b > 0 THEN
        CALL FGL_WINMESSAGE("Error","Sample Error", "error")
        NEXT FIELD b
    END IF
    LET c = add(a,b)
Checks failed: 2
Failures:
/Volumes/Daily/github/fourjs-reuben/eap_3_20/trunk/ggc/calculator_test/calculator_test20.4gl:67:error:(GGC-14) Not implemented. - Getting the value of a 'MenuAction' is not implemented.
Check failures:
/Volumes/Daily/github/fourjs-reuben/eap_3_20/trunk/ggc/calculator_test/calculator_test20.4gl:63:error:Focused field name is not valid, expected: 'formonly.b', got: 'ok'
/Volumes/Daily/github/fourjs-reuben/eap_3_20/trunk/ggc/calculator_test/calculator_test20.4gl:66:error:Field value is not valid, expected: '3', got: '0'
The Test Program Code
CALL ggc.checkWindowName("w")
CALL ggc.checkWindowTitle("Calculator")
CALL ggc.checkFormName("calculator")
CALL ggc.checkFormTitle("Calculator")
CALL ggc.checkFocus("formonly.a")
CALL ggc.checkFieldValue("formonly.a", "0") -- INTEGER
CALL ggc.checkValue("0")
CALL ggc.checkActionActive("add") -- add
CALL ggc.checkNoMessage()
CALL ggc.checkNoError()
CALL ggc.setValue("1")
CALL ggc.key("Tab")
CALL ggc.action("add")
Digging Deeper


