Ask Reuben – July 25, 2025
VBox/HBox Size Rule
What determines how tall the children of a VBox container are?
What determines how wide the children of a HBox container are?
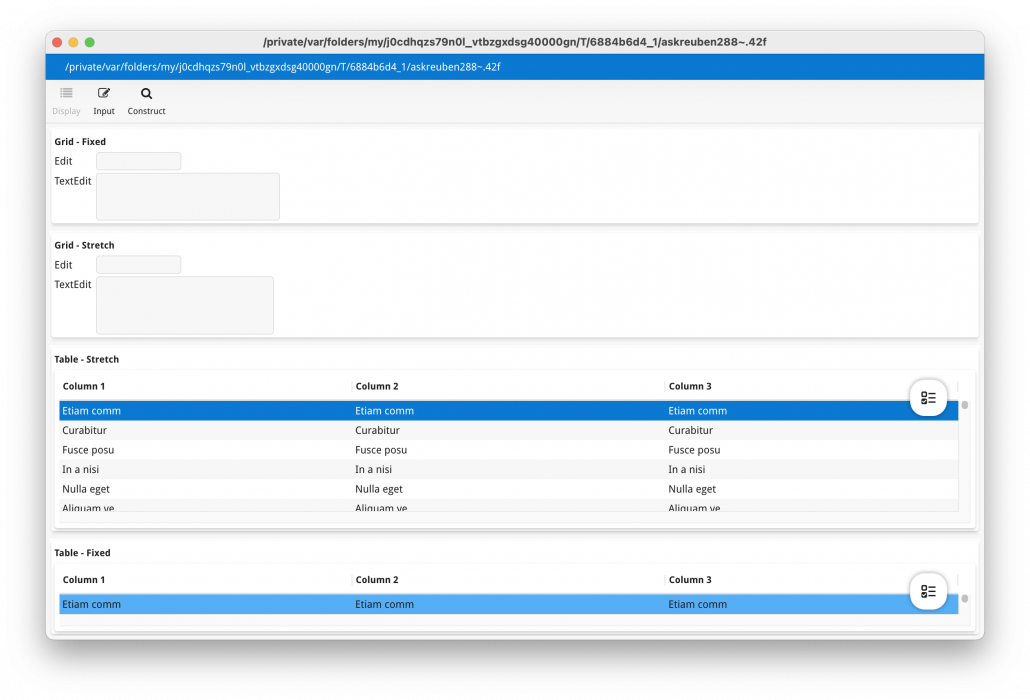
The VBOX and HBOX container are used to define a layout area and how children of that container are laid out. Children of a VBOX container are laid out vertically, children of an HBOX container are laid out horizontally. Nowhere with a VBOX, HBOX do you get to specify explicitly … For the purposes of this article, I will refer to VBOX and height and the vertical direction, the same principles apply to HBOX with width in the horizontal direction. The factors that contribute to the height of a VOX and the heights of its children containers include When looking at child containers, you may see FOLDER, PAGE, GROUP, HBOX, VBOX, you need to look inside them to get ultimately to the containers that contain widgets. That is TABLE, TREE, GRID, SCROLLGRID. These have the following properties for their minimum height and wether they can stretch When multiple child containers can stretch to fill available space, they will do so equally and in proportion. That is if their are 2 identical stretchable containers, they will take 1/2 of the space each, if there are 3 identical stretchable containers they will take 1/3 of the space each and so on. There are two attributes that can influence this. To illustrate this, I have prepared a sample form for which the code is at the end of the article. If using Genero Studio, you can use the Form Preview functionality to view how the form will render. If not using Genero Studio, write a small little Genero program to open the form. The form contains a VBOX with 4 child containers. They are all GROUP’s, primarily so that we can identify them through the GROUP title, and inside the 4 GROUPS, there is respectively … What we will do in to illustrate is to add or remove the HIDDEN attribute to the GROUPs to illustrate various combinations. That is … becomes …. … when I want to hide that GROUP for the purpose of the illustration. In this first screenshot, note that all 4 containers are visible. The first and last containers cannot stretch so have their minimum height, whilst the two middle containers have stretched to fill the remaining space.
GROUP (TEXT=...)
GROUP (TEXT=..., HIDDEN)
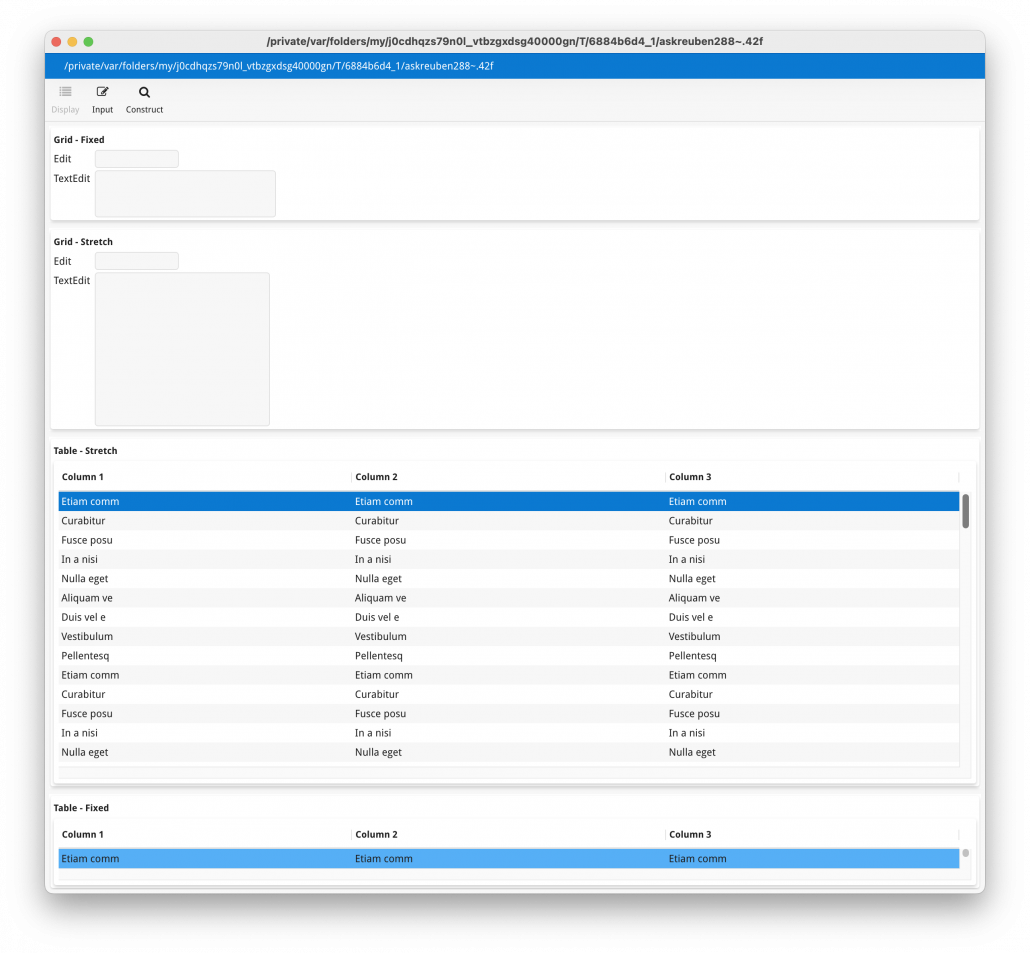
If we increase the size of the window, the two stretchable containers in the middle stretch to fill the new space, whilst the two non-stretchable containers remain at their minimum height.
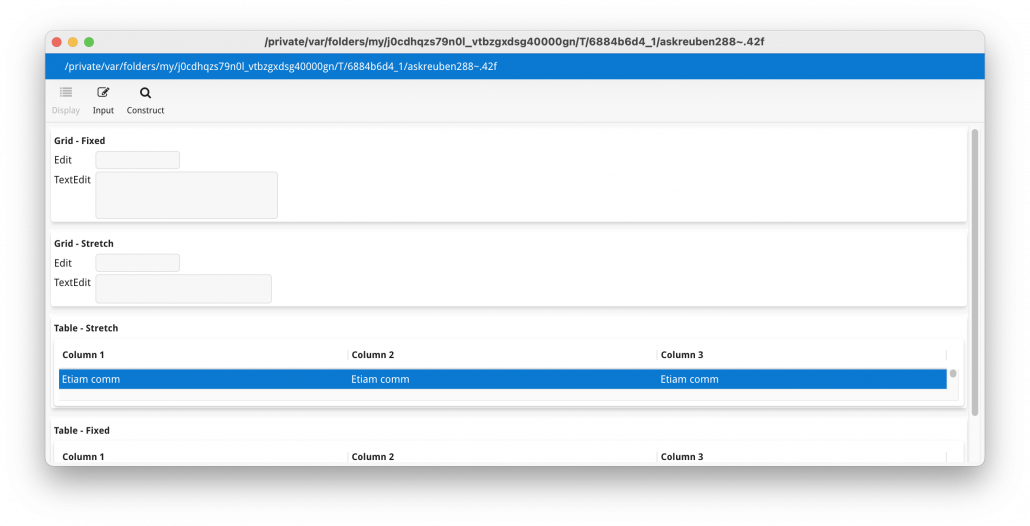
If we decrease the size of the container, the two stretchable center containers compress, whilst the two non-stretcable containers remain at their minimum height. Eventually if we make the window small enough, we will see a vertical scrollbar as all containers are now at their minimum height and cannot be compressed any further.
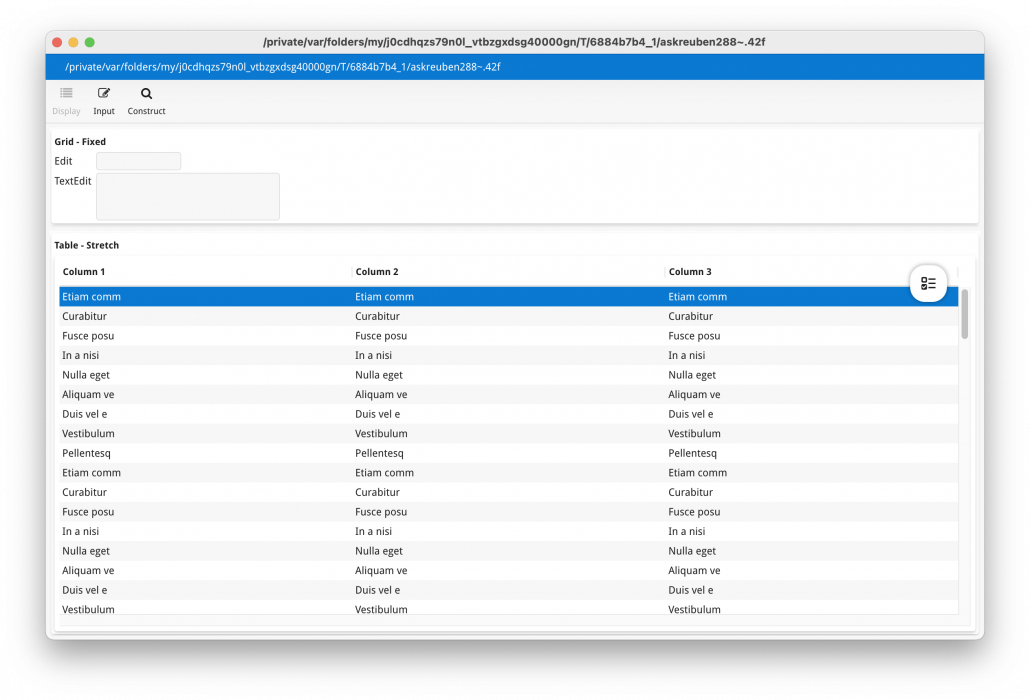
Now modify the form by setting HIDDEN on the second and fourth containers. We are now left with a non-stretchable GRID and a stretchable TABLE. This is a typical pattern we see, particularly with master-detail screens, and if you resize the window, you will see the TABLE expand and compress to show as many rows can fit in the space available.
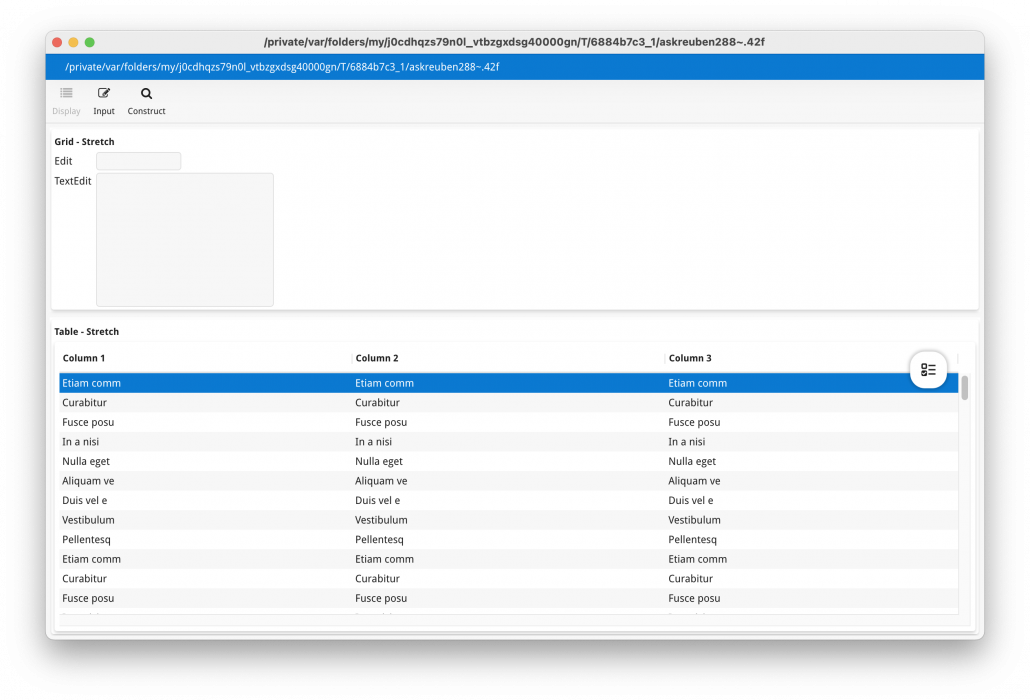
Now put the HIDDEN attribute on the first and last containers leaving us with the two stretchable containers being visible. Now you see that bother containers increase and decrease when we expand and compress the form.
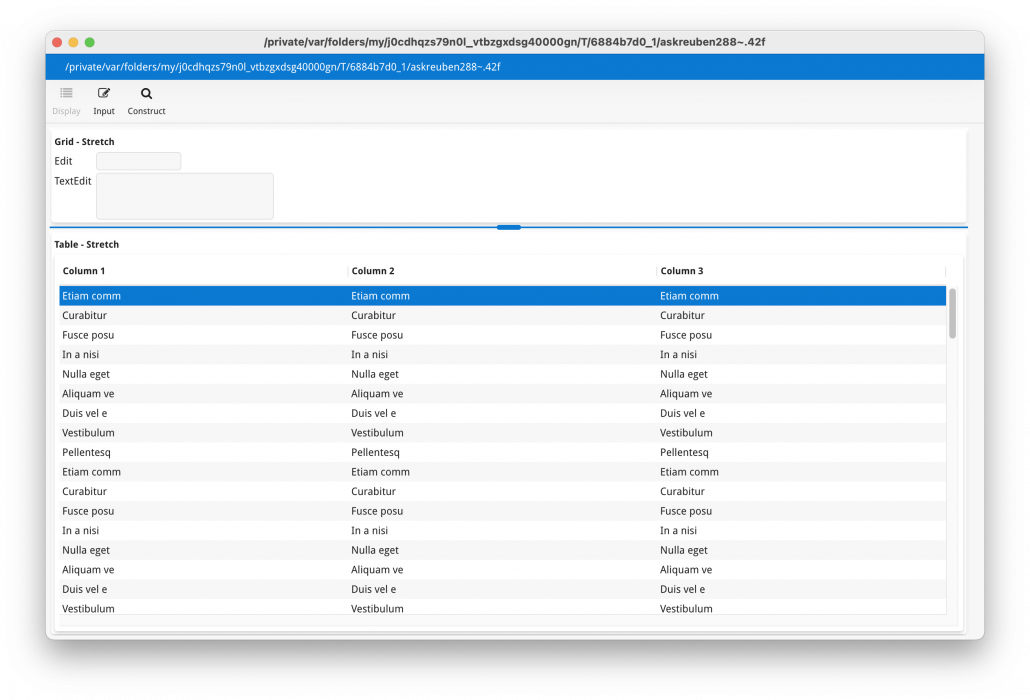
If we add the SPLITTER attribute to the VBOX …
VBOX (SPLITTER)
… the user can now drag the splitter to get their desired sizing of the two containers. So in screenshot below, user has dragged splitter for a 25%/75% split.
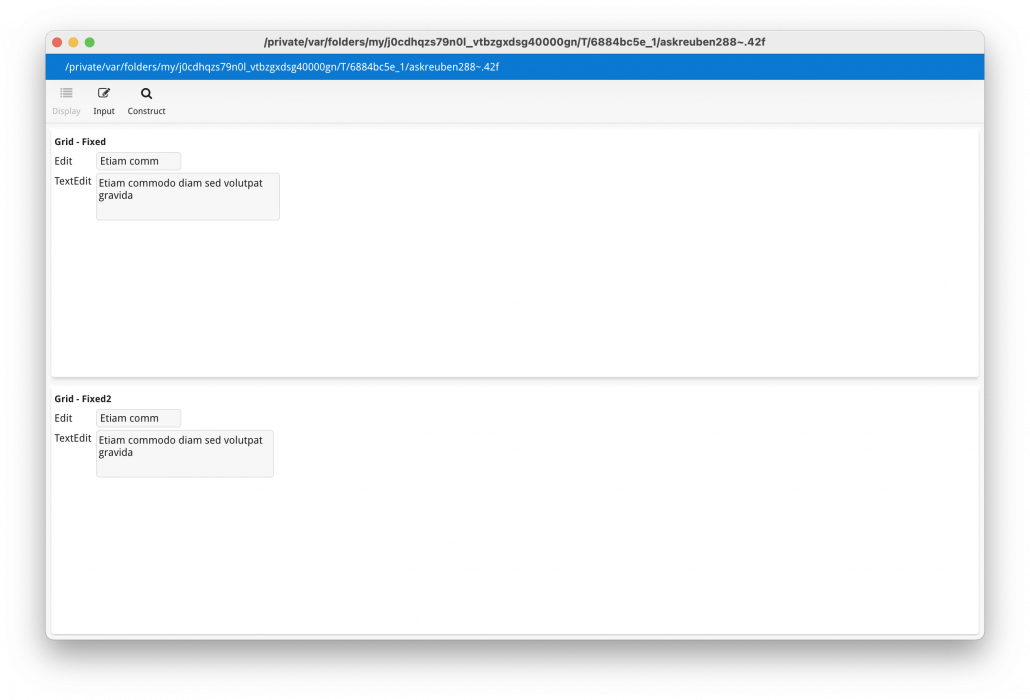
Finally the last thing to look at is to see the impact of the packed Presentation Style attribute. It is a little more tricky to setup, but in the two screenshots below, I have put the HIDDEN on the 3rd and 4th containers (the two TABLE containers), and ensured that STRETCH=NONE for both TEXTEDIT so that I do not have any containers that stretch. The first screenshot is with packed=No for the VBox presentation style …
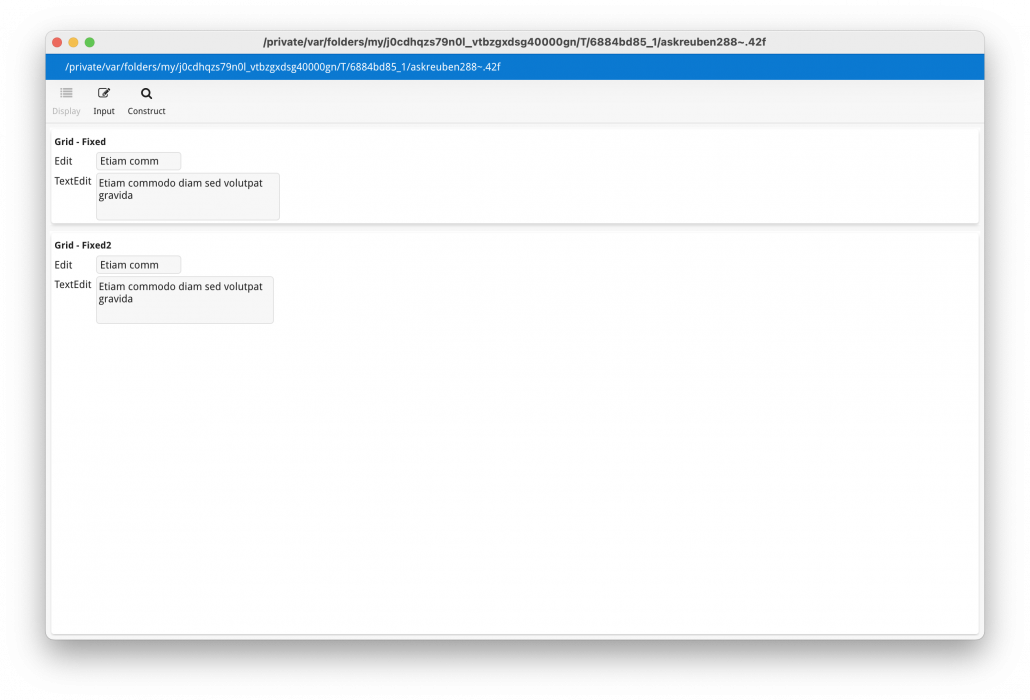
… and the next screenshot is with the 4st altered so that packed=yes.
At the moment there is nothing else in the Genero syntax that allows you to influence the space allocation so that instead of being shared equally, it is shared in a different ratio. That is instead of 50/50, make it 25/75. Using SPLITTER and stored settings, the user should only have to make this change once and it will be remembered.
Before packed, there were techniques that involved adding invisible stretchable images so that a GRID which would not otherwise stretch would stretch. See this Ask-Reuben article.
In summary, anytime you are trying to understand how the child containers have been sized, look for the following
- Is SPLITTER allowed?
- Is packed Presentation Style in use ?
- For each of the child containers, what is the minimum size ?
- For each of the child containers, can they stretch in that direction ? In the case of a GRID that means inspecting each widget for their STRETCH attribute.
- What is the size of the parent container.
- How does the total minimum size for the child containers compare to the size of the parent container?
The key step I see people missing is the understanding of the STRETCH attribute and how it will make a GRID container stretch.
LAYOUT
VBOX vbox1
GROUP grp1 (TEXT="Grid - Fixed")
GRID grd1
{
Edit         [f01       ]
TextEdit     [f02                     ]
             [                        ]
             [                        ]
}
END
END
GROUP grp2 (TEXT="Grid - Stretch")
GRID grd2
{
Edit         [f11       ]
TextEdit     [f12                    ]
             [                       ]
             [                       ]
}
END
END

GROUP grp3 (TEXT="Table - Stretch")
TABLE tab1 (STRETCHCOLUMNS)
{
[c01       |c02        |c03       ]
}
END
END
GROUP grp4 (TEXT="Table - Fixed")
TABLE tab2 (STRETCHCOLUMNS, WANTFIXEDPAGESIZE)
{
[c11       |c12        |c13       ]
}
END
END
END
END

ATTRIBUTES
EDIT f01 = formonly.field01;
TEXTEDIT f02 = formonly.field02, STRETCH=NONE;

EDIT f11 = formonly.field11;
TEXTEDIT f12 = formonly.field12, STRETCH=Y;

EDIT c01 = formonly.col01, TITLE="Column 1";
EDIT c02 = formonly.col02, TITLE="Column 2";
EDIT c03 = formonly.col03, TITLE="Column 3";

EDIT c11 = formonly.col11, TITLE="Column 1";
EDIT c12 = formonly.col12, TITLE="Column 2";
EDIT c13 = formonly.col13, TITLE="Column 3";

INSTRUCTIONS
SCREEN RECORD scr0(col01, col02, col03);
SCREEN RECORD scr1(col11, col12, col13);

