Port forwarding and the client-side firewall
This section details how to configure port forwarding with a client-side firewall.

If you have a client side firewall, you cannot connect directly to your clients from outside the firewall. There are two solutions to this problem:
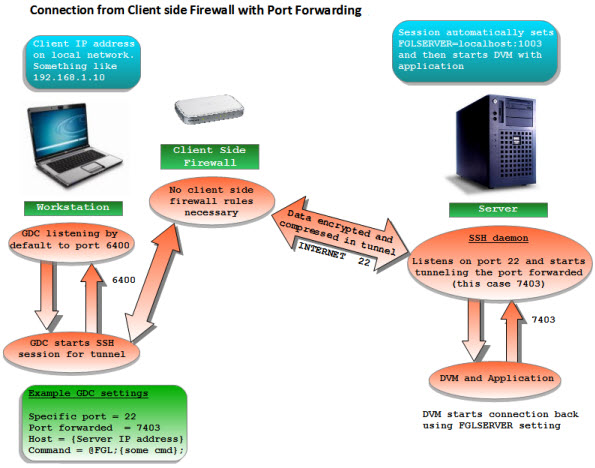
- First, you can set up port forwarding while using SSH or SSH2 (See Figure 1). This is by far the easiest and most secure method to connect without the help of a VPN.
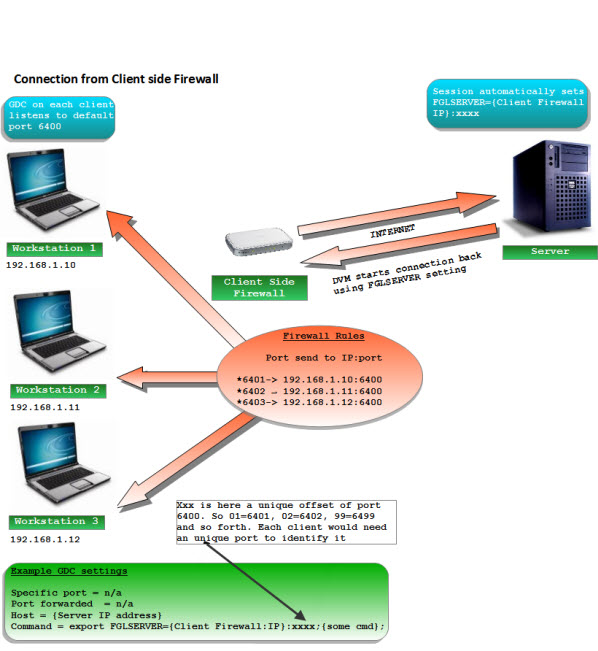
- The second method requires adding rules to the router to allow connections (See Figure 2). The set up of the router will be covered here; port forwarding is covered in a separate section.

The router will need rules added to take a connection coming in on a specific port and direct it to one of your clients. The way Genero is normally configured, all clients would use port 6400. If you only have one client, you can add a rule to the router to forward 6400 to the client on port 6400. If you have more than one client, you will need to allocate other ports on the router to forward to the other clients.
In the examples shown, the internal addresses are not public IP addresses. If you have public IP addresses on each client, you can open port 6400 for each of the clients.
Incoming 6400 -> 192.168.1.10:6400Incoming 6401 -> 192.168.1.10:6400
Incoming 6402 -> 192.168.1.11:6400
Incoming 6403 -> 192.168.1.12:6400Incoming 6401 -> 192.168.1.10:6401
Incoming 6402 -> 192.168.1.11:6402
Incoming 6403 -> 192.168.1.12:6403>gdc -p 6401
>gdc -p 6402If you are setting up multiple clients in this manner, you may want to avoid starting the first client on 6400; any misconfigured new clients will pop up on that user's console unexpectedly.
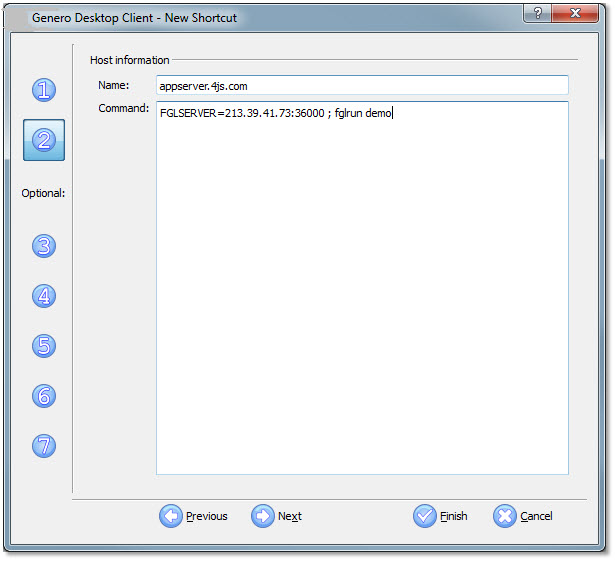
On the command line of the GDC shortcut setup, assign FGLSERVER to be the IP of the firewall router with the corresponding port of the router. This must be hard-coded, since there is no way for the client computer or Genero to know how the connection is established.
Incoming 213.39.41.73:10000 -> 192.168.0.53:6400FGLSERVER=213.39.41.73:36000; fglrun demo
The FGLSERVER variable is normally set using @FGL, but that would set FGLSERVER to the IP of the local client machine and the port specified when the GDC was started with -p. If the IP addresses used behind the firewall are public, this would be OK. If the addresses are not public, however, we must use the IP address of the router, and let the router translate and forward it. If the router is translating the port, then we must use the port that the router is expecting.
In our example the port that the router is looking for is 10000. The FGLSERVER port value must be set to 10000 minus 6400, resulting in 3600. This is because FGLSERVER=<ip> :0 tells Genero to connect on port 6400. The number after the colon is added to 6400.