Add a file loading image that displays in the center of the page when file loading is in progress in your Genero Browser Client (GBC) applications.
About this task:
This customization involves extending the
ApplicationHostMenuWidget and the ApplicationHostMenuRuntimeWidget to define the animation icon
behavior. For this you create the following files:
- MyApplicationHostMenuRuntimeWidget.js
- MyApplicationHostMenuWidget.js.
- MyApplicationHostMenuRuntimeWidget.scss
- MyApplicationHostMenuRuntimeWidget.tpl.html.
-
With a text editor create a file called
MyApplicationHostMenuRuntimeWidget.js in your
project_dir/customization/custom_project_dir/js directory.
Copy the code shown in the example and
save.
"use strict";

modulum('MyApplicationHostMenuRuntimeWidget', ['WidgetBase', 'WidgetFactory'],
  /**
   * @param {gbc} context
   * @param {classes} cls
   */
  function(context, cls) {

    /**
     * @class classes.MyApplicationHostMenuRuntimeWidget
     * @extends classes.WidgetBase
     */
    cls.MyApplicationHostMenuRuntimeWidget = context.oo.Class(cls.WidgetBase, function($super) {
      /** @lends classes.MyApplicationHostMenuRuntimeWidget.prototype */
      return {
        __name: "MyApplicationHostMenuRuntimeWidget",
        _waitingTime: 100,
        _timer: null,

        _initElement: function() {
          $super._initElement.call(this);
          this._waitingTime = 1000*parseFloat(gbc.constants.theme["gbc-loader-threshold"]);
        },

        setIdle: function() {
          if(this._timer){
            window.clearTimeout(this._timer);
            this._timer = null;
          }
          this.removeClass("processing");
        },
        setProcessing: function() {
          if(this._timer){
            window.clearTimeout(this._timer);
            this._timer = null;
          }
          this._timer = window.setTimeout(function(){
            this.addClass("processing");
          }.bind(this),this._waitingTime);
        }
      };
    });
    cls.WidgetFactory.register('ApplicationHostMenuRuntime', cls.MyApplicationHostMenuRuntimeWidget);
  });
In the code, you can see:- Two variables are added, _timer and _waitingTime
- In the _initElement function, the _timer is set from a calculation using the gbc-loader-threshold value in the theme.scss.json.
- The setIdle function uses the window object clearTimeout() method to clear the timer. The function also removes the processing class.
- The setProcessing function sets the timer with the setTimeout() method, which calls a function to add the processing class and to bind to it after a delay specified by _waitingTime.
-
Create a file called MyApplicationHostMenuWidget.js in your
project_dir/customization/custom_project_dir/js directory.
Copy the code shown in the example and
save:
"use strict";

modulum('MyApplicationHostMenuWidget', ['ApplicationHostMenuWidget', 'WidgetFactory'],
  /**
   * @param {gbc} context
   * @param {classes} cls
   */
  function(context, cls) {

    /**
     * @class classes.MyApplicationHostMenuWidget
     * @extends classes.ApplicationHostMenuWidget
     */
    cls.MyApplicationHostMenuWidget = context.oo.Class(cls.ApplicationHostMenuWidget, function($super) {
      /** @lends classes.MyApplicationHostMenuWidget.prototype */
      return {
        __name: "MyApplicationHostMenuWidget",
        __templateName: "ApplicationHostMenuWidget",

        _initElement:function(){
          $super._initElement.call(this);
          this._element.addClass("gbc_ApplicationHostMenuWidget");
        },
        _createMenuItems: function() {
          this._uploadStatus = cls.WidgetFactory.create('ApplicationHostUploadsMenu');
          this.addChildWidget(this._uploadStatus);
         this._runtimeStatus = cls.WidgetFactory.create('ApplicationHostMenuRuntime');
          document.body.appendChild(this._runtimeStatus._element);
          this._aboutMenu = cls.WidgetFactory.create('ApplicationHostAboutMenu');
          this.addChildWidget(this._aboutMenu);
          this._settingsMenu = cls.WidgetFactory.create('ApplicationHostSettingsMenu');
          this.addChildWidget(this._settingsMenu);
          //debug
          this._proxyLogMenu = cls.WidgetFactory.create('ApplicationHostMenuProxyLog');
          this.addChildWidget(this._proxyLogMenu);
          this._vmLogMenu = cls.WidgetFactory.create('ApplicationHostMenuVmLog');
          this.addChildWidget(this._vmLogMenu);
          this._runInGwcMenu = cls.WidgetFactory.create('ApplicationHostMenuRunInGwc');
          this.addChildWidget(this._runInGwcMenu);
          this._runInGdcMenu = cls.WidgetFactory.create('ApplicationHostMenuRunInGdc');
          this.addChildWidget(this._runInGdcMenu);
          this._debugMenu = cls.WidgetFactory.create('ApplicationHostDebugMenu');
          this.addChildWidget(this._debugMenu);
        },

        _destroyMenuItems: function(){
          this._runtimeStatus.getElement().remove();
          $super._destroyMenuItems.call(this);

        }
      };
    });
    cls.WidgetFactory.register('ApplicationHostMenu', cls.MyApplicationHostMenuWidget);
  });
In the _createMenuItems function the runtimeStatus element (shown highlighted) is appended to the document body element.
-
In your project_dir/customization/custom_project_dir/sass directory create a file called
MyApplicationHostMenuRuntimeWidget.scss.
Copy the code shown in the example and save:
.gbc_MyApplicationHostMenuRuntimeWidget.processing {
  opacity: 0;
  position: fixed;
  z-index: 9999;
  top: 40%;
  left: 50%;

  & > *:hover {
    cursor: default;
  }
  &.processing {
    //animation: pulse 200ms infinite;
    opacity: 1;
  }

  $base-line-height: 100px;
  $white: rgb(158,158,158);
  $off-white: rgba($white, 0.2);
  $spin-duration: 1s;
  $pulse-duration: 750ms;

  @keyframes spin {
    0% {
      transform: rotate(0deg);
    }
    100% {
      transform: rotate(360deg);
    }
  }

  .loading {
    border-radius: 50%;
    width: $base-line-height;
    height: $base-line-height;
    border: .5rem solid $off-white;
    border-top-color: $white;
    animation: spin $spin-duration infinite linear;
    &--double {
      border-style: double;
      border-width: .5rem;
    }
  }
}
This style example defines the animation icon and its behavior:
- The style is added for when the .gbc_MyApplicationHostMenuRuntimeWidget.processing selector has the processing value. This means that the animation icon is shown only when the application is busy loading a file.
- The position of the icon is fixed to display over other elements (z-index=9999) in the center of the page ( top: 40%; left: 50%;)
- An at-rule, @keyframes spin, specifies how the icon will gradually transform from the start to the end (0% and 100%) to give the rotation effect.
- The loading class has settings for the size, border, and color properties of the icon. Its animation property references the spin rule, and the spin duration value. The animation continues for ever and the linear value specifies an animation with the same speed from start to finish.
-
In your project_dir/customization/custom_project_dir/js directory create a file called
MyApplicationHostMenuRuntimeWidget.tpl.html.
Copy the code shown in the example and save:
<div>
    <div class="loading" title="1">
    </div>
</div>
The div class attribute references the loading style you created in the MyApplicationHostMenuRuntimeWidget.scss file. -
Open your project_dir/customization/custom_project_dir/theme.scss.json file for editing.
Copy the code shown in the example and save.
{
  "gbc-loader-threshold": "0.5s"
}
The value (0.5s) specifies a delay (in seconds) for the timer function loading the icon. -
Open the project_dir/customization/custom_project_dir/sass/customization.scss file for editing.
Copy the code shown in the example and
save.
@import "MyApplicationHostMenuRuntimeWidget";
In this example we import the MyApplicationHostMenuRuntimeWidget style. - Rebuild using grunt.
- View the changes by opening the GAS demos application in your browser. You can do this by configuring the demos application for your project, see Test customization using the demo.
-
In the Topic tree of the demo directory, navigate to User Interface > UI Basics > Widgets. Double-click on the ProgressBar application in the panel to the
right.
Tip: You may need to use CTRL + F5 to clear the browser cache before you see your changes.
-
Click on the Go1 menu button to start a file loading.
The animation icon is displayed in the center of the browser window while the file is
being loaded.
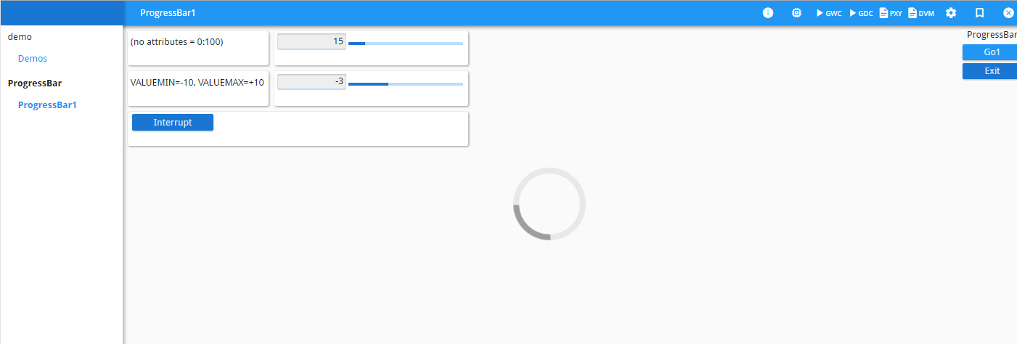
Figure 1. Icon centered in the browser window