Creating a package
To create a package from Genero Studio, you must define a package node with one or more child directory nodes.
The package node defines the target platform (such as a JAR or ZIP file) for the package. A package node will contain at least one directory node. The directory nodes identify where the application files can be found and how they should be organized when written to the package.
A package node creates a single package. You must have a package node for each package you need to create.
To create a package from Genero Studio:
- Identify the target platform.
- Identify the files required by the application.
- Add a package node.
- Add directory nodes.
- Build the package.
Identify the target platform
Each package is designed for a specific platform. A package will eventually be shared as a JAR or compressed (zip) file.
Identify the files required
All applications have binaries that must be included in the package. An application may require other files, such as:
- images
- libraries
- resource files
Identify which files are needed for the application, and where the files are located.
Add a package node
A package node defines the package basics. It specifies the target platform and some package base directories.
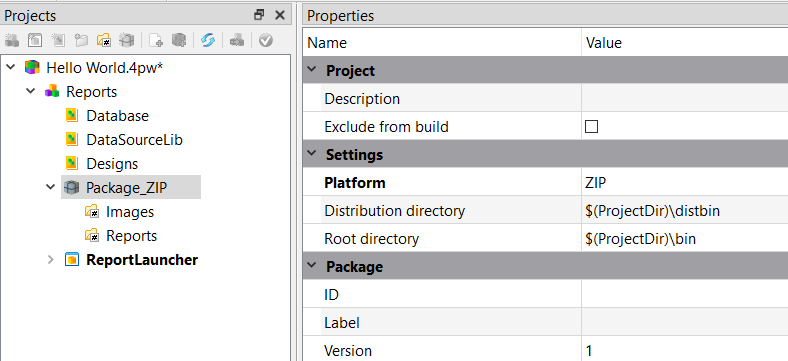
The package node is the parent node in the package definition. It specifies the target platform; each target platform must have its own package node. A package node contains one or more directory nodes, as shown in Figure 1.
To add a package node, right-click a group node in the Projects view. Select New package and then the target platform:
- Empty Package
- Java
- ZIP
- Root directory
- Base directory containing the files to be included in the package. The target platform has rules on what structure is allowed and expected. The top-level directory in this structure is known as the Root directory (RootDir). All files to be included in the package must sit under the Root directory.
- Distribution directory
- Directory where the package is written. The default distribution directory is $(ProjectDir)/distbin.
Add directory nodes
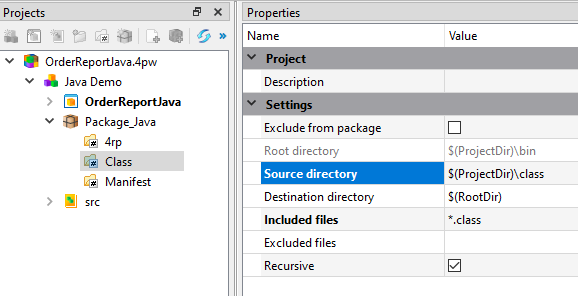
A directory node specifies the directory where application files sit (the source of one or more application files) and where they will be written to within the package. You create a directory node for each directory that houses needed application files.
Directory nodes are children of the package node. A package must have at least one directory node.
To add a directory node, right-click on the Package node and select New Directory.
To configure a directory node, define these properties:
- Source directory
- Directory containing the files to be included in the package, such as binary files or compiled form files.
- Destination directory
- Directory where the application resources will be written to, within the package. The destination directory must be within the root directory (defined in the package node). The default destination directory is the root directory ($(RootDir)).
- Included files
- Files to include in the package. For example, specify *.class *.4rp to include only files that match these types. By default, all files are included.
- Excluded files
- Files to exclude from the package. By default, no files are excluded.
- Recursive
- If selected, the files are searched recursively in the sub directories.
To include an external file or a library binary file:
- Add a directory node.
- Set the Source directory property to the path where the file sits. The path can be defined using environment variables.
- Set the Included files to the name of the file.
To exclude the directory from the package build without deleting it, select Exclude from package.
Build the package
Right-click on the package node and select Build. The package is saved in the distribution directory. The file name is the name of the package node. The file type depends on the platform, as described in Table 1.
| Target platform | Packaged file | What to do next? |
|---|---|---|
| Java | Java Archive (.jar) | Deploy using Java |
| ZIP | .zip file | Share zipped file |