The Web Services wizard
The Web Services Wizard guides you through the steps to add the necessary SOAP web service information to your application.
After you have completed a wizard page, click Next to move to the next page.
When you have completed the pages, select Finish to generate the WSDL file. Additional files may also be created, based on your selections on the wizard pages.
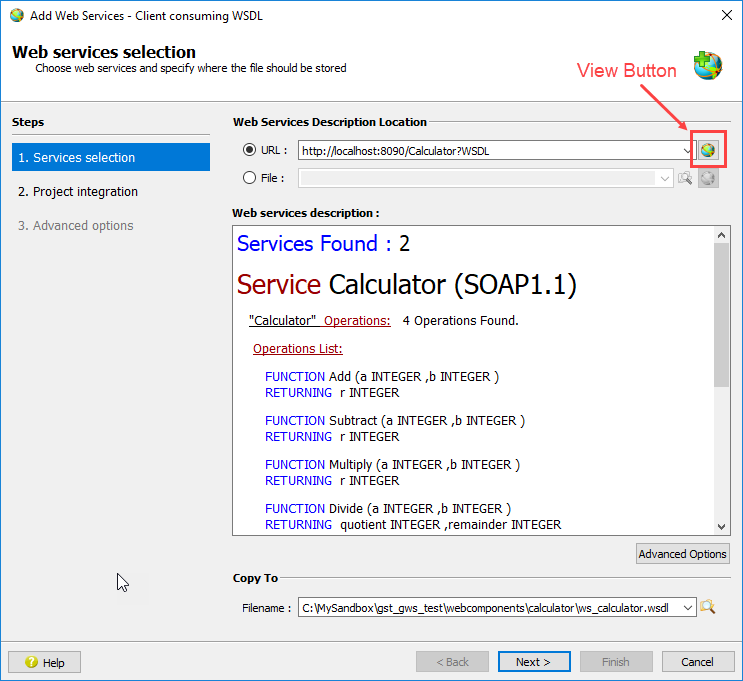
Step: Web services selection
In this page of the wizard, complete the Web Services Description Location to provide the details needed to locate the WSDL file.
- URL: Provide the URL to retrieve the WSDL from the web service. The
URL takes the format of
http://servername:port/servicename?WSDL. - File: Use the Browse button to locate the WSDL file in your file system.
Once you have provided the location of the WSDL file, click the View button (located next to the location field). The description of the Web Service is retrieved from the WSDL and displayed.
If you click the Advanced Options button, a dialog displays that allows you to add additional schema files and folders and HTTPS options.
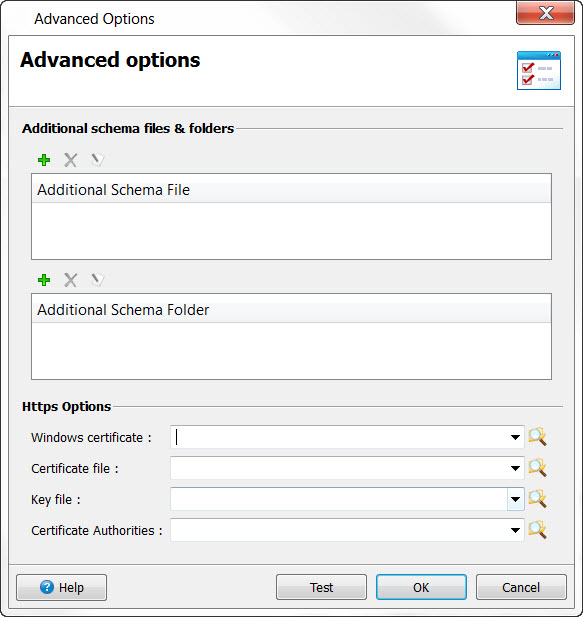
- Additional Schema File - press the Add icon to add an external schema file. An Add dialog opens, allowing you to search for the file. Other icons allow you to delete a previously added file, or to edit it.
- Additional Schema Folder- press the Add icon to add the path and filename of the schema folder.
- Https Options - Set the options needed for the fglwsdl tool, which implements adding the external schema.
In the Copy to section, use the Browse button to specify the directory where a copy of the WSDL file should be saved. If you used the File option to specify the WSDL file, this directory must be different.
When you have completed the page, click Next to continue.
Step: Web services project integration (Client only)
This wizard page, displayed when creating a client consuming a WSDL, specifies how the web service should be integrated into the project. There are two options:
Option: Add web services to project (Recommended): If selected, the WSDL file is added to the project. Files that show the Web Services operations as functions are generated and stored in the application's target directory. These include:
- The .inc file. This globals file contains the definitions of the input and output records, and the prototypes of the operations.
- The .4gl file contains the definitions of the functions for your GWS client or server application, and the code that manages the Web Service request or publishes a service,
Option: Advanced: If selected, you are given the flexibility to write your own web client stub. The 4gl and inc files are generated and added to your project in Project manager. The WSDL file is created in the "copy to" path.
Step: Advanced Code Generation Options
This wizard page allows you to select the service or binding, and to select options for code generation that will modify the default behavior. See the fglwsdl topic in the Genero Business Development Language User Guide for a description of the options that you can set on this page.
In the Select service/binding combobox, you must choose from the list of services or bindings in the generated WSDL file.
| Wizard checkbox | fglwsdl option / description |
|---|---|
| Compatible with Genero 1.xx | -compatibility |
| Force RPC convention (applies to RPC only) | -fRPC |
| Generate choice records for inherited types | -fInheritance |
| Ignore SOAP faults | -ignoreFaults |
| WS-Addressing | -wsa yes or -wsa no; allows support of WS-Addressing. Only
WS-Addressing 1.0 is supported. |
| Use mtom management | -mtom yes or -mtom no |
| Check data type constraints (facets) for simple types | By default, the wizard includes -noFacets as part of its fglwsdl command.
Select this option to remove the -noFacets option. |
| Generate XML Lists as Arrays | -fArray |
| Generate DOM callback handlers | -domHandler |
| Generate fglprofile aliases for server URL | -alias; generates FGLPROFILE logical names in place of URLs
for the client stub. |
| Ignore mixed attributes | -ignoreMixed |
| Use hex64 as string | -hexb64AsString |
| Wizard checkbox | fglwsdl option / description |
|---|---|
| Include service documentation | -comments |
| Prefix functions, variables, and types with | -prefix; specify the prefix string in the editable combobox. |
| Prefix variables and types with namespace | -autoNsPrefix; specify the number of words of the namespace that are to be
excluded from the prefix. The default prefix is the full namespace, and you may exclude up to nine
words. After the ninth word, you can only add the last word of the namespace as the prefix. |
| Define prefix for variables and types per namespace | -nsPrefix; for each namespace, you can define a prefix for variables and
types. |
The Command line read-only field displays the fglwsdl command to be executed, based on the options selected. It is automatically updated as you select and remove options.
Step: Code Generation Result
This page displays the results of the code generation. It only displays when Advanced has been selected in the Web Services Project Integration page of the wizard.