Model the app

The Business Application Diagram allows you to model your application graphically and implement it for use using wizards that generate the code and create its forms.

In this task, you work with the Business Application Diagram provided by the BAM. It shows the flow of your program.

  1. Expand the Applicationflow node and open the appflow.4ba file. You will see there is one Program entity (main) and one CRUD Form (form) entity. Rename the entities to something more relevant to your project, for example:
    1. Rename the main entity to "Program".
    2. Rename the form entity to "Account".
  2. Right-click on the blank diagram and select New > CRUD Form. Rename the form entity to "Orders"
  3. Right-click the Account entity, and select Add Relation To. Click and drag from the Account to the Orders entity to create a relation from form to form.
    Figure: Defining a master-detail relationship between forms

    This figure is a screenshot of a master-detail relationship being defined between the forms in the Business Application diagram.
  4. Save the changes to your project.

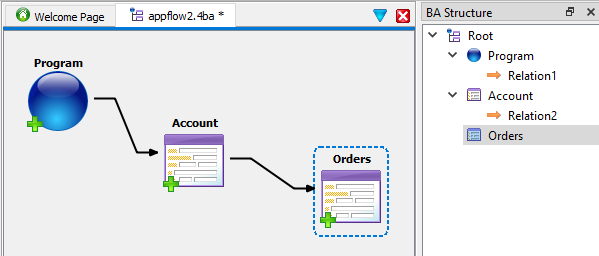
Implement the master form

From the BA diagram, implement the CRUD form from database, and select fields from the table.

  1. Expand the Applicationflow node and open the appflow.4ba file.
  2. Right-click on the Account entity and select Implement CRUD Form from Database for the database table that you wish the form to access. Select the officestore database and the account table. Use the right arrow to add the columns from "userid" to "zip" (for example) by transferring this selection to the Selected Fields list. Select Finish to accept the defaults from the rest of the wizard prompts.
    Per the default, this form will be organized in a Grid layout.
  3. Save your form to the src directory of your project ($ProjectDir) and in the Entities node of the project.
  4. Save the changes to your project.

Implement the detail form

From the BA diagram, implement a CRUD form from database for the detail form. Set the relation properties between the master and detail form.

  1. Expand the Applicationflow node and open the appflow.4ba file.
  2. Right-click on the Orders entity and select Implement CRUD Form from Database for the database table that you wish the form to access. Select the officestore database and the orders table. Use the right arrow to add the columns from "orderid" to "creditcard" (for example) by transferring this selection to the Selected Fields list. Select Next.
  3. Select Table for the container layout. Select Next to accept the defaults from the rest of the wizard prompts.
  4. Save your form to the src directory of your project ($ProjectDir) and in the Entities node of the project.
  5. Select the relation entity between Account and Orders entities and set the filter, action, and functionality properties as described in the sub steps.
    1. Filter property:
      • Set Source Field to "account.userid"
      • Set Destination Field to "orders.userid"
    2. Source UI Settings > Action property: enter "orders" as the action name.
    3. Functionality property. Select disable Add.
    Figure: Defining a relationship between the master and detail form

    This figure shows a screenshot of a relationship being defined between the master and the detail form.
  6. Save the changes to your project.

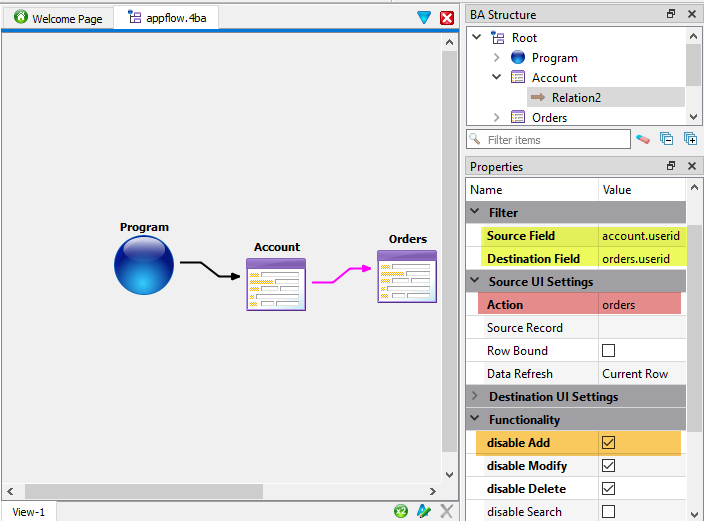
Implement the edit form

Add an edit form to edit the order detail.

A user may want to edit an order and expects to be able to tap (double click) the row to go to a form populated with the selected record. This is achieved in the mobile app by creating a form similar to the Orders form but with a Grid layout instead of a Table.

  1. Expand the Applicationflow node and open the appflow.4ba file.
  2. Right-click on the blank diagram and select New > CRUD Form. Rename the form entity to "EditOrder"
  3. Right-click on the EditOrder entity and select Implement CRUD Form from Database. Select the officestore database and the orders table. Use the right arrow to add the columns: "orderid", "userid", "orderdate", "totalprice", "creditcard", "cardtype" "exprdate", (for example) by transferring this selection to the Selected Fields list. Select Finish to accept the defaults from the rest of the wizard prompts.
    Per the default, this form will be organized in a Grid layout.
  4. Save your form to the src directory of your project ($ProjectDir) and in the Entities node of the project.
  5. Create a relation between Orders and EditOrder entities. Right-click on the Orders entity and select Add Relation. Click on the Orders entity again and drag the Relation arrow to the EditOrder entity.
  6. Select the Relation between the Orders and the EditOrder entity and set the filter, action, and functionality properties as described in the sub steps.
    1. Filter property:
      • Set Source Field to "orders.userid"
      • Set Destination Field to "orders.userid"
    2. Source UI Settings > Action property: enter "open_EditOrder_form" as the action name.
    3. Functionality property. Select disable Add.
    4. MODIFY Behavior property when user clicks accept and cancel buttons:
      • Set On accept to Exitform
      • Set On cancel to Exitform
    Figure: Defining a relation between Orders and EditOrder forms

    This figure shows a screenshot of a relation being defined between the orders and the EditOrder form.
  7. Double-click on the Orders entity to open it in Form Designer. Specify the action triggered when a row is tapped by setting the functionality described in the sub steps.
    1. Select the table container in the form.
    2. In the Property view, select the Miscellaneous > doubleClick property: enter "open_EditOrder_form" as the action name.
  8. Save the changes to your project.

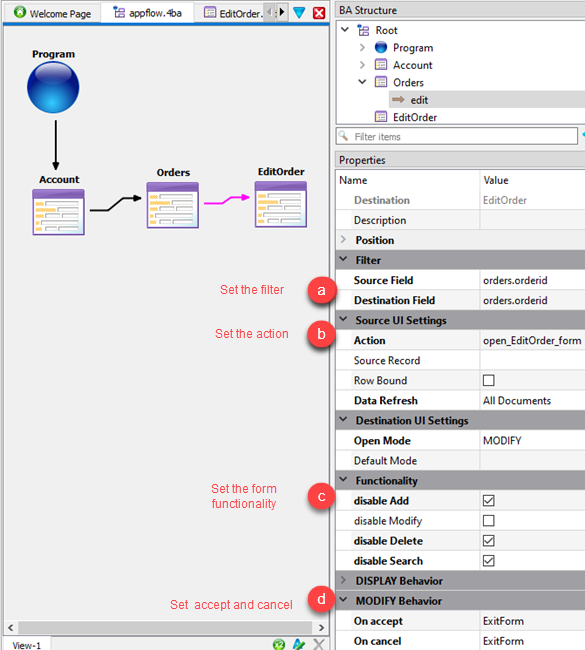
Implement the program

From the BA diagram, implement the program module.

  1. Expand the Applicationflow node and open the appflow.4ba file.
  2. Right-click on the Program entity (Program) and select Implement Program.

    The Save As dialog opens.

  3. Save the program file.
    1. Specify the path of the 4prg file to the src directory of your project ($ProjectDir).
    2. Insert the file into the project by selecting the application node (Program_prg).
      Note: Ensure the Insert the file in the project check box is selected.
    3. Click OK to apply the changes and close the dialog.
      The Program.4prg file is created.
  4. Save the changes to your project.