Install and configure Java SDK and Android SDK
Follow this procedure to install and configure the Java SDK and Android™ SDK. Once configured, the menus are enabled in Genero Studio.
- If a proxy is needed on your network, it must be defined in (or, if you are on a Mac, ).
You must configure for the Java and Android SDKs.
-
Set the
JAVA_HOMEvariable to the location of the Java SDK directory. To edit theJAVA_HOMEenvironment variable, select an Android configuration, highlight the Java SDK environment set, and double-click theJAVA_HOMEenvironment variable.Figure: Set Java environment 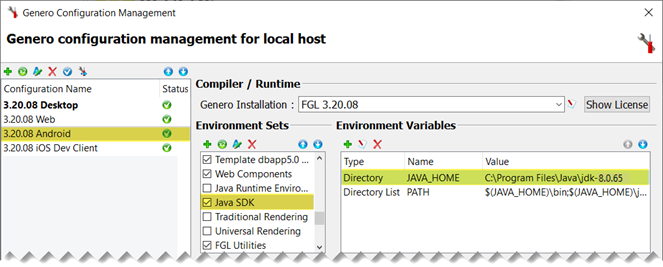
-
Set the
ANDROID_HOMEvariable to the location where you want to install the Android SDK, for example C:\Android\android-sdk. To edit theANDROID_HOMEenvironment variable, highlight the Android environment set, double-click theANDROID_SDK_ROOTenvironment variable, change the name toANDROID_HOME, and edit the value to point to the Android SDK directory.Note:Setting ANDROID_HOME is not mandatory, and keeping ANDROID_SDK_ROOT should still be fine. However, all procedures have been updated to promote the use of ANDROID_HOME over ANDROID_SDK_ROOT.
Note:On Windows, it is recommended to set
ANDROID_HOMEto a location outside of the Program Files directory. If you install Android SDK in the Program Files directory, Genero Mobile must be run as administrator to auto-configure the SDK.Figure: Set ANDROID_HOME in Android environment (formerly ANDROID_SDK_ROOT) 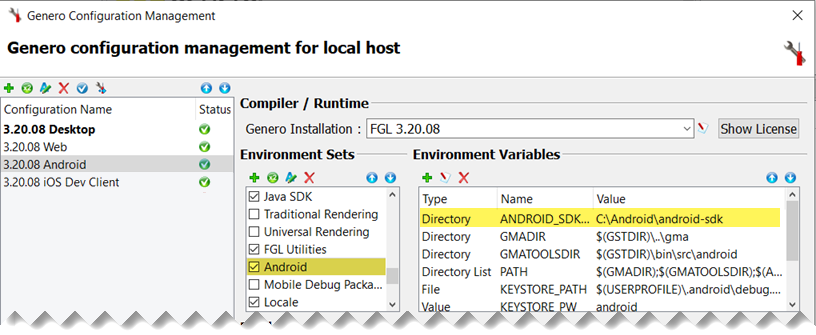
-
In the
PATHvariable of the Android environment set, ensure that $(ANDROID_HOME)\cmdline-tools\latest\bin is included, and add it if it is not.Important:If you are using the default Android environment set, or if you made a copy in the past, you may need to edit the directory set to change all occurrences of
$(ANDROID_SDK_ROOT)to$(ANDROID_HOME).Figure: Verify PATH in Android environment set 
You need an internet connection the first time you build an Android package. During this first build, an automated process downloads and installs Gradle with all necessary extensions into a directory in your user directory. Gradle is a project automation tool; find out more at http://www.gradle.org.