Display to an iOS physical device

This configuration allows you to run a program from Genero Studio and display it to your iOS device. This configuration does require an Apple® iOS developer account.

Before you begin:
Note: A USB connection is needed when you register a device in your iOS developer account in order to retrieve the device ID, which is necessary for listing devices in Genero Studio.
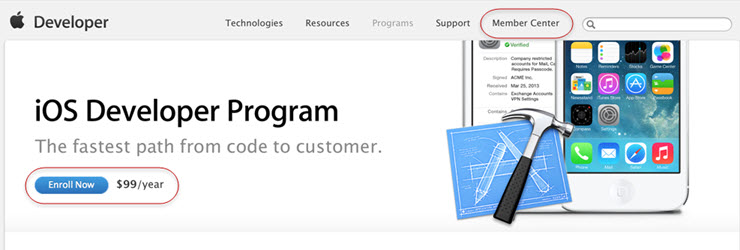
  1. Log into the iOS Developer Center. If you are a member of the iOS Developer Center then just log in. If not, follow these steps to enroll in an iOS developer program. Please note, it can take Apple a day or two to approve memberships.
    1. Go to http://developer.apple.com and select the iOS Developer Program option.
    2. Select the Enroll Now option and follow the instructions. You will need to enroll in either a Developer or Enterprise program. When you are finished you will have an Apple ID with which to log in. If you are a member of the IOS Developer Program select Member Center to log in.

      iOS Developer Program website
  2. Generate and import a development certificate. The Development Certificate will be used to allow you to view your program on your iOS device which can be an iPhone, iPod, or iPad.
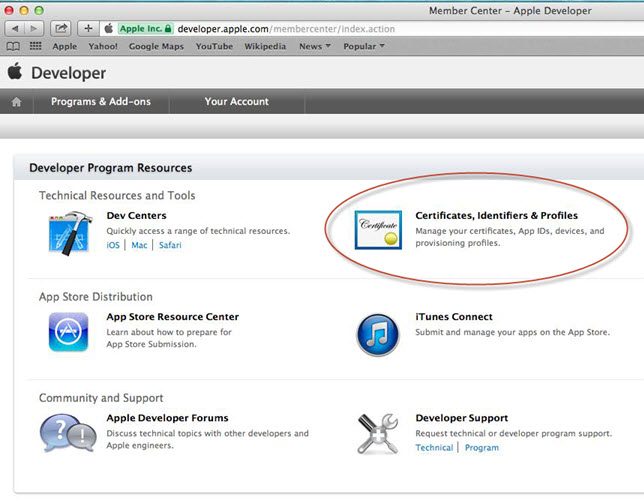
    1. Select Certificates, Identifiers & Profiles.

      Certificates, Identifiers & Profiles section of Developer Center
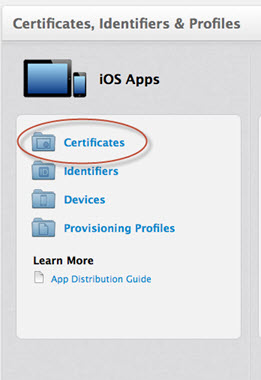
    2. Select Certificates under the iOS Apps section.

      Certificates folder
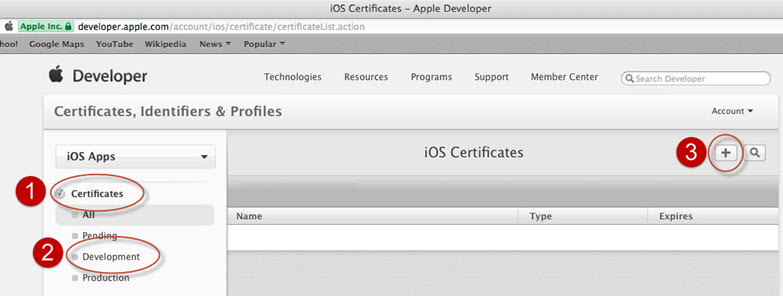
    3. Under Certificates, select Development followed by the + symbol.

      Screen shot identifying where to click to add a new development certificate.
    4. Follow the instructions, on the Select Type page and select the iOS App Development option for an iOS App Development certificate then click Continue.
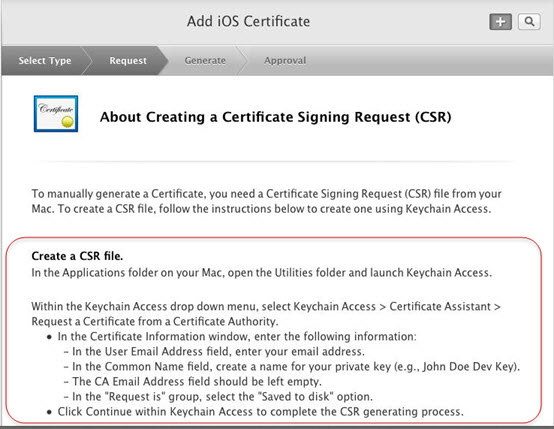
    5. Follow the instructions on the page to create a CSR file then click Continue.

      Screen shot of Create a CSR file instructions.
    6. Your certificate request is now available. Now you can go back to the Development Certificate section still active in your browser and click Choose file....
    7. Navigate to the file you just saved and choose that file.
    8. Click Generate.
    9. Once the certificate is generated, click Download. The certificate will download into your Downloads folder.
    10. Double-click this file to install it into Keychain.
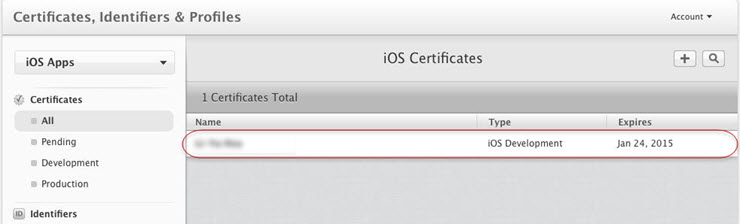
    11. When done, your new certificate should be listed in the Certificates list.

      Screen shot showing certificate completed and in list.
  3. Provision your device for development. If you have only an iOS developer account, you need to register each device you will use to test your IOS app. These steps are not necessary if you have an iOS enterprise account. Follow Apple's instructions for provisioning your device.
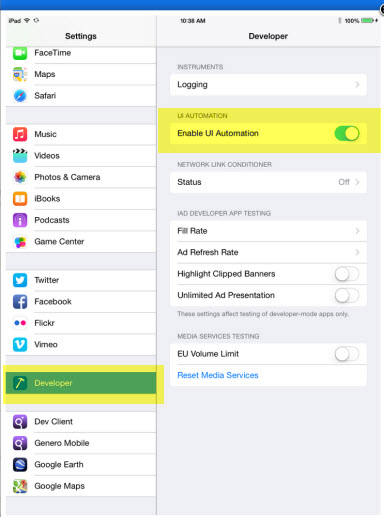
  4. For iOS 8 and above, enable UI automation.
    1. Open the Settings app.
    2. Select Developer.
    3. Turn on Enable UI automation.

    Screen shot of Settings app, Developer selected, Enable UI Automation turned on.
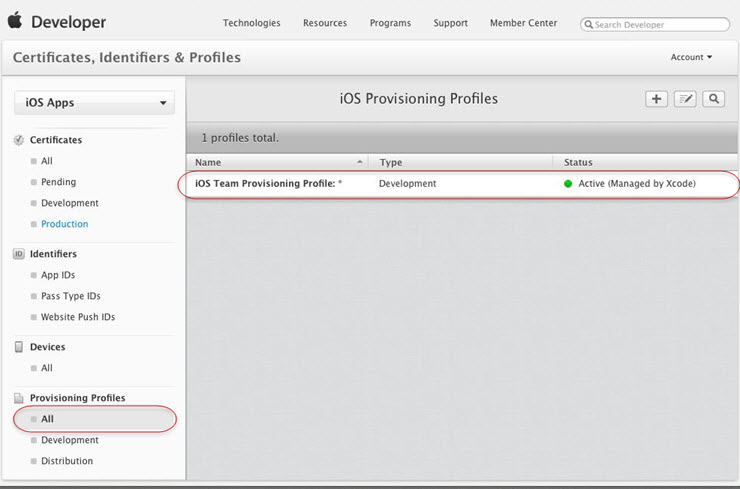
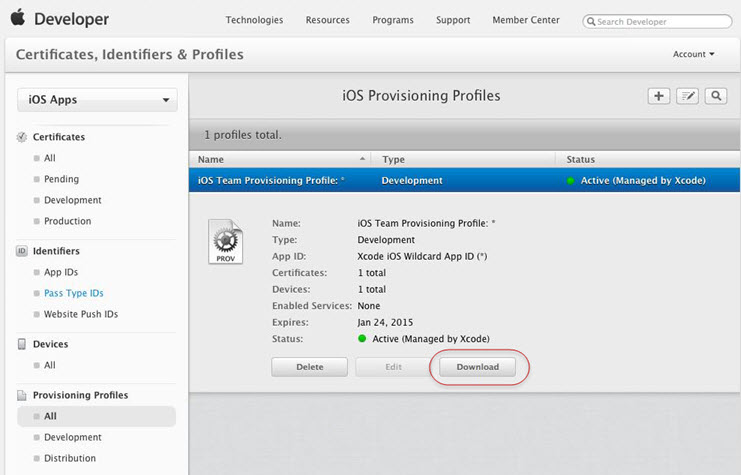
  5. Go back to the Member Center and you should have a provisioning profile granted. Please note, it can take some time before Apple changes the status from Pending to Active.

    Screen shot showing active provisioning profile.
  6. Select the Provisioning Profile and click Download.
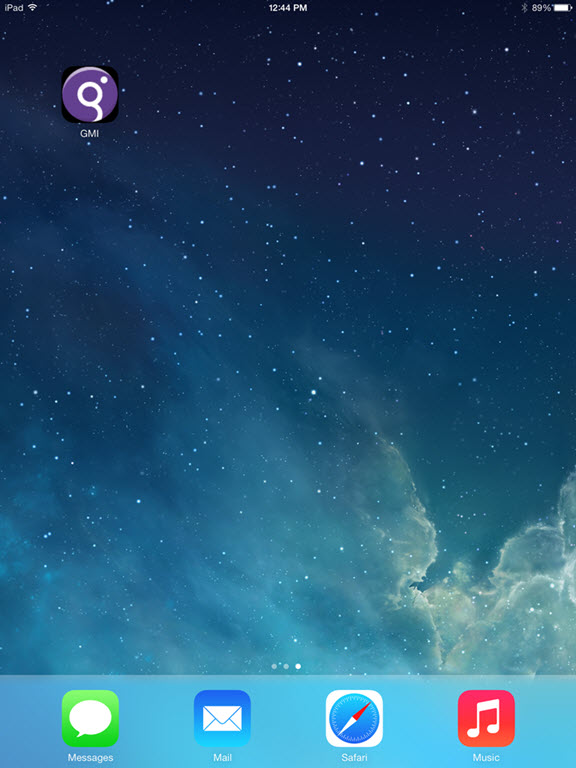
    Screen shot showing option to download Provisioning Profile.
  7. Launch Genero Studio.
  8. Select Tools >> Genero Configurations.
  9. Select the iOS environment set.
  10. Set the IDENTITY environment variable in the iOS environment set, to identify which certificate to use from those defined in Keychain® Access.

    The certificate name generally contain the first and last name of the developer as defined in your Apple ID account. You can find it at http://appleid.apple.com/.

    To view the list of certificates in the Keychain Access, leave Genero Studio and complete these steps:
    1. Open Applications > Utilities > Keychain Access.
    2. Select login in the Keychain section.
    3. Select My certificates in the Categories section.
      The list of certificates displays. Use this list to find the sub string to enter for the IDENTITY environment variable. At a minimum, the IDENTITY environment variable must contain just enough characters to identify the certificate (amongst those listed in Keychain Access) used to sign the package. In theory, it can be as small as two letters, if those two letters are sufficient enough to identify the certificate.
  11. Set the PROVISIONING_PROFILE environment variable to the provisioning profile file you downloaded.
  12. Select Tools > iOS Tools > Deploy Genero Mobile for iOS. A USB connection is required to deploy to the device.
    In the Genero Studio output panel you will see that the deploy started and finished. On the device you will see a new icon labeled GMI.

    GMI icon shown on an iPad
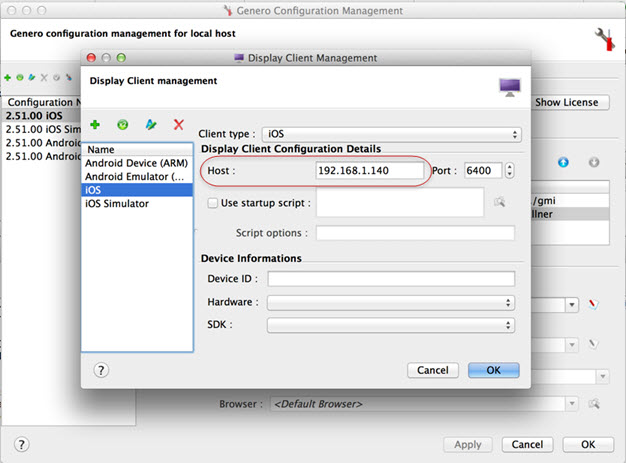
  13. Set up your device as a display client. Wi-Fi is used to display the app to the device in developer mode.
    1. Confirm that your computer and your mobile device are on the same Wi-Fi network.
    2. Get the IP address of your device. (From your device, select Settings > Wi-Fiand select the Wi-Fi network to see the network details and IP Address.)
    3. Edit the iOS Display client setting for the iOS Genero configuration. In the Host field, enter your device's IP address.
    4. Select OK to save the changes.

      Display Client management dialog showing Host field filled in with IP address.
  14. On the device, tap the GMI app to launch it.
  15. Test your configuration. From Genero Studio, find the OfficeStoreMobile project and open it. Execute the OrdersApp. You should now see the Orders program running on the device.
  16. You can now run your own apps from Genero Studio to the device.