Use the Simple BAM Desktop Project (.4pw) template to create your managed project.
Before you begin, select and confirm that the template of your choice is selected in the Environment Sets
list. The selected template will be the code generation template used for the project.
Tip: Unless you have a known reason to do otherwise, select the latest available template.
Starting with dbapp4.0, you must also select between a Desktop and a Mobile version of the
template.
-
In the Advanced Properties dialog, add an FGLPROFILE environment variable
to the Environment Variables page.
-
In the Environment Variable dialog, add the FGLPROFILE user variable.
Specify a type of "File List", and have the Value point to the location of the fglprofile file
provided in the My Genero Files/samples/OfficeStoreRes/ directory.
The FGLPROFILE file contains the configuration information to access the sample databases.
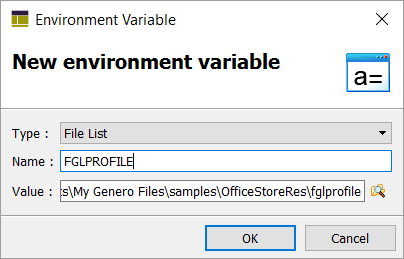
Figure 1. Edit environment variable dialog
-
In the Environment Variable dialog, add the FGLPROFILE user variable.
Specify a type of "File List", and have the Value point to the location of the fglprofile file
provided in the My Genero Files/samples/OfficeStoreRes/ directory.