Add Zoom forms

Zoom forms contain logic that allow the user to pick a value from a list that is displayed in a form in a popup window.

This task assumes that you have created a BA diagram with a Program entity and at least one CRUD form entity.

  1. Right-click on the open BA diagram and select New Zoom Form.
  2. Right-click the new form and select Implement Zoom from Database from the context menu.
  3. Select the database table (in our example, the country table) that contains the values to be displayed in the zoom form. Select the column that corresponds to the field on the main form. In our example, this is the country code. (You can select the country name also, to display it in the zoom form if you wish; the code field will be identified as the unique key later in this process.)

    This figure is a zoom form example: a table with a country code column and a country column. All fields are Edit fields.

    Figure 1. Example zoom form definition

  4. Switch from the form design to the Records tab and select the master table record. Confirm that the active property is checked.
  5. Select the record and confirm that the unique key property is set. If not, set the unique key on one of the fields in the record.

    This figure is a screenshot of Record1 and its properties. masterTable is country.

    Figure 2. Records tab.

  6. Save the Zoom form (4fdz) and add it to the project structure under the Application node.
  7. The CRUD form has to be modified to trigger the zoom form when needed. In this example, the country.code field is changed to a ButtonEdit, which can trigger an action when the user clicks it. When the user selects the country code from the zoom form, it is automatically inserted into the country.code field on the main form. From the BA diagram, right-click on the main form and choose Open Form.
  8. Select the field containing the foreign key (in this example, the account.country field.) Right-click and select Convert Widget to change the widget to a ButtonEdit.

    This figure is a screenshot of the Convert Widget menu.

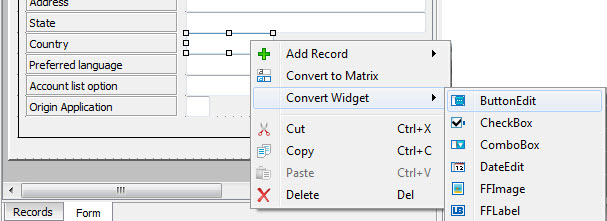
    Figure 3. Convert Widget

  9. Scroll to the bottom of the properties list, and set the value of the action property for the ButtonEdit field to a unique action name (such as zoom).
  10. Save the form.
  11. Create a relation between the CRUD form and the Zoom in the BA diagram. On the open BA diagram, Right-click the CRUD form icon and select New Relation. Click the CRUD form icon again and drag the relation arrow to the second form.
  12. Select the relation arrow to display the relation properties, and enter the action name in the action property that is the same as the one assigned to your ButtonEdit field (zoom1, in this example.) If there is more than one zoom form in an application, the action name must be unique.
    Option Description
    Source Field Set to the value that will be inserted into on the CRUD form (account.country, in this example).
    Destination Field Set to the value the user selects from the table in the zoom form (country.code, in this example).
    Open Mode Set to DISPLAY (default) or SEARCH.

    This figure is a screenshot of a Zoom form in a Business Application diagram.

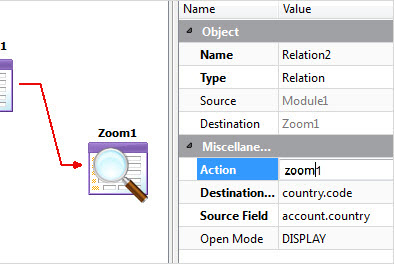
    Figure 4. Business Application diagram

  13. Save all diagrams and forms.