Design address labels
A common reason for using labels is to print addresses, which have specific layout requirements.
You should be familiar with designing a basic label report. See Design labels.
The number of lines required for an address can vary,
depending on the complexity of the address. Many database tables contain multiple
fields for storing address information, such as addr1,
addr2, and city. When an address record is
created, the fields that are not needed for the address are set to NULL.
When these NULL fields are printed on an address label, they appear as blank lines, which you might want to remove. In addition, you might want to print information, such as a postal code, after the last non-blank address line.
-
Create your address label report.
-
Add all the lines of the address as children of this node, using
relative positioning.
Figure: Address Label Report 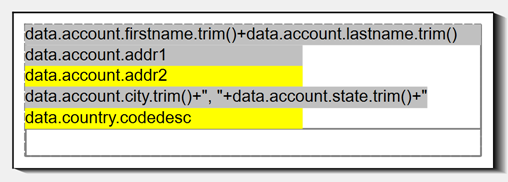
Tip: To add the lines, select the container on the report page and double-click each field in the Data View in the order in which you want them to display. This ensures that the report elements use relative positioning and are in the correct order. It also ensures that the report elements are of the correct type for the field; for example, a String field under 30 characters creates a Word Box, and a Numeric field creates a Decimal Format Box. For further information, see Absolute or relative positioning and Adding data values and captions.
When the report is run, the report prints an address label. If one of the lines is empty, a blank line is printed, as in Figure 2.Figure: Address label with blank line 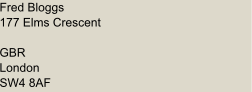
-
Add all the lines of the address as children of this node, using
relative positioning.
-
For each line that might contain an empty value, edit the Visibility Condition to specify that the
line does not print if the content is blank.
For example, if the line contains the data value
addr2, set the Visibility Condition to addr2.trim().length()>0.When the report is run, the address is printed without blank lines, as in Figure 3.Figure: Address label with no blank lines 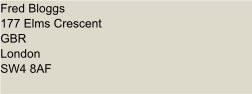
-
To append a field to the end of the last non-blank line, use a conditionality
expression to test whether the subsequent lines contain a value.
For example, consider an address label containing three Word Boxes:
addr1,addr2, andcity. You want to print an additional field,postcode, after the last non-empty line.- For the Word Box containing
addr1, test whetheraddr2andcityare empty by setting the value of the Text property to: city.trim().length()+addr2.trim().length()==0?addr1.trim()+postcode.trim():addr1.trim() - For the Word Box containing
addr2, test whethercityis empty by setting the text to: city.trim().length()==0?addr2.trim()+postcode.trim():addr2.trim() cityonly prints if it is not empty (assuming the Visibility Condition is set correctly). Therefore, set the text to: city.trim()+postcode.trim()
When the report is run, the last non-empty line has the postcode at the end, as in Figure 4.Figure: Address label with postcode appended to the last non-blank line 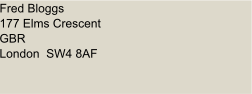
- For the Word Box containing