Change footer text
This procedure shows you how to change a footer using a front call.
About this task
To implement this footer change requires you to:
- add a JavaScript function to the JavaScript module that implements your GBC custom front call functions
- extend the MainContainerWidget where the footer is defined
- create a form to apply the customization
This customization can be used to display information in the header or footer such as the name of the logged-in user, databases user is logged in to, and so on.
Before you begin
You must have a project directory which contains the following
.js and .tpl.html files in customization-project-dir/js:
- MyMainContainerWidget.tpl.html
- MyMainContainerWidget.tpl.js
-
In the gbc-project-dir/customization/customization-project-dir/js directory, add a js file called
myFrontCallModule.js or add the functions contained in
the
modulummethod to your existing module:
In this example the customization is defined in the// in myFrontCallModule.js "use strict"; modulum('FrontCallService.modules.myfcmodule', ['FrontCallService'], function(context, cls) { context.FrontCallService.modules.myfcmodule = { myCustomSyncFunction: function (name) { if (name === undefined) { this.parametersError(); return; } if (name.length === 0) { this.runtimeError("name shouldn't be empty"); return; } return ["Hello " + name + " !"]; }, replace_html: function (id, value) { document.getElementById(id).innerHTML=value; //return; return ["0"]; }, myCustomAsyncFunction: function (name) { if (name === undefined) { this.parametersError(); return; } if (name.length === 0) { this.runtimeError("name shouldn't be empty"); return; } window.setTimeout(function () { this.setReturnValues(["After 5s, Hello " + name + " !"]); }.bind(this), 5000); } }; } );replace_htmlfunction. This function is called by the front call. It has two parameters: the id is the identifier of theDIVelement where the footer is added, and the text (value) to display in the footer is provided in the second parameter.
-
Edit MyMainContainerWidget.js.
-
Open gbc-project-dir/customization/customization-project-dir/js
/MyMainContainerWidget.jswith a text editor. -
Remove the existing code. Your file should resemble the code in the
following example.
"use strict"; modulum('MyMainContainerWidget', ['MainContainerWidget', 'WidgetFactory'], function(context, cls) { /** * @class MyMainContainerWidget * @memberOf classes * @extends classes.MainContainerWidget */ cls.MyMainContainerWidget = context.oo.Class(cls.MainContainerWidget, function($super) { return /** @lends classes.MyMainContainerWidget.prototype */ { __name: "MyMainContainerWidget", }; }); /* * This is a sample widget that would replace the default one in GBC * To activate it, please uncomment the line below. This will override * the original widget registration to this one. */ cls.WidgetFactory.registerBuilder('MainContainer', cls.MyMainContainerWidget); }); - Save your changes.
-
Open gbc-project-dir/customization/customization-project-dir/js
-
Edit MyMainContainerWidget.tpl.html.
-
Open gbc-project-dir/customization/customization-project-dir/js
/MyMainContainerWidget.tpl.htmlwith a text editor. -
Modify the code to explicitly illustrate the main container elements.
Your file should resemble the code in the following example.
<div> <!-- GBC will be rendered in this div --> <div class="containerElement"></div> <footer> Place your footer here <div id="gbc_cust_username">User Name will go here</div> </footer> </div> - Save your changes.
-
Open gbc-project-dir/customization/customization-project-dir/js
-
Save your changes and rebuild your customization using
gbc build:$gbc build--customization customization-project-dir -
In your Genero BDL app, create a simple form for the user to enter text.
-
Your file should resemble the code in the following example.
LAYOUT (TEXT="Replace HTML") GRID { Text to go into footer [f01 ][b01 ] } END END ATTRIBUTES f01 = formonly.txt, SCROLL; BUTTON b01: replace, TEXT="Replace"; - Save your file as replace_html.per
- Compile your form.
-
Your file should resemble the code in the following example.
-
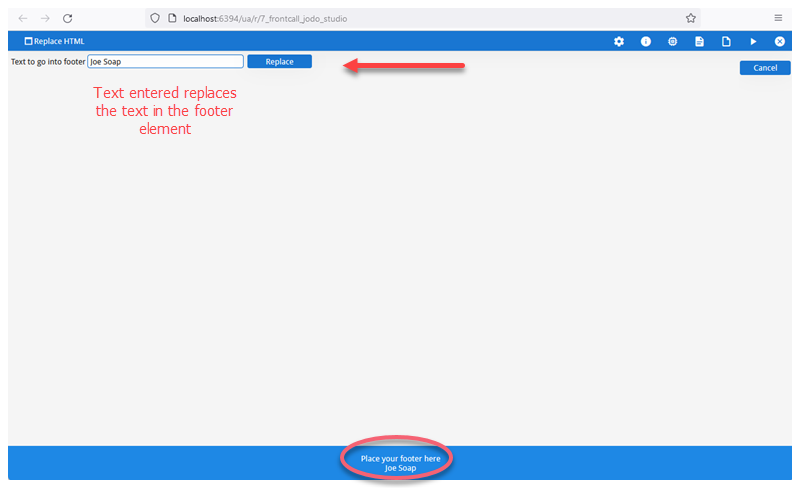
View the changes by opening the app with a front call command to call the
replace_htmlfunction.
In this example, the replace_html form is opened. The front call to theMAIN DEFINE txt STRING DEFINE result INTEGER OPTIONS INPUT WRAP OPTIONS FIELD ORDER FORM OPEN WINDOW w WITH FORM "replace_html" INPUT BY NAME txt ATTRIBUTES(UNBUFFERED, ACCEPT=FALSE) ON ACTION replace CALL ui.Interface.frontCall("myfcmodule","replace_html",["gbc_cust_username",txt], result) # do something END INPUT END MAINreplace_htmlfunction is made when the user clicks the Replace button after inputting text. In the call toui.Interface.frontCall()the["gbc_cust_username",txt]specifies the id of theDIVelement where the footer is added and the text to add.Figure: Footer text changed 