Genero Mobile Development Client for Android
Set up a development environment to display app forms on an Android™ device.
Using the GMA front-end on Android devices
To display Genero application forms on an Android device in development mode (with programs executing on a computer), the GMA front-end app must be installed on the device (or emulator).
Installing the GMA front-end application
Before installing the GMA front-end, fulfill the prerequisites to build an Android app, as described in Building Android apps with Genero.
- Setup the Java SDK and Android SDK environment for GMA.
- Get the GMA package (fjs-gma-*.zip) from the download site.
- Unzip the archive, containing an APK ready to install.
- Plug your device via USB cable to the computer.
- Install the GMA front-end APK with the gmabuildtool command with the
testoption.
For example:
$ . ~/genero/devel/fgl/mobile/java-1.8.env
$ . ~/genero/devel/fgl/mobile/android-sdk.env
$ mkdir /tmp/gma
$ cd /tmp/gma
$ unzip ~/Download/fjs-gma-4.00.03-build202201041615-allos.zip
Archive:  ~/Download/fjs-gma-4.00.03-build202201041615-allos.zip
  ...
  inflating: fjs-gma-4.00.03-build202201041615.apk
  ...
$ gmabuildtool test --test-apk ./fjs-gma-4.00.03-build202201041615.apk
...
Configure FGLSERVER and run the app
With the GMA front-end installed on the physical device, make sure that WIFI is enabled. When the GMA front-end is installed on the emulator, check that the TCP port is forwarded. Then start the GMA app.
The main GMA screen shows the IP address of the device and the TCP port offset from 6400 it is listening to. For example, a TCP port offset of 0 results in a TCP port 6400 (6400+0=6400).
FGLSERVER=10.0.11.188:0Now you are ready to run your app on the server and display on the Android device or emulator.
TCP port forwarding for GMA on emulator
When the GMA development client is running in an Android emulator, an fglrun instance can connect to GMA by using TCP port forwarding feature of adb:
adb forward tcp:localhost_port tcp:gma_device_portadb forward tcp:6400 tcp:6400FGLSERVER=127.0.0.1:0adb forward tcp:6402 tcp:6400FGLSERVER=127.0.0.1:2The GMA front-end interface
Genero Mobile Development Client is the GMA front-end installed on the Android device or emulator. It provides a development environment to display apps on a device. It includes an embedded Dynamic Virtual Machine (DVM) needed to execute applications you may want to test on the front-end.
The following sections provide details about the interface and its configuration. You can run applications on a GAS to display on the front-end. You can test apps on a device without deploying the apps using the GeneroApps feature.
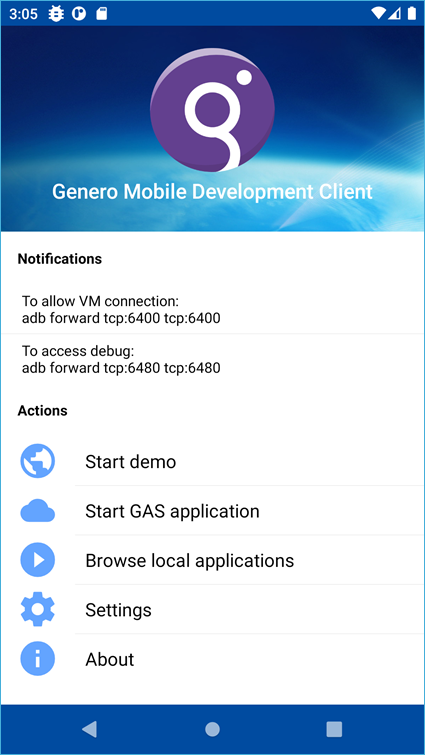
In the Notifications section of the page, you get details of the VM connection and debug ports. The GMA front-end has a port open (default is 6400) listening for an incoming Genero virtual machine (VM) connection from a server. You do not need to place GMA in listen mode.
If the physical device has internet access, you are given the IP address and the TCP port offset
number in the message "Waiting incoming connection
on:device-ip-address:0". Port offset 0 indicates port 6400 is offset at
index 0 (6400+0=6400).
The IP address and the port offset is the value you need to set for the GUI server (FGLSERVER on the server side) when configuring to run your app on a server for display on the device. For more information on executing a mobile app on a server and displaying the user interface on a mobile device, see Configure FGLSERVER and run the app and Debugging a mobile app.
When working with an emulator, or when the physical device has no internet connection, you need to forward the device listening port (6400) to the host computer running the application. For more information on this procedure, see TCP port forwarding for GMA on emulator.
If you need to access debug information, you will need to forward the debug services port (6480) to access the debug interface web page. For more information, see Access GMA front-end information for debugging.
Menu options provided in the Actions section allow you to perform the functions listed.
- Start demo. The demo app shows how various forms, menus, and widgets are displayed on your mobile device.
- Start GAS application. An application can be started from a GAS running
on a server. Select this menu to enter the application URL. In the dialog window that pops up, you
can type the URL or scan a QR code using the SCAN option. Note: The SCAN option needs a QR code scan app to be installed on the device.
- Browse local applications. An alternate method to deploying your app for testing on a device is to place the app in the GeneroApps directory and run it from there. Apps you place in this directory are not deployed on the device, but you can run them directly on the device for testing purposes. For more information on testing local applications, see the section Run local applications on the GMA front-end.
- Settings. There are options to configure settings for debugging, logging, setting FGL services, and managing cookies, cache, and security certificates. Select the menu to open the Configure GMA front-end settings page.
- About. This page displays information about the current installation of
the GMA front-end. The page has three tabs.
- Product displays the GMA front-end version number and gives locale information.
- Legal displays copyright and license information.
- Details displays information about the GMA front-end, and the Android device. It is useful to know what
version of the FGL runtime is installed on the front-end, and you will find the information here.
Look for the vm entry ending in
vm...fgl.version. If you need to send these details for debugging purposes to Four Js support, select the option to SEND, and follow the instructions to send a message or email with the details.
Configure GMA front-end settings
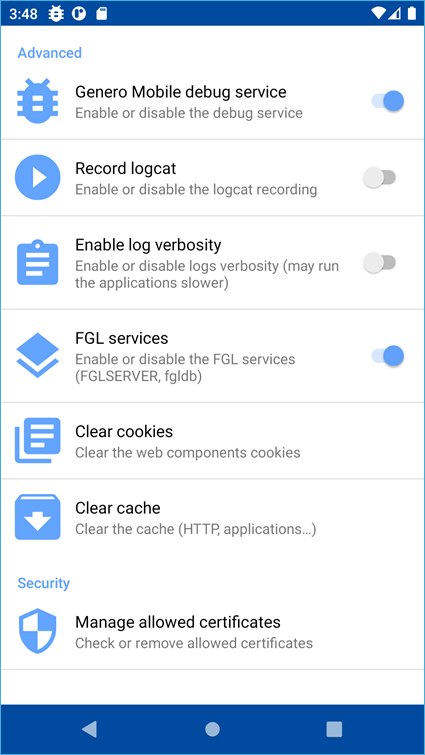
You access the settings page—shown in Figure 2—from the Settings menu option in the GMA front-end home page.
-
The Genero Mobile debug service option enables or disables debugging services. The option is enabled by default. When an application is executing on an Android™ device, you can view debug information, such as the AUI tree, VM logs, Android™ logs, and so on, from a browser on a computer that the physical device is connected to by USB. If using the emulator, you can view debug information in the browser of the host computer. For more information on using debug services, see Access GMA front-end information for debugging.
-
The Record logcat option enables or disables the setting to write Android system logs to file. Log recording is disabled by default. You can view the logs on the debug interface web page, and you can download the log files from its page. For more information, see Access GMA front-end information for debugging. If you need to see more details in the logs, select the Enable log verbosity option.
-
The FGL services option is enabled by default. The GMA front-end can use FGL services such as the debugger.
-
Tap the Clear cookies option to clear cookies that may have been generated by applications using WebView and web components. A message is displayed when the cookies are cleared.
-
Tap the Clear cache option to clear the cache.
-
Select the Manage allowed certificates setting to manage certificates. Applications that you run on the GMA front-end via URL connections to GAS, or applications with runOnServer calls to remote server, may store certificates. In the dialog window that pops up, you can use a swipe gesture to remove a certificate or you can use the CLEAR ALL option to remove all certificates.
Run local applications on the GMA front-end
The GMA front-end creates a directory called GeneroApps on the device as a location where you place app executable files (42m) and app configuration files (xcf), and from where you can run them using the embedded DVM of the GMA front-end.
- Connect your Android device to your computer using the USB port.
- From your computer, access the internal SD card using a file browser.
To navigate directories on your device, use MTP (media device) mode instead of Charging . Set this under (found by accessing the three-dot menu in the upper right corner of your device).
- Place the compiled app files (42m, 42f,
42r, xcf, and so on) into the
GeneroApps directory. Note: Apps must be compiled with the version of DVM installed on the GMA front-end. Check the Details tab in the About page (accessible from the client home page ) if in doubt. Look for the vm entry ending in
vm...fgl.version.The path to GeneroApps can be found at ../Android/data/com.fourjs.gma/files/GeneroApps. This path can be in the Internal storage directory or the sdcard directory, depending on your device preference. The default path is Internal storage.
You can drag & drop files into the directory using your computer's file explorer, or if you are using the adb command tool, use thepushfeature:adb push myMain.42m /Internal storage/Android/data/com.fourjs.gma/files/GeneroApps - To run an application on your device, tap Browse Local applications. This brings you to the GeneroApps directory.
- Tap on a program file (42r) or a program configuration file
(xcf) to start the app.
- An app executable file (42r) launches the app with the default settings.
- An app configuration file (xcf) launches the app according to the contents
of this configuration file. In an app configuration (xcf) file, you can set app parameters, set environment variables, and so on.Important: An application configuration file is only required when you have specific configuration needs to set, such as parameters/arguments for the app or environment variables.
Creating an app configuration file is detailed in the Genero Application Server User Guide.
Access GMA front-end information for debugging
When an application is executing on an Android™ device, you can view debug information, such as the AUI tree, VM logs, Android™ logs, and so on, from a browser on a computer that the physical device is connected to by USB. If using the emulator, you can view debug information in the browser of the host computer.
First you need to forward the required ports from the device to the machine where you want the information displayed. Typically, you forward the device listening port (6400) and the debug services port (6480). For details of how to forward the ports, see Debugging an app running on an Android device emulator.
Once you have forwarded the ports, launch your browser and enter the IP address of the device and the port 6480. If using the emulator, you can enter localhost:6480. The debug interface web page is displayed; an example is shown in Figure 3.
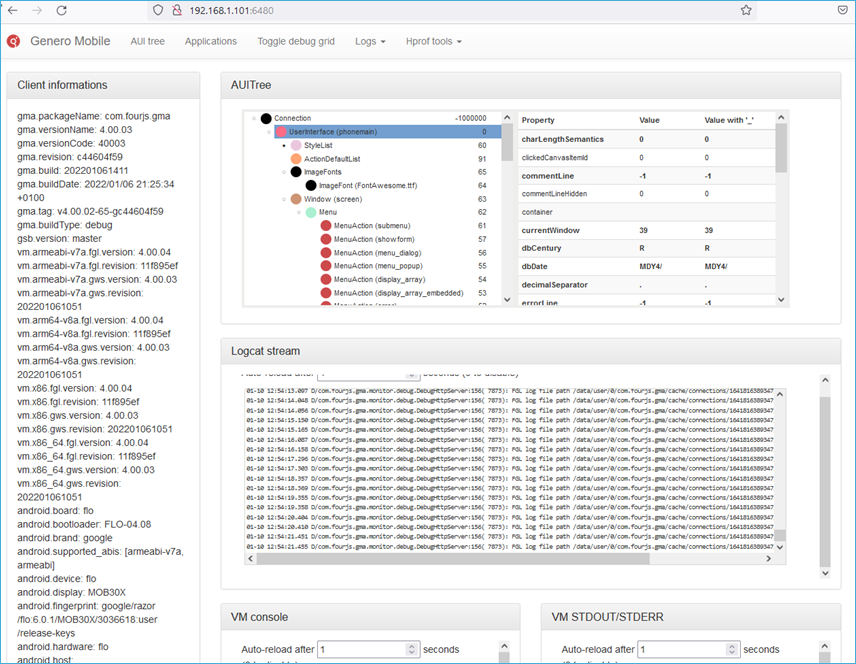
- AUI tree
- Displays the content of the Abstract User Interface tree of the current application in a browser tab, where you can inspect its properties.
- Applications
- Opens a page which allows you to enter the URL of an application to run. For example, you can run applications from a GAS on a remote server.
- Toggle debug grid
- Displays the contents of the AUI tree in grid view instead of tree view. Note: Grid view is not available with universal rendering. A message is displayed when universal rendering is detected.
- Logs
- The logs menu has the following options for viewing the VM and Android logs to help with debugging the current application.
- The Console menu opens a tab displaying all communication threads between the DVM and the GMA front-end.
- The STDOUT/STDERR menu opens a tab to view messages being displayed to the standard out and standard error by DVMs started by the application.
- The Logcat stream menu opens a tab to display a continuous stream of messages the Android system is displaying to the standard out, including any errors that are being thrown into your stack traces by the current application.
- The Logcat logs menu opens a tab to display a list of Android system log files. Note: If you not see any files listed, check that the setting Record logcat is enabled in the GMA front-end Settings.Clicking on a file in the list, opens a dialog prompting you to open it or save it to your computer.
- Hprof tools
- The Heap/CPU Profiling tool menu gives you the option to:
- Create dumps of the memory heap and CPU to help with debugging the states of all the monitors and threads. When you select this option, a dialog window is displayed for you to save the dump file (.hprof) to your machine.
- View dump of dump files you have already saved. Clicking on a file in the list, opens a dialog prompting you to open it with an appropriate application.