Modernizing the IBM® Informix® 4GL “stores demo” with Genero®
21st Century 4GL
Case studies
Compatibility
Step by step stores demo modernization example:
Step 1: Install the Informix stores demo
Step 1: Install the Informix stores demo
Every Informix 4GL installation comes with the well known stores demo.
Depend on if you have RDS or C4GL you
$ r4gldemo
or
$ c4gldemo
When prompted choose ‘Y’ to get the demo programs copied to your local directory.
… wait until the demo has been installed and compiled.
On a UNIX/Linux platforms, you must set the TERM and TERMCAP environment variables:
      $ TERMCAP=$INFORMIXDIR/etc/termcap
      $ TERM=xterm
      $ export TERMCAP TERM
Ensure the original Informix 4GL stores demo runs:
$ fglgo demo4.4gi
or for c4gl
$ ./demo4.4ge
Executing this first step guarantees that you have the Informix environment properly set.
Step 2: Compile the stores demo with Genero BDL
Step 2: Compile the stores demo with Genero BDL
Step 2.1: Extract database schema information
First you need to extract the database schema from the Informix stores7 database, so that Genero forms and BDL compilers know how to deal with instructions such as DEFINE … LIKE:
fgldbsch -db stores7
This will produce the stores7.sch file containing database column type descriptions and the stores7.att file containing column attributes.
Step 2.2: Compile the demo4 program
Use the fgl2p command to compile the sources so that demo4 can be executed in the Genero runtime system. fgl2p is a shorthand tool to both compile and link 4GL modules. Each module can be individually compiled with the fglcomp command, and modules can be linked with fgllink. If your project is built with make, it’s easy to adapt makefiles to use Genero compilers and tools. The following list shows Informix 4GL command line tools and their Genero equivalents:
form4gl form.per |
fglform form.per |
fglpc module.4gl |
fglcomp module.4gl |
cat m1.4go m24go ... > prog.4gi |
fgllink -o prog.42r m1.42m m2.42m .. |
c4gl -c module.4gl |
fglcomp module.4gl |
c4gl -o prog.4ge m1.o m2.o .. |
fgllink -o prog.42r m1.42m m2.42m .. |
c4gl -o prog.4ge m1.4gl m2.4gl .. |
fgl2p -o prog.42r m1.4gl m2.4gl .. |
mkmessage myhelp.msg myhelp.iem |
fglmkmsg myhelp.msg myhelp.iem |
Execute the next command to compile the demo4 program:
      fgl2p -o demo4.42r d4_main.4gl d4_cust.4gl d4_orders.4gl d4_report.4gl
      d4_stock.4gl d4_demo.4gl d4_globals.4gl
Note that the equivalent command with c4gl is very similar:
      c4gl  -o demo4.4ge d4_main.4gl d4_cust.4gl d4_orders.4gl d4_report.4gl
      d4_stock.4gl d4_demo.4gl d4_globals.4gl
Step 2.3: Compile the form files
On a UNIX® /Linux, you can compile all forms in the stores demo with a single shell command:
for f in *.per; do fglform $f; done
Here is the MS Windows® DOS command equivalent:
for %f in (*.per) do fglform %i
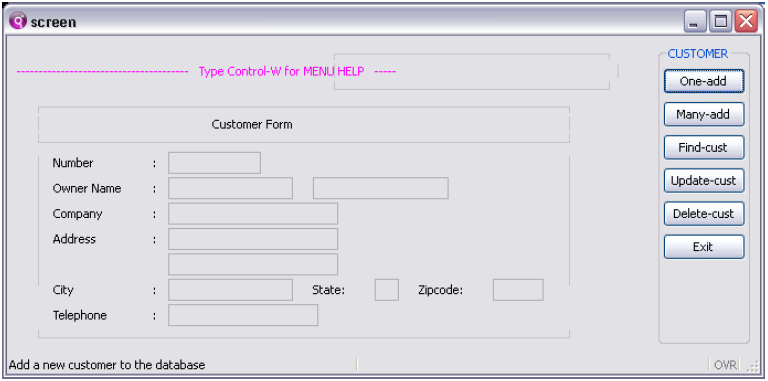
Step 3: Run the stores demo in text mode
Step 3: Run the stores demo in text mode
Step 3.1: Setup your Genero environment
By default, Genero runs in graphical mode. In order to use text mode and display forms in the current terminal, you must set the FGLGUI environment variable to zero (UNIX example):
      $ FGLGUI=0
      $ export FGLGUI
Step 3.2: Run the stores demo
Now you should be able to run the demo program:
fglrun demo4

Step 4: Run the stores demo in graphics mode
Step 4: Run the stores demo in graphics mode
In order to run the demo application in graphics mode, you must change the environment settings and start the Genero Desktop Client (GDC).
Step 4.1: Setup your environment
By default Genero uses graphics mode; just unset the FGLGUI variable (UNIX example):
$ unset FGLGUI
On Windows:
$ set FGLGUI=
If the GUI ‘front-end’ resides on another machine, you need to define where the Genero runtime system can find it on the network using the FGLSERVER environment variable (UNIX example):
      $ FGLSERVER=hostname:0
      $ export FGLSERVER
FGLSERVER must define the hostname (or IP address) where the front-end runs, followed by a colon and the 6400 port number offset, that the front-end listens to. This is very similar to setting the DISPLAY variable of an X11 server.
Step 4.2: Start the GDC
Before executing the program in GUI mode, you need to start the graphical desktop front-end (GDC) that will render the application’s forms on the display.
On UNIX, make sure you have the GDC environment set and start the front-end program with:
$ gdc &
On Windows, you can run the GDC from the [Start] menu.
By default, the GDC will listen on port 6400 (make sure firewall settings allow this).
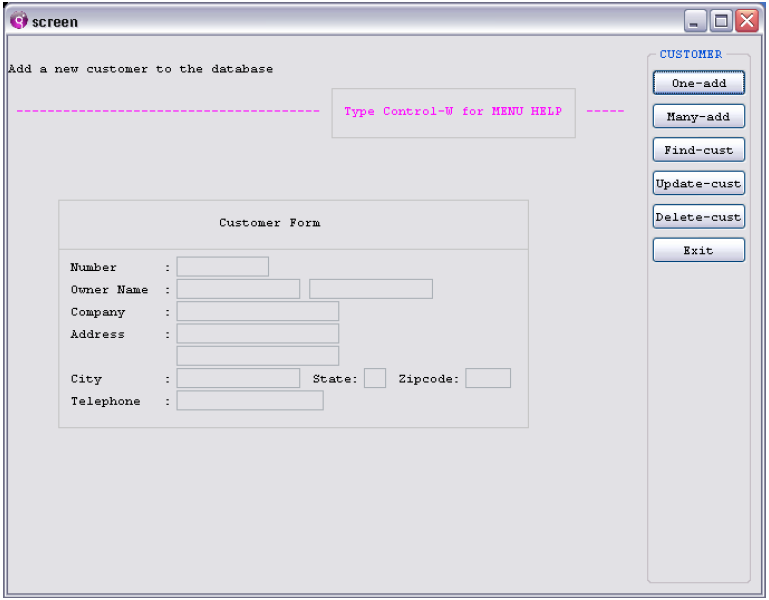
Step 4.3: Run the stores demo in graphics mode
Execute the fglrun command with demo4 again:
fglrun demo4
Now the demo program should display on the graphical front-end.
The default rendering in GUI mode uses proportional fonts and creates individual desktop windows for each 4GL window. This type of rendering is used for applications that have already been enhanced for graphical displays.
Note in the screenshot above that the semi-graphic boxing is mal-aligned. To display 4GL .per forms correctly, you need to set the GUI mode to “traditional”, as shown in the next step.
Step 4.4: Run the stores demo in traditional mode
To run the Informix stores demo program in graphics mode using ‘old-style, fixed font’ rendering, you can turn on ‘traditional’ mode by setting the gui.uiMode configuration parameter. You can define global Genero settings with an external configuration file defined by an environment variable named FGLPROFILE (UNIX example):
      $ FGLPROFILE=$PWD/demo4.prf
      $ export FGLPROFILE
Create the demo4.prf file and add the following line:
gui.uiMode = ”traditional”
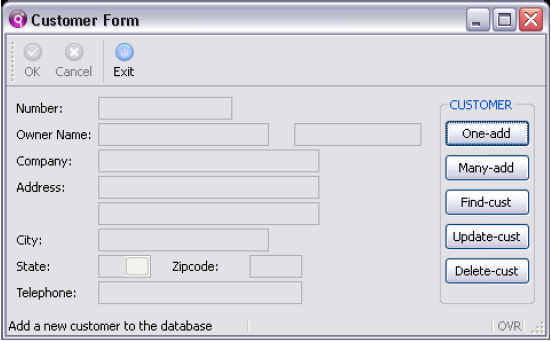
Now you can run the demo again to see a “traditional” rendering:
$ fglrun demo4
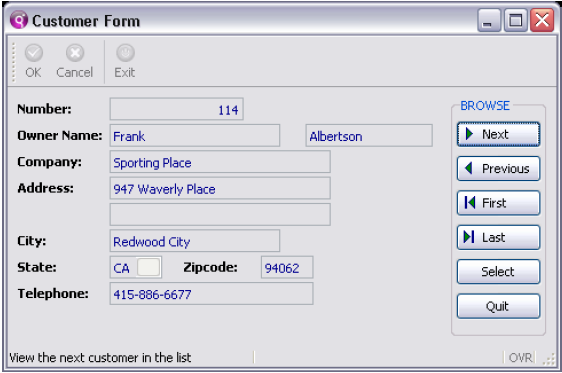
In this mode, the stores demo correctly aligns the semi-graphics, as in non gui mode:
Step 5: Enhance the stores demo with Genero features
Step 5: Enhance the stores demo with Genero features
Now let’s focus on the form and the sub-program handling the customer input and state list. We will just focus on GUI features; much more can be done to enhance the demo, notably the reports section. This will be dealt with in a later paper.
Step 5.1: Return to the default ‘traditional’ mode
First, turn off the ‘traditional’ mode. Comment out the ‘traditional’ mode entry in the demo4.prf file by adding a # sharp at the beginning of the line:
# gui.uiMode = ”traditional”
Step 5.2: Remove redundant ‘text’ mode instructions
In order to beautify the stores demo in ‘text’ mode, the original program displays text, lines and rectangles using screen coordinates. In graphics mode, this is unnecessary.
Note, however, that to simplify the modernization of your legacy code you can keep text-oriented instructions such as DISPLAY AT. These instructions will be ignored in graphical mode when a form designed with a LAYOUT section is used.
- Edit the d4_main.4gl source and comment out the lines in the ring_menu() and unring_menu() functions.
- Edit the d4_cust.4gl source and comment out the lines calling the fgl_drawbox() built-in function, as well as DISPLAY … AT instructions, for example in the input_cust() function.
Recompile the modified 4GL source modules with fglcomp. Since no functions have been added or removed, there is no need to re-link here:
      fglcomp -M d4_main.4gl
      fglcomp -M d4_cust.4gl
Note: the -M argument outputs any errors to standard error rather than creating a .err file.
Step 5.3: Review the customer form layout
The original forms of the stores demo are designed to be displayed on a text terminal. By revisiting the layout we can enhance the rendering with minimal changes to the code. Edit thecustform.per file and replace the screen section by the following LAYOUT section:
      LAYOUT (TEXT="Customer Form")
      GRID
      {
      Number:      [f000       ]
      Owner Name:  [f001           ][f002           ]
      Company:     [f003                ]
      Address:     [f004                ]
                   [f005                ]
      City:        [f006           ]
      State:       [a0   ] Zipcode:[f007 ]
      Telephone:   [f008              ]
      }
      END _ GRID
- The title “Customer Form” becomes a TEXT attribute of LAYOUT. This text will now appear in the title bar of the window.
- Label and field positions have been adjusted (cf. colons) to accommodate proportional fonts.
- The a0 state field size is increased to make room for the BUTTONEDIT widget.
In the ATTRIBUTES section, replace the a0 field definition with following line:
      BUTTONEDIT a0 = customer.state, UPSHIFT, ACTION = z_state,
      IMAGE = "zoom";
This code defines the customer.state field as a button-edit widget, associated to an action named z_state that will be invoked when the user clicks on the field button.
In order to create a simple toolbar, add the following lines before the LAYOUT section:
      TOOLBAR
       ITEM accept (IMAGE="ok2")
       ITEM cancel (IMAGE="cancel2")
       SEPARATOR
       ITEM exit (IMAGE="exit2")
      END
This will declare three toolbar buttons bound respectively to the accept, cancel and exitactions, which can be handled by program interactive instructions.
Now you can recompile the form with fglform:
fglform -M custform.per
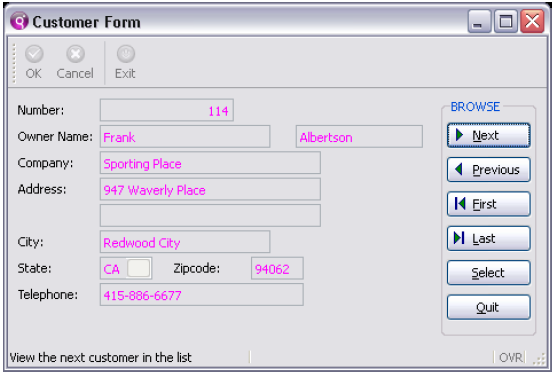
Execute the demo program to see the result. Click on the [Customer] button in the first menu to display the customer form below. Note the new toolbar with three buttons, the new layout of the form fields and labels, as well as the new state field with a zoom button. This button/action is not yet available: We will implement the code to handle this action in the next section.
fglrun demo4
Step 5.4: Implementing the z_state action
For now the button-edit field is bound to the z_state action, but it has no associated trigger code. In order to execute user code when the z_state action is invoked, we need to add some code in the d4_cust.4gl source.
Edit the d4_cust.4gl file: In the input_cust() and update_customer() functions, before [AFTER FIELD state], add the following lines (in red):
 ON ACTION z_state
   CALL statehelp(FALSE)
      AFTER FIELD state
           CALL statehelp(TRUE)
Note that we have added a parameter to the statehelp() function, to indicate if the current field value must be checked or not. You must modify the statehelp() function as follows (new code is highlighted in bold), and add TRUE in the two existing calls:
     FUNCTION statehelp(check)
       DEFINE check BOOLEAN, idx INTEGER
IF check THEN
SELECT COUNT(*) INTO idx
FROM state
WHERE code = p_customer.state
IF idx = 1 THEN
RETURN
END IF
END IF
Recompile the d4_cust.4gl module with fglcomp:
fglcomp -M d4_cust.4gl
And execute the demo program:
fglrun demo4
Select the [Customer] menu option to enter the customer form, select the [One-add] menu option to enter the INPUT instruction and click on the state field button to see what happens.
The state list window appears when you click on the field button. For now, the list displays in a static screen array. This does not look very nice in graphical mode. The next step will show you how to use a table layout container to improve the display and provide sorting features, without changing a single line of business logic.
Step 5.5: Review the state list window
For now the state list window defined by the state_list.per form uses a static screen array. This is fine and should be left as is when running in text mode, but should be replaced by a TABLE container to benefit the modern display possibilities in the GUI mode.
Edit the state_list.per file and replace the SCREEN section with the following:
      LAYOUT (TEXT="State Selection", STYLE="dialog4")
      TABLE
      {
       Id   Name
      [a0] [f000           ]
      [a0] [f000           ]
      [a0] [f000           ]
      [a0] [f000           ]
      [a0] [f000           ]
      [a0] [f000           ]
      [a0] [f000           ]
      }
      END - TABLE
Recompile the state_list.per form with fglform:
fglform -M state_list.per
And execute the demo program:
fglrun demo4
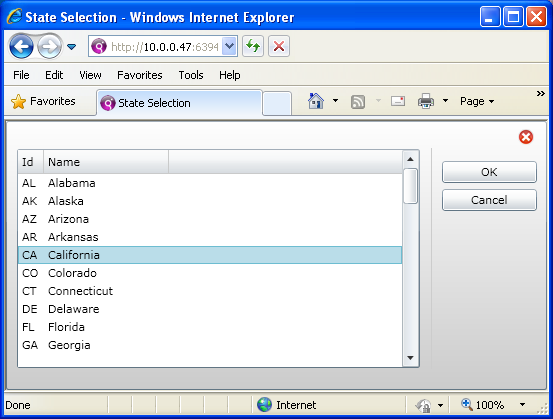
Enter the customer form by clicking [Customer], then [One-add], and then select the state field button:

With a few changes in the .per file you will get a fully featured resizable list window, in which you can move/hide columns and sort rows by clicking on the column headers without the need to add code.
Step 5.6 (Optional): Review colors and attributes
Genero has a system of Styles, these allow you to override the colors, font and other attributes of any element in the UI. These styles are overridden though by color attributes in the code so it’s a good idea to remove things like ATTTRIBUTES(MAGENTA) from the code, this allow the color to default to the system default colors on your client OS and allows you to change colors globals using Genero Styles File ( .4st ).
Other attributes like BORDER for example can also be removed as windows will have the normal decoration for your client OS by default. Again the look of a Window can be changed using the Genero Styles File.
The real advantage of the external Genero Styles File is it can apply to all programs to give a consistent look and feel to your system without have to modify each program.
For Example:
These lines would make all Labels ( text on the forms ) appear Bold and all data ( normal fields on the form ) appear in darkblue.
The following two screenshots are showing what a little more effort can produce:


Step 6: Enable the stores demo for the Web
Step 6: Enable the stores demo for the Web
We will now configure the stores demo for the web. You need Genero Application Server installed and the GAS dispatcher running on the machine where the stores demo is located. This enables the Genero Web Client (GWC). For more details about GAS installation, see the documentation.
Step 6.1: Configure Genero Application Server for Informix
Edit the as.xcf configuration file, found in the FGLASDIR/etc directory. Under the node, add the Informix client and database server settings (PATH, INFORMIXDIR, INFORMIXSERVER):
<!--?xml version="1.0" encoding="UTF-8" ?-->

<em><strong>Stores_demo_DIR</strong></em> demo4.42r
Here Informix_Client_SDK_DIR is the path to the Informix Client SDK, and myserver defines the Informix server identified in sqlhosts.
Step 6.2: Register the stores demo in the GAS
Create a new file FGLASDIR/app/stores-gwc.xcf which defines how to start the demo from a browser:
httpdispatch
Here Stores_demo_DIRis the path to the stores demo files.
Step 6.3: Start the GAS dispatcher
Before running the demo in a web browser, make sure the GAS environment is set (see documentation) and the dispatcher is started as follows:
http://localhost:6394/wa/r/stores-gwc
This can be found in FGLASDIR/bin. By default, the GAS server listens on port 6394 (make sure firewall settings allow this).
Step 6.4: Run the stores demo from a web browser in GWC Ajax
Start your web browser, and type in the URL identifying the stores demo:
<!--?xml version="1.0" encoding="UTF-8" ?-->

<em><strong>Stores_demo_DIR</strong></em> demo4.42r

<output></output>

<map id="DUA_AJAX"> <em><strong>myfiles</strong></em>  <em><strong>myfiles/main2.xhtml</strong></em>
</map> <map id="DUA_AJAX_HTML"> <em><strong>myfiles</strong></em>  <em><strong>myfiles/main2.xhtml</strong></em>
</map>
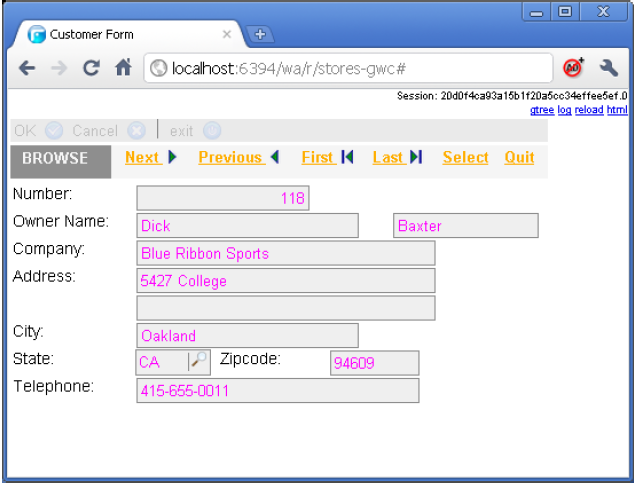
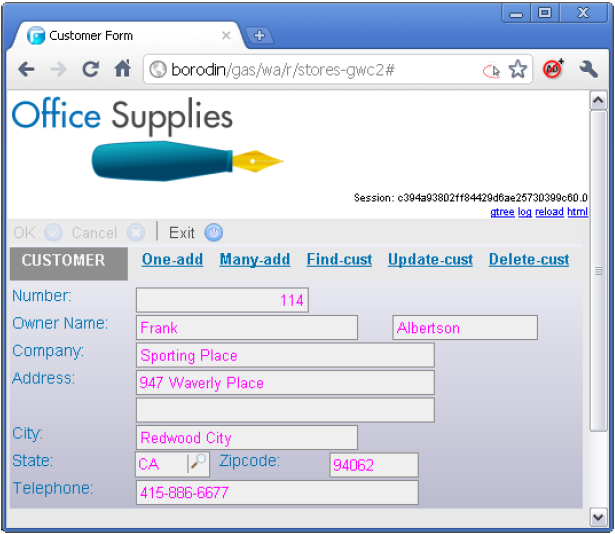
You should see the first menu. Click on [Customer] to get to the following form:
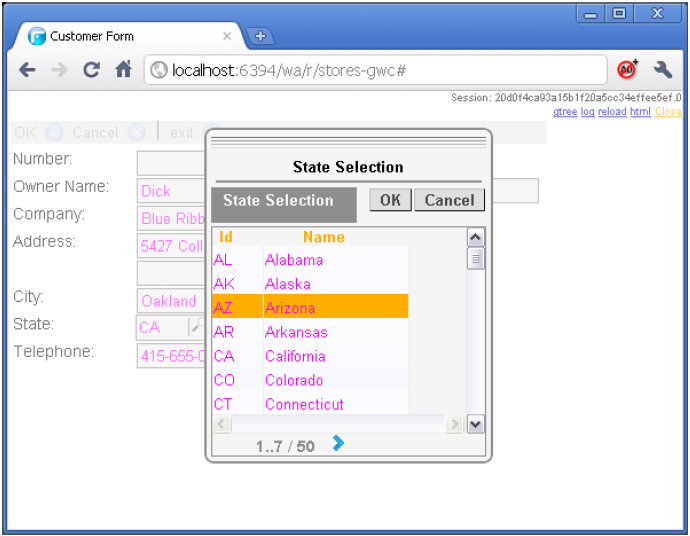
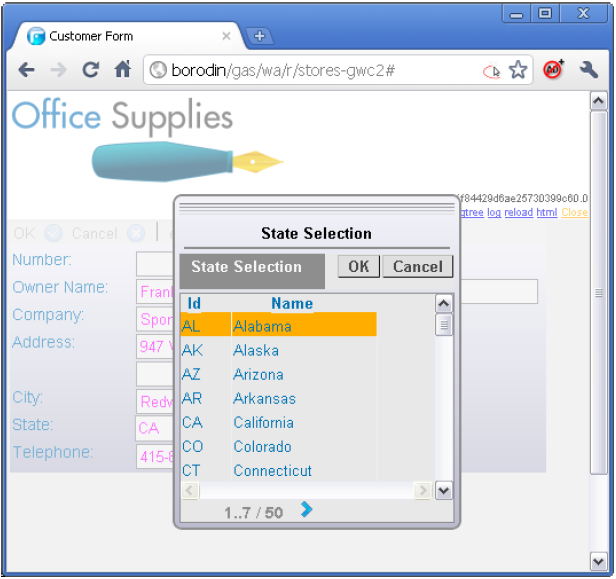
When opening the state list window by clicking on the State field button, you will get the following:
Step 6.5: Customize the stores demo for GWC Ajax
Create another configuration file named FGLASDIR/app/stores-gwc2.xcf with the following content:
<div class="myheader"><img src="/..." /></div>
Here Stores_demo_DIR is the path to the stores demo files and myfiles is a path to the resource files such as pictures, snippet files and CSS style files.
Copy the default XHTML template FGLASDIR/tpl/SetAjax/main.xhtml to myfiles/main2.xhtmland make the following changes:
- Just before the < body > tag, add a banner with your company logo (you need to copy amylogo.png picture file in myfiles directory):
<ul>
 	<li>Inside the tag, add the following style to the first < div > tag:</li>
</ul>
[av_codeblock wrapper_element='pre' wrapper_element_attributes='' escape_html='aviaTBescape_html' av_uid='av-12yvrau']
<div>style="background-color: #E6E6E6; ...
- Define a background color for the global form in the < body > tag:
- Refer to your CSS file in myfiles/main2.xhtml, by adding the following line after the < script > block in the < head > tag. Note that this new line must be added just below the < link > tag referring to the gwccomponents.css resource file, so that myfile.css styles overwrite the defaults:
.myheader { background-color: darkblue; }
.gWindow {
background: -webkit-gradient(linear, left top, left bottom,
from(#F2F2F9), to(#B7B7CC));
background: -moz-linear-gradient(top, #F2F2F9, #B7B7CC);
}
.gDialog, .gNormalMenu { background-color: #E6E6E6; }
.gMenuAction { color: #026DAE; }
.gLabel { color: #026DAE !important; }
.gTable * { background-color: #E6E6E6; }
.gTable thead th span { color: #026DAE; }
.gTable .gEdit * { color: #026DAE !important; }
.gTable .gSelectedRow.gCurrentRow * { background-color: #FFAA00
!important;}- Create the myfiles/myfile.css file, with the following CSS style definition directives:
http://localhost:6394/wa/r/stores-gwc2
Step 6.6: Run the customized stores demo in GWC Ajax
In your web browser, change the URL identifying the stores demo to:
http://localhost:6394/wa/r/stores-gwc?OutputMap=DUA_SL
You should see the first menu, click [Customer] to get the following form:
While the state list window will look like this:
Step 6.7: Run the stores demo in GWC using Microsoft® Silverlight®
In your web browser, change the URL identifying the stores demo to:
With this URL, the application will be rendered in MS Silverlight. Note that this will be rendered with the default styles and could be enhanced as easily as with Ajax.

The state list window will look as follows:
Step 7: Reports
Step 7: Reports
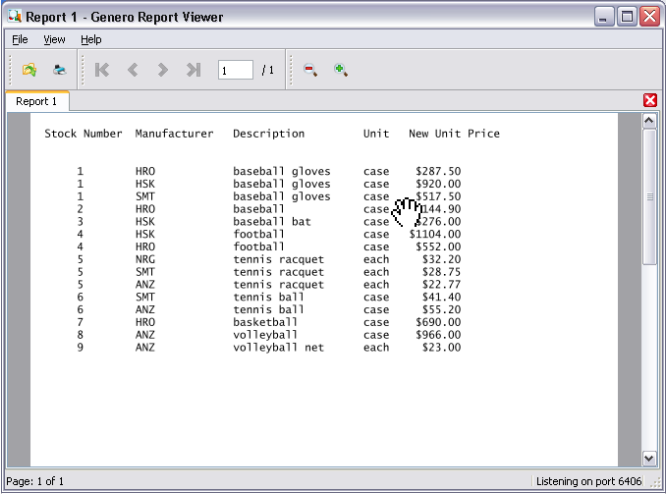
By default a report sent to a PRINTER will go to the printer set in the DBPRINT environment variable, the same as with Informix4GL. If the report is set to go to SCREEN then a simple window is opened and the report text is displayed:

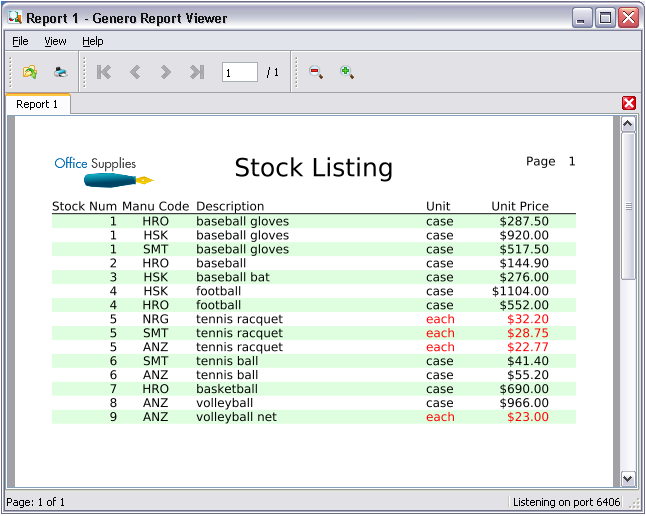
The Genero suite of tools also includes the Genero Report Writer(GRW). This can take a simple ASCII report and allow you to run it to produce a PDF, XLS, SVG , HTML or Image(JPG/PNG).
It also allows you to write reports that have no formatting in the 4GL code but instead just output a stream of XML data to the Genero Reporting Engine(GRE). This can use templates that you design using the GUI Genero Report Designer(GRD) within Genero Studio to produce rich reports using proportional fonts, images and bar-codes etc.
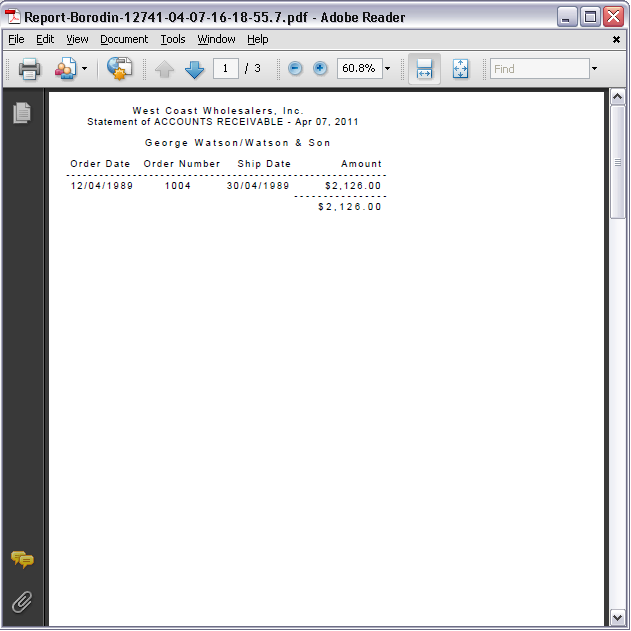
Step 7.1: Report to PDF
The first step in allowing a report to run through the GRE to produce a PDF or XLS is to link in the additional library code that will handle the setup of the GRE options. To do this we will add a .42x file to our link line.
      export FGLLDPATH=$GREDIR/lib
      fgl2p -o demo4.42r d4_main.4gl d4_cust.4gl d4_orders.4gl d4_report.4gl
      d4_stock.4gl d4_demo.4gl d4_globals.4gl libgre.42x
The FGLLDPATH is telling the compiler and the runtime system that object code can also be found in that directory. Note: you can specify multiple directories using a colon to separate them.
This assumes that the GREDIR environment variable is set to point to the install folder of the GRE.
The next step is modify the d4_report.4gl to make the calls required to allow the report to be sent to the GRE.
In function print_ar() you to need to add the following variable:
DEFINE myHandler om.SaxDocumentHandler
In the case statement for different print destinations you will need to add some lines to setup the GRE:
WHEN "s"
IF NOT fgl_report_loadCurrentSettings(NULL) THEN
 RETURN
END IF
CALL fgl_report_selectDevice("PDF")
LET myHandler = fgl_report_commitCurrentSettings()
START REPORT ar_report
CLEAR SCREEN
MESSAGE "Printing AR REPORT -- Please wait"
In the same function after the finish report you need to add one line:
      FINISH REPORT ar_report
      CALL fgl_report_stopGraphicalCompatibilityMode()
The result of running that report will now be a PDF document that is produced on the server and opened on the client.
Step 7.2: Report to XLS & SVG
To output the report to a different target you only need to change the one line:
CALL fgl_report_selectDevice("SVG")
Here is the output from another of the stores demos reports, this time output to our built in SVG report viewer.
Sending that report to XLS, will open Excel or OpenOffice and display a spreadsheet as shown below. The only change in the 4GL is to select “XLS” as the output target:
CALL fgl_report_selectDevice("XLS")

If the report is modified to use the full power of the GRW then the output can look something like this:
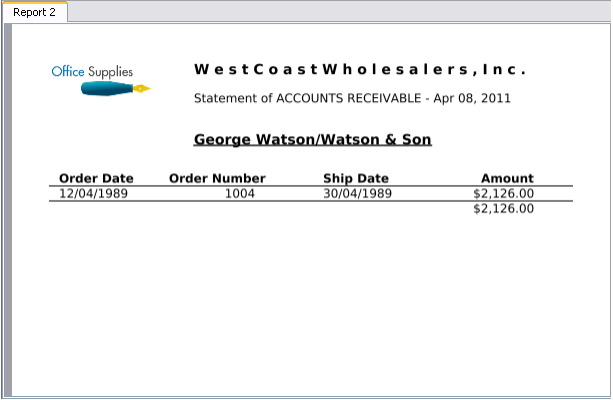
More examples of the power of the GRW, these are both produced from the same 4GL report:

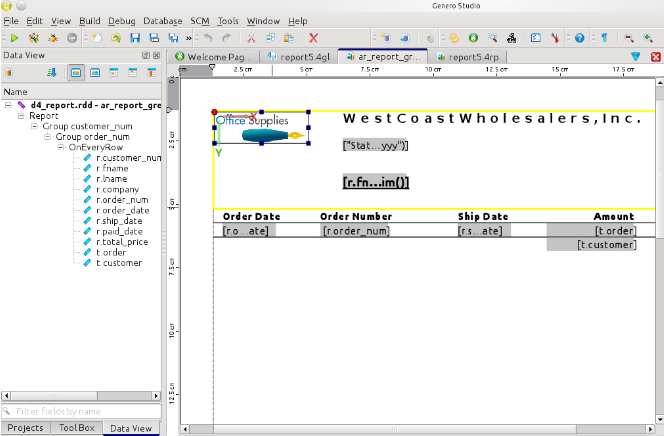
This a screenshot showing part of Genero Studio and the Genero Report Designer for one of the reports shown above:
Registered Trademarks
Registered Trademarks
Trademarks used in this document:
® Four Js and Genero are registered trademarks of Four J’s Development Tools Europe Ltd.
® IBM and Informix are registered trademarks of IBM Corporation.
® Linux is a registered trademark owned by Linus Torvalds.
® Microsoft, Silverlight and Windows are registered trademarks of Microsoft Corporation.
® UNIX is a registered trademark of The Open Group for the United States and other countries.